
For thousands of years, the precise methods behind the transport and raising of the stones at Stonehenge have been hidden from archaeologists. The reasons for this are mainly down to the poor preservation of organic materials in the chalk soils of the Stonehenge landscape – any timber or rope evidence from the period have just not survived the ravages of time.
For me, the surviving stone elements of the monument are impressive, but also hide the vast amounts of timber and natural fibre ropes that must have been responsible for its construction. Indeed, I wonder if the location of the monument itself is a combination of factors, including available open space, cultural significance of the area and crucially, the availability of good quality and more easily processed structural timber in the form of pine (as evidenced from the pollen records in the area from this period).
This project was designed for English Heritage as a way of engaging the public in the physical act of moving and raising a monolith using simple engineering principles and people as the main source of energy. That is not to say that neolithic builders wouldn’t have employed their own domesticated animals as traction. It is an obvious but under explored area of research, partly due to the fact that traction animals such as oxen are no longer found (or trained) in the numbers required to move the larger sarsen stones, some of which weigh up to an estimated 40 tonnes!
Over the years, many methods have been suggested, some of them tried. but still we hear members of the public and archaeologists alike saying “how did they do it?” It is this persistent unknown that continues to fuel ideas of UFO’s and powers beyond those of human ingenuity and endeavour. I am certain that these ideas are a result of a general underestimation of human ability, not just in the Neolithic period, but right back into the Middle and Early Stone Age. No ancient culture achieved anything without the inventions and knowledge of its predecessors and as humans we “stand on the shoulders of giants” in everything we do – everyday!
This project was designed to involve the general public and schools in the processes required to move a stone and put it vertically in the ground. As such, I was asked to make the process repeatable as several events over the course of 4 days. This project outline directly influenced the methods I designed and employed. The method had to be simple and repeatable to ensure success. If my project goal was to move a monolith from the Preseli Hills in South Wales (a distance of over 120 miles), the method would have been quite different, with significant technological investment made into the creation of a timber cradle that would ensure the easiest movement of the monolith over a range of terrains (a possible future project!)
The project parameters were….
Public Engagement
A Repeatable Process (roughly 1 hour sessions)
To be Conducted in March
To be Safe
I decided on a simple method for this project. The method would involve the movement of the monolith directly on rollers placed beneath it. It would be raised by firstly tipping it into a prepared hole with a ramp (copying the original evidence for ramped pits at Stonehenge) to locate it in the base, and then adjusting the angle of pull from the public to the stone by the placement of an “A” frame (shear legs). The mechanical advantage of this device would help in the raising and lowering of the monolith.
The simplicity of this method would cut out the time required to build a tailored timber sled, and the time that would be required in the transition from raising off, and lowering accurately back onto a sled. A negative aspect to this simple method would be the uneven movement of the stone across the rollers (which would require difficult lateral adjustments) and the potential for any rollers to bog down if the ground was waterlogged by March weather.
The first stage of the project involved the location of a monolith that would fit the bill. Unfortunately sarsen stones are unavailable to us in the modern world, due mainly to their location in Sites of Special Scientific Interest. I was therefore forced to look for bluestones from Shropshire and Wales, but the quarrying of this material is now conducted to produce aggregate and does not produce rock sizes of large enough proportions. My remaining options were to have a concrete monolith fabricated or to look at Limestone quarries on Purbeck to find a single piece of stone that would match the largest weight of the bluestones at Stronehenge.
After much searching I found a good piece of stone with a weight of between 3.75 and 4 tonnes.

The stone was irregular on both sides and required some dressing with a chisel to take off the worst lumps and ridges and to cut in some notches at either end to locate eventual strops.


I then designed and calculated the method on paper. It is a fascinating process, going from theory to reality. I have found over the years that I learn 100% more, taking a drawn concept to a scale model. The physical construction of a scale model throws up suggestions and ideas that cannot be seen in the drawing /thought stage. The move from a scale model to life sized experiment increases knowledge by a factor of 10!
There is no replacement in experimental archaeology for trying things at full scale, using correct materials and authentic methods on the correct ground. This project benefited from a realistic scale and accurate ground – but in terms of materials we used modern ropes, strops and rollers with testable and known safe working loads to minimise the risk of material failure and the potential for injury to the public.

Phase 1
Phase 1 would involve the hauling of the stone across rollers to a position over the ramp of the prepared pit. The position of the last roller is critical (this changed during the test phase to become a fixed “roller” that actually formed a pivot point) and creates a tipping point for the stone which falls gently onto the ramp of the pit. The ramp was calculated to be half the length of the stone. Even at this stage of design, it was clear that manoeuvring the stone to this position might be problematic if the ground was wet.

Phase 2
Phase 2 would see the placement of the “A” frame over the monolith to adjust the angle of pull and enable a more efficient use of force. Ideally, the “A” frame should create an angle of 45 degrees on the pulling rope from the stone to the apex of the frame. Additional advantage could be achieved by attaching the pulling rope to the top of an extended A Frame.

Phase 3
Phase 3 involves the pulling of the stone to an upright position. Safety and success of this stage relies on the precise fitting of the stone into the pit. The vertical side of the pit acts as a stop. I modified the ramp profile during digging to include a step at its base. The step would act as a stop to prevent the stone being pulled out of the hole by over enthusiastic pulling teams!
What was uncertain at this stage was how badly the hole sides would degrade with each attempt so I built timber shoring for the vertical face to reduce the chances of serious damage.
The pit was dug by hand to ensure the angles and dimensions were accurate.


The stone was delivered by Phill Bascombe hauliers with a very helpful driver who made the whole operation go smoothly on a very cold morning!


The next stage of the operation was to move it from the delivery point to the intended pulling route. This was done with the help of volunteers recruited for the morning. The frozen ground helped this stage and fears of the rollers bogging in were unfounded.

Ground conditions would play a role later on in the project as the temperature rose and the heavy frosts and snowfall gave way to saturated turf.
After the thaw, our test phase consisted of pulling the stone to its tipping point edge of the pit and aligning it properly for the “A” frame to be attached. This was done with some issues of lateral movement on the rollers. The pulling course tracked across a gentle slope to the prepared hole, but this slope was enough for gravity to pull the stone sideways on the rollers. Adjustments were made using a combination of leverage on the side of the down slope side of the stone, and directly pulling on the up slope side. It was also possible to over steer the monolith on its approach – effectively aiming up slope of the pit, allowing for the gradient to act upon the stones course. There is also a subtlety and accuracy required in the placing of rollers on the ground. The spacing between each roller must be wide enough to prevent bunching (when rollers tough each other beneath a stone, they become very efficient brakes!), and the perpendicular angle of each roller in relation to its direction of pull is critical to keep the stone on track. It is possible to steer the stone to a surprising degree using just the rollers.

The tipping point of the stone and the dimensions of the pit were accurate enough to allow the stone – with some strenuous teasing, to fall perfectly into position on the ramp. Even at this stage, the timber shoring on the vertical face of the pit hinted that it might cause problems later on. The use of softwood meant the end of the stone bit into the grain and effectively created a friction brake. Our first attempt and raising the stone was unsuccessful as the stone refused to move against the timber shoring. The shoring was removed before the next attempt.
With hindsight, the shoring idea had developed as a means to protect the pit profile and dimensions during the planned repeated attempts during the public event. In reality, although it obviously protected the pit, the timber was soft enough and rough enough to form an ideal and very efficient brake.

The image above shows the “A” frame in position, the stone tilted into the ramp – but not fully due to the timber shoring, and the effect of the rollers on the soft thawed ground at the beginning of the first test!

Along with the issues of the shoring acting as a brake, it was also noted that we simply needed more people to achieve a successful raising, and that those people should be pushed well down the ropes (away from the monolith) to improve the angle of pull. It was clear that 25 people could move the stone, but we would need many more to pull it to a vertical position!
The first real attempt was made in front of cameras, the press and English Heritage Members who kindly volunteers to be our workforce. There is nothing quite like trying something for the first time with the press present! The operation worked with over 70 people pulling, although the stone sat unevenly in the hole! This first proper test highlighted an issue which was unforeseen.

The soft ground had allowed one of the rollers to be dragged into the pit with the monolith and become lodged unevenly beneath its foot.

The feet of the “A” frame had also sunk into the soft ground to a depth of nearly 30 cm and acted like ploughs during the early stages of the lift – effectively adjusting the angle of pull to a degree that made the process far more difficult.
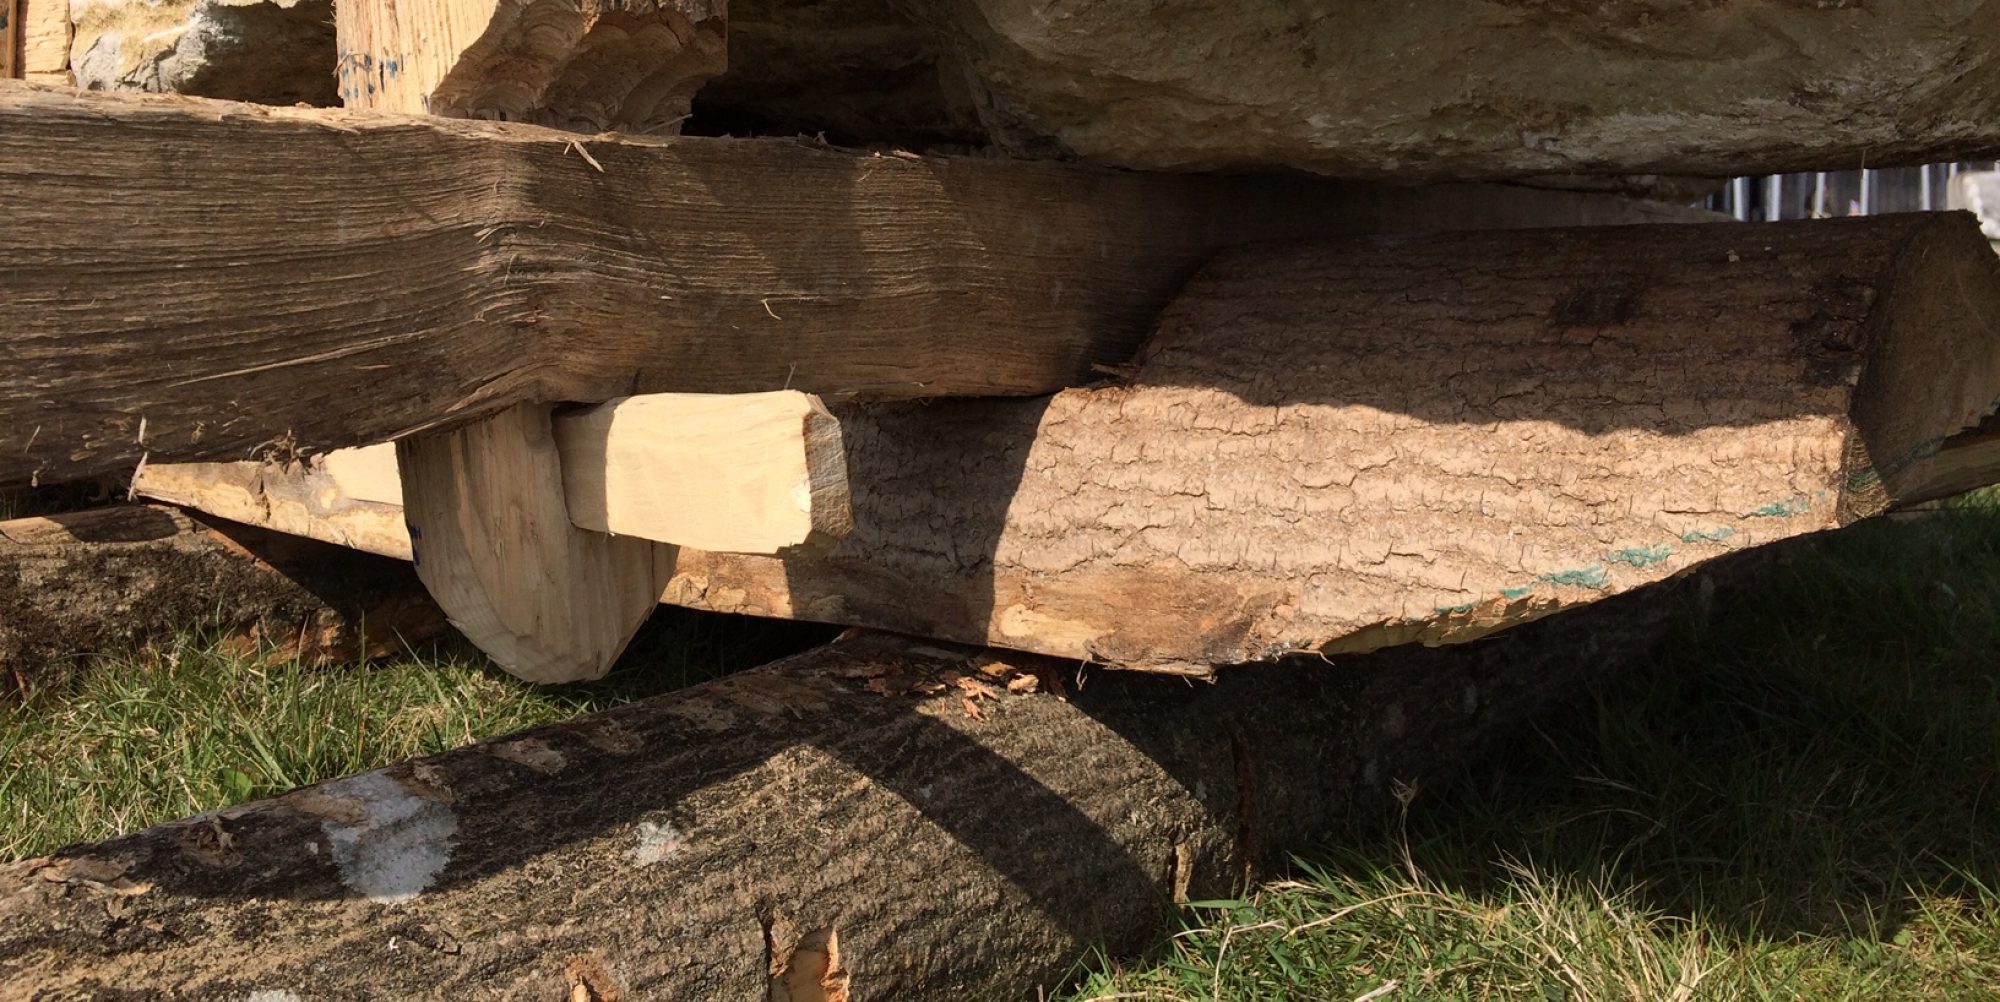
The stone was lowered and remedial works made to adjust the issues. The “A” frame feet locations were supported by digging a slot trench perpendicular to the angle of pull and a 5 cm thick plank was embedded into the slot to support the feet as pressure was applied during the raising (see photo below – bottom right).

I also decided to create a permanent pivot point at the top of the pit ramp by bedding in a roller. This would prevent rollers going past the tipping point and falling into the pit, it might even act as a brake as the next roller came to it – slowing down that critical stage of dropping the stone into the pit.

Coir matting was also placed on the roller course to try and alleviate the issues of mud (the rollers were beginning to spin rather than roll beneath the stone), highlighting the issues of this particular movement method in wet conditions. We felt we were now ready for the main public events over the next three days!
The public and schools gathered for several set sessions over the next three project days. The public were understandably keen to take part in moving and raising a stone, the key to success would be in harnessing their enthusiasm and strength in a controlled way.
Each group of volunteers was given an introduction to the history and understanding of how Stonehenge may have been built by Juilan Richards and they were treated to a health an safety briefing by me (including a description of what might happen to them if they stepped inside “The Death Zone” during the operation!

The stone was successfully manoeuvred to tits tipping point and dropped perfectly into place on the ramp. The pulling teams were organised and prepared with encouraging words and an emphasis on the three commands “PULL”, “HOLD” and “STOP”.
The “A” frame was attached to the pulling ropes and tested to ensure a correct angle. Then with a loud command of “PULL” the teams (75 people in total) exerted themselves on the ropes…
Pulling a stone to upright requires a high level of initial effort. The ropes and strops creaked and people groaned and the stone moved… almost imperceptibly, a centimetre, then two off the ramp….. “PULL” was the only encouragement I could give as the stone began to rise, faster and faster as the mechanical advantage of the “A” frame really began to have an effect. Then suddenly, I was having to control their exuberant power with commands of “HOLD” – “HOLD! And as if by magic, the stone paused a little from vertical, my voice and hand gestures controlling the tonnes of force exerted by the volunteers to a remarkable degree of precision. A final “PULL” saw the stone find its vertical position against the pit wall.
Props were placed to keep the stone in position and the pulling teams were allowed to rest and admire their work!
It was fascinating to see the effect of a successful raising on the volunteers. many people congratulated each other and us. People came up to me to say how amazed and impressed and proud they were, and how it really made them think about the Stonehenge itself – the scale and achievement of it all.
It was a confirmation to us all of the power of public engagement in full scale projects.
What was really interesting was the fact that although the project was initially designed as a public engagement event, we found ourselves asking more and more questions about the process which inevitably led to suggestions and opinions about possible methods. The raising and lowering of the stone 7 times over the three days allowed us to refine aspects of the method (the quickest attempt took just 30 minutes to haul, raise and lower the stone!), and to suggest further remedies. In general, we felt that winter was not an ideal time to perform the task on this or larger scale (unless the ground was entirely frozen). I accept that rollers could be replaced by a split timber sleeper track and the stone pulled on a sled to simplify the adjustment and precision of the operation. But the impact of many feet on winter turf and the manoeuvring of large lumps of rock must have required remedial works to be carried out to prevent the original construction site becoming a bog. perhaps stripping the topsoil, or placing woven panels in heavily used areas?
The changing nature of the pit became a focus for me. After each attempt, the damaged vertical face of the pit had to be adjusted to maintain it as vertical. The “foot” of the stone scoured the vertical face and the base of the pit when it was raised and lowered, undercutting the face of the pit a little each time. This visible effect would be recognisable in the archaeological evidence (we are going to compare our pit with the profiles of Stonehenge pits), especially where stones are thought to have been moved or re positioned.

