The Stonehenge Monolith Project 2019
This project arose from a series of questions that stemmed from our previous public engagement project of pulling and raising a monolith in 2018.
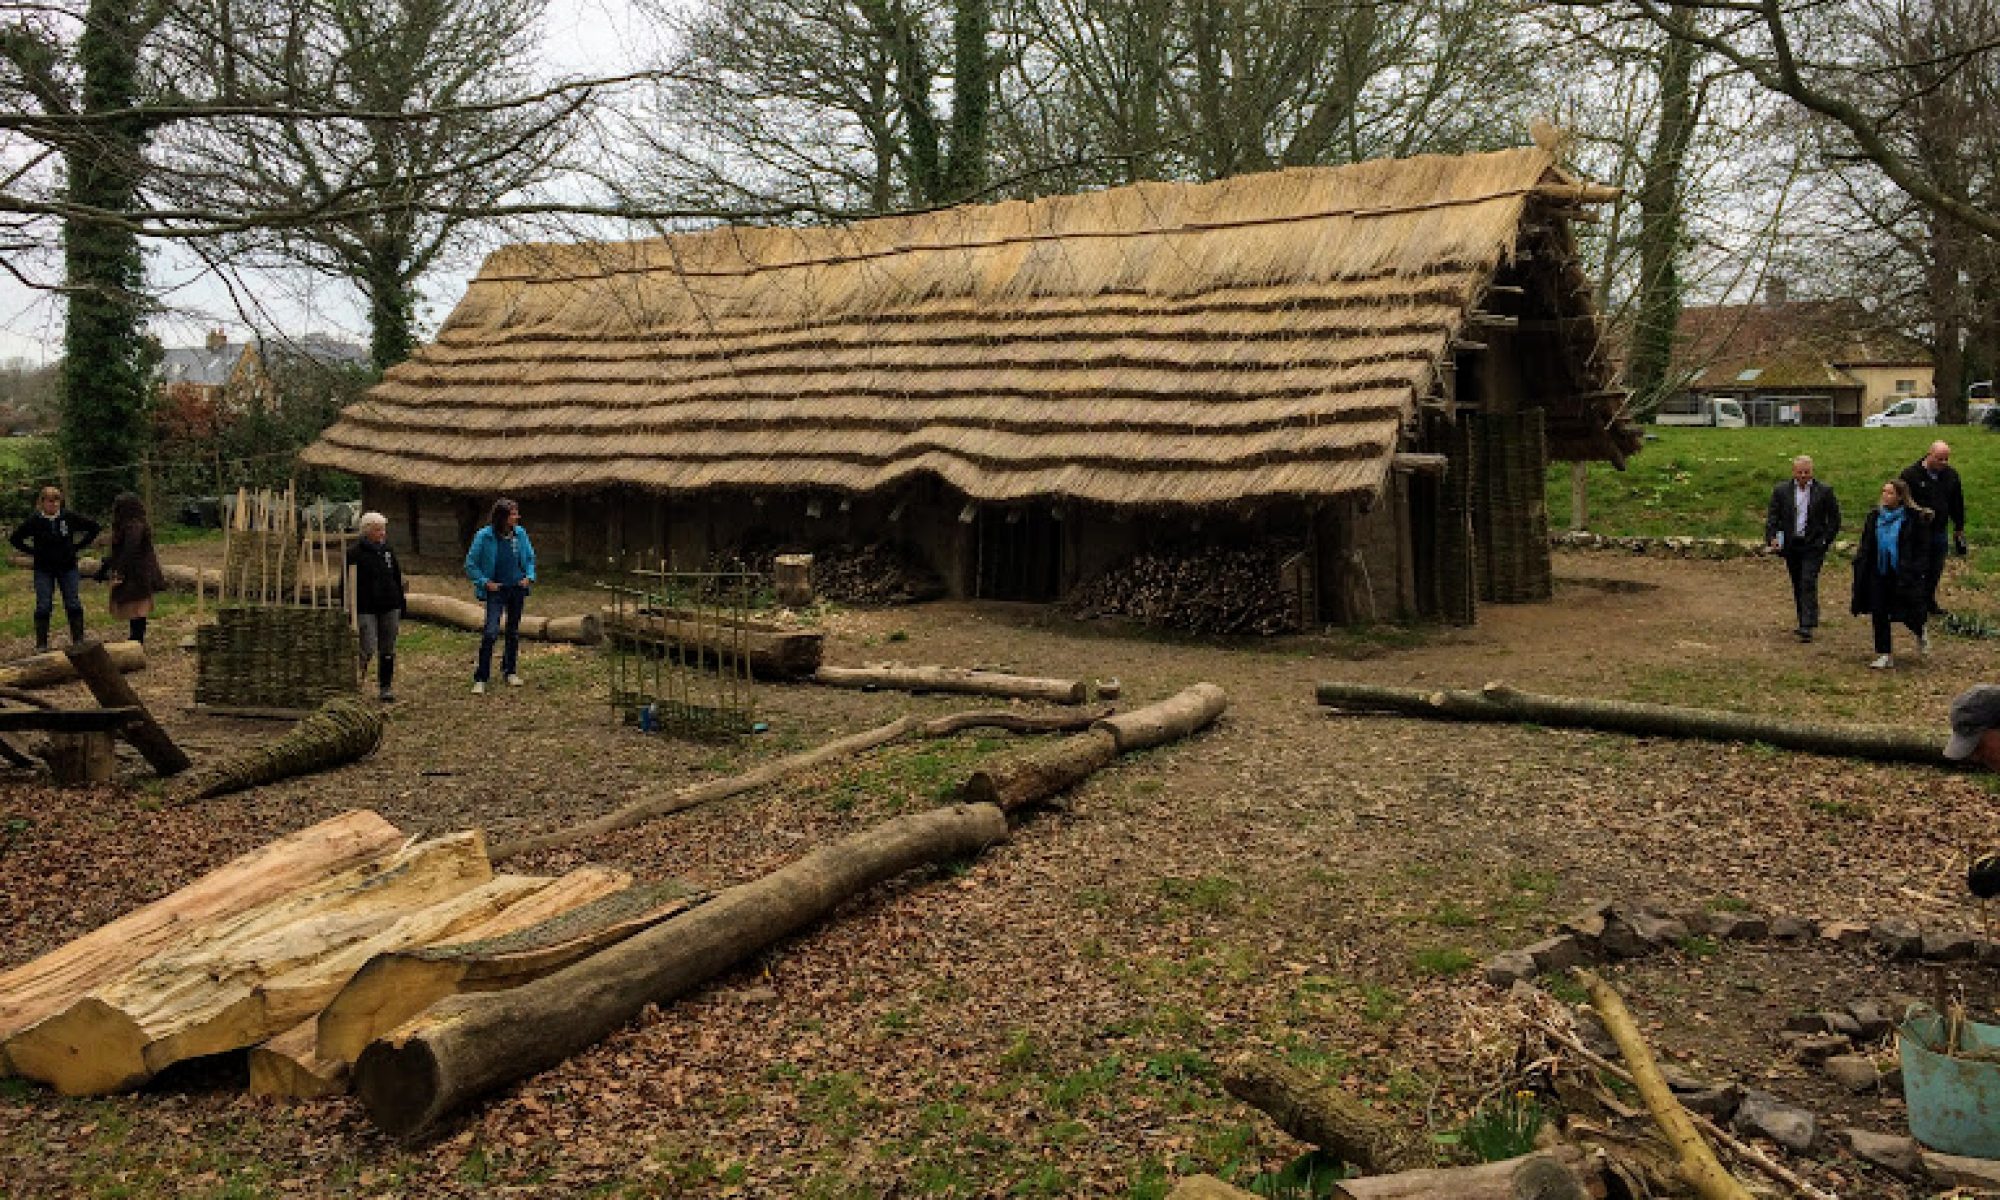
This project would not have been possible without the support of English Heritage and their amazing group of Stonehenge Volunteers! Their enthusiasm and dedication during the construction of the sled and throughout the pulling tests made the project safe, successful and enjoyable.
Although successful, our previous project highlighted issues of ground conditions, ease of manoeuvrability, and efficiency of hauling over large distances. The idea of a timber sled or cradle is not new, but questions of its design, efficiency of use, and whether the time and effort expended in its manufacture truly offset subsequent efficiency in use, are still pertinent.
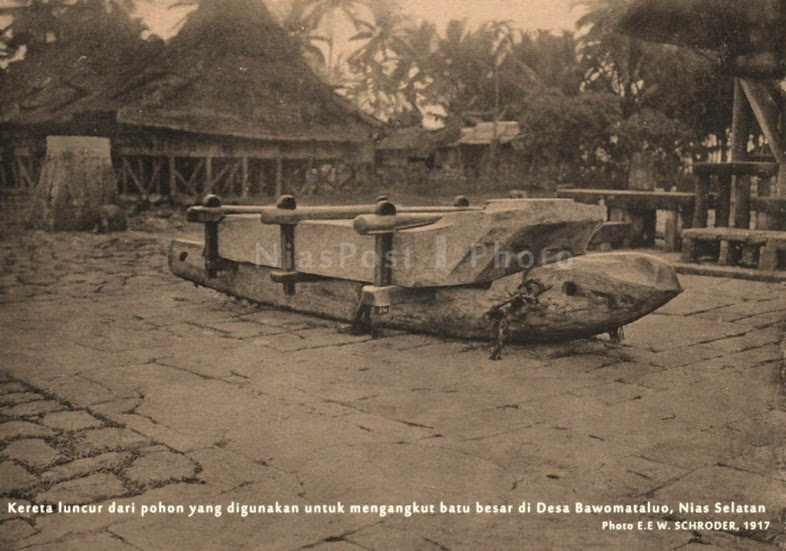
This years project began with the construction of a timber sled using appropriate techniques, materials and technologies (see “Monolith Timber Sled project”). Regarding sled design, I was inspired historic photographs of Schroder (1917) showing indigenous Indonesian solutions to moving large monoliths at the turn of the century. Although we cannot glean meaning from these photographs, the visible technology on display is impressive. The ability of this traditional culture, to produce fine carpentry for such a “functional” task is perhaps surprising to some. But this blend of aesthetics, meaning, and function is a feature of modern humanity , and should not be seen as anything out of the ordinary for the last hundred thousand years.

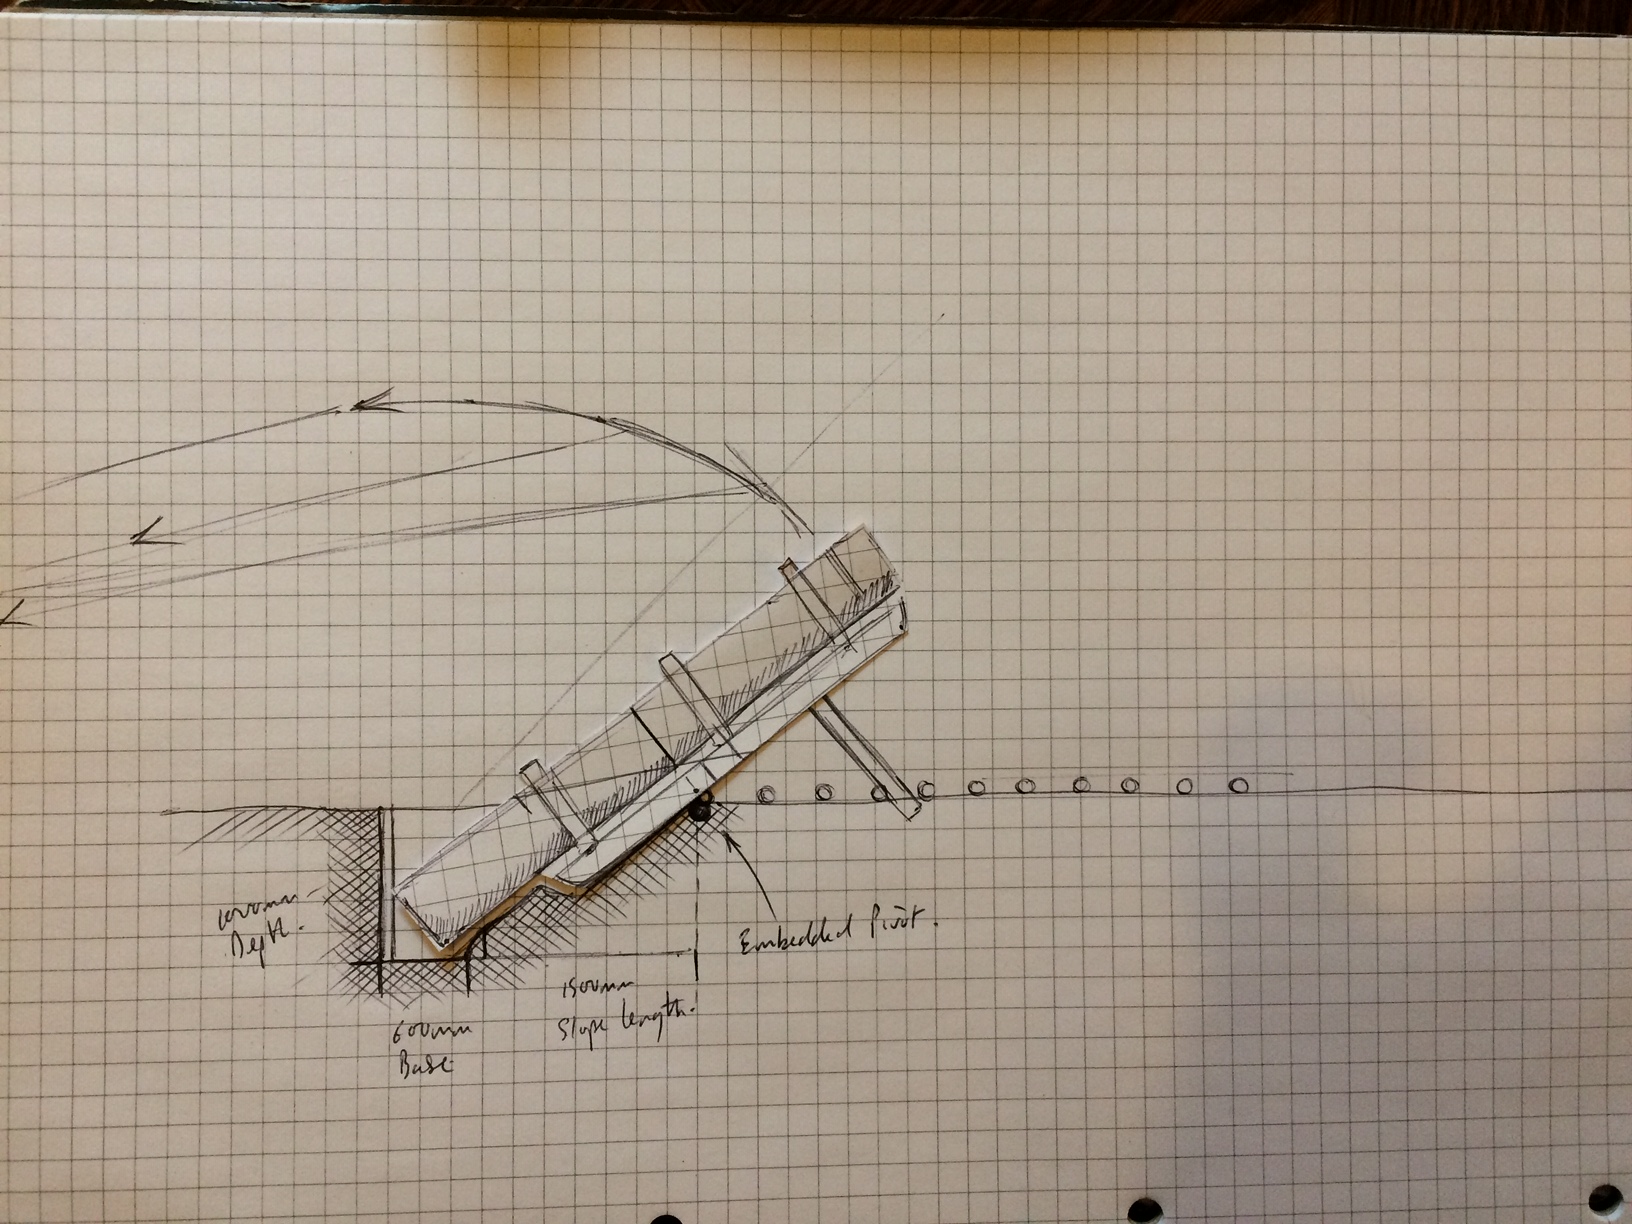
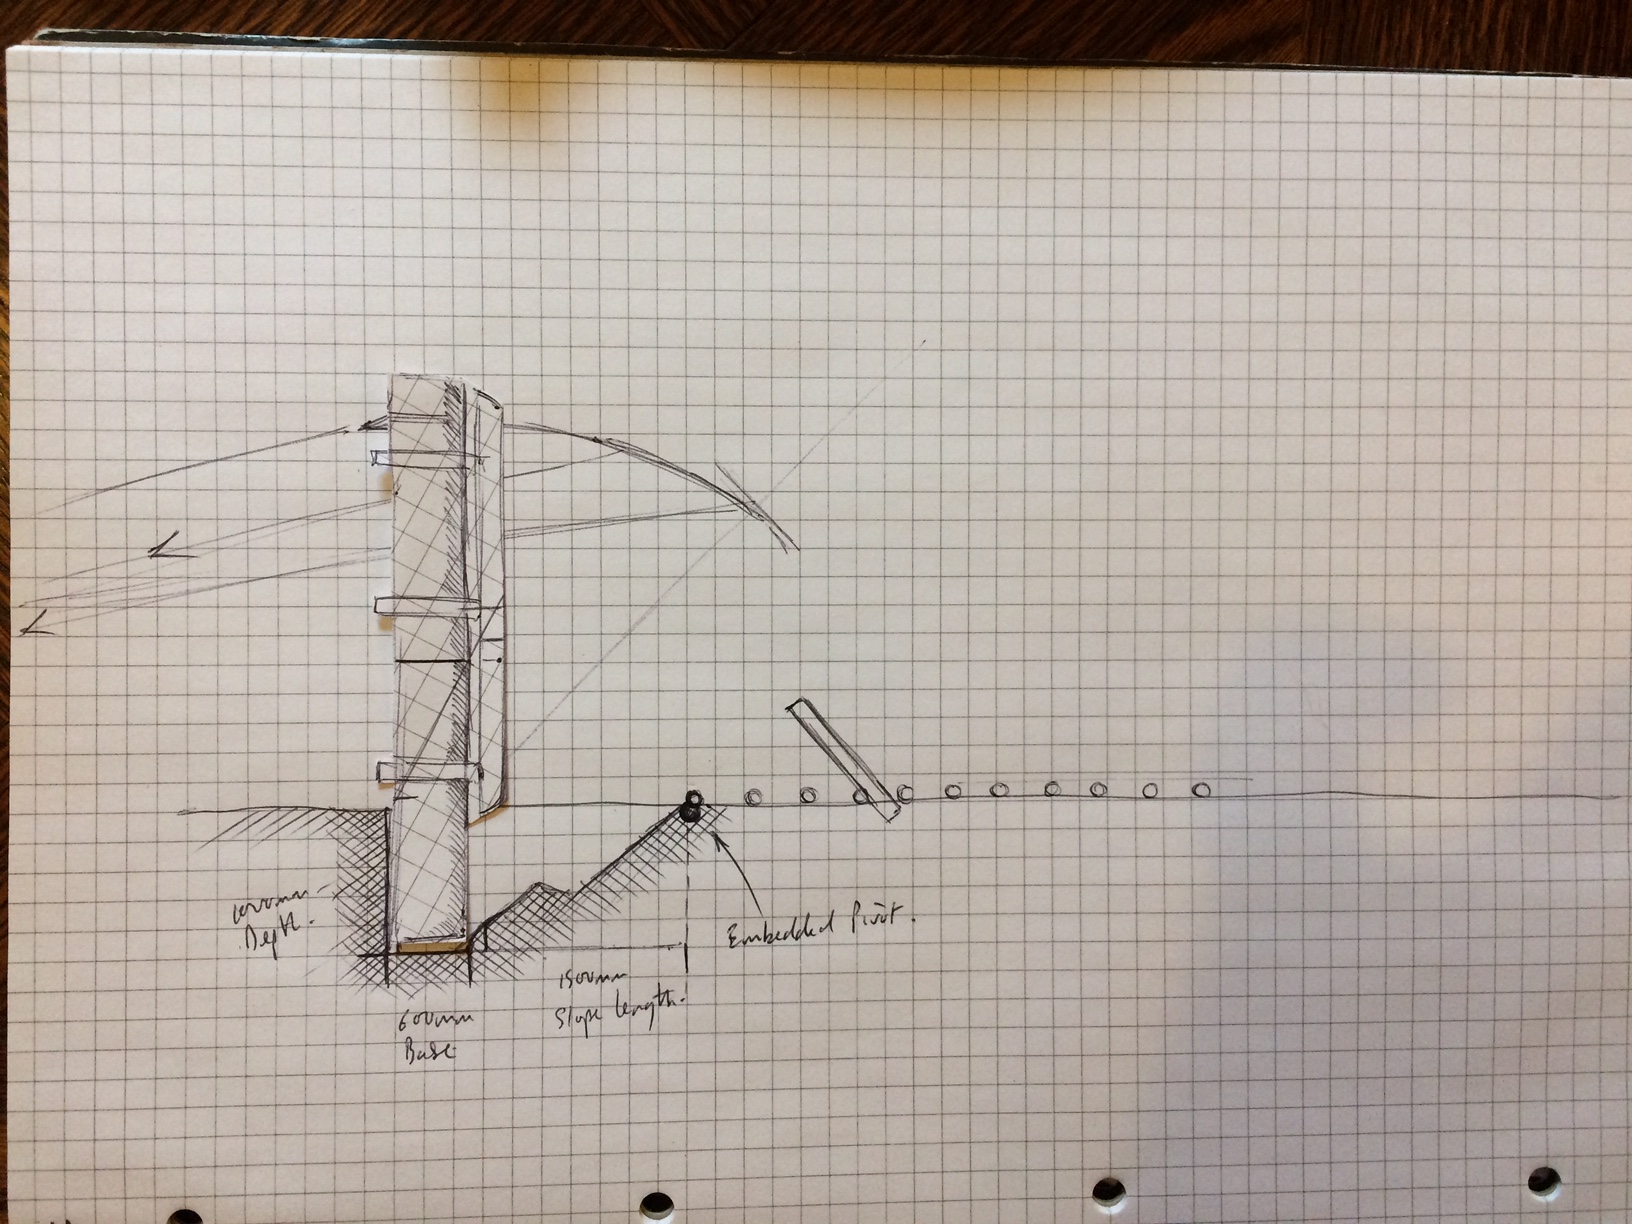
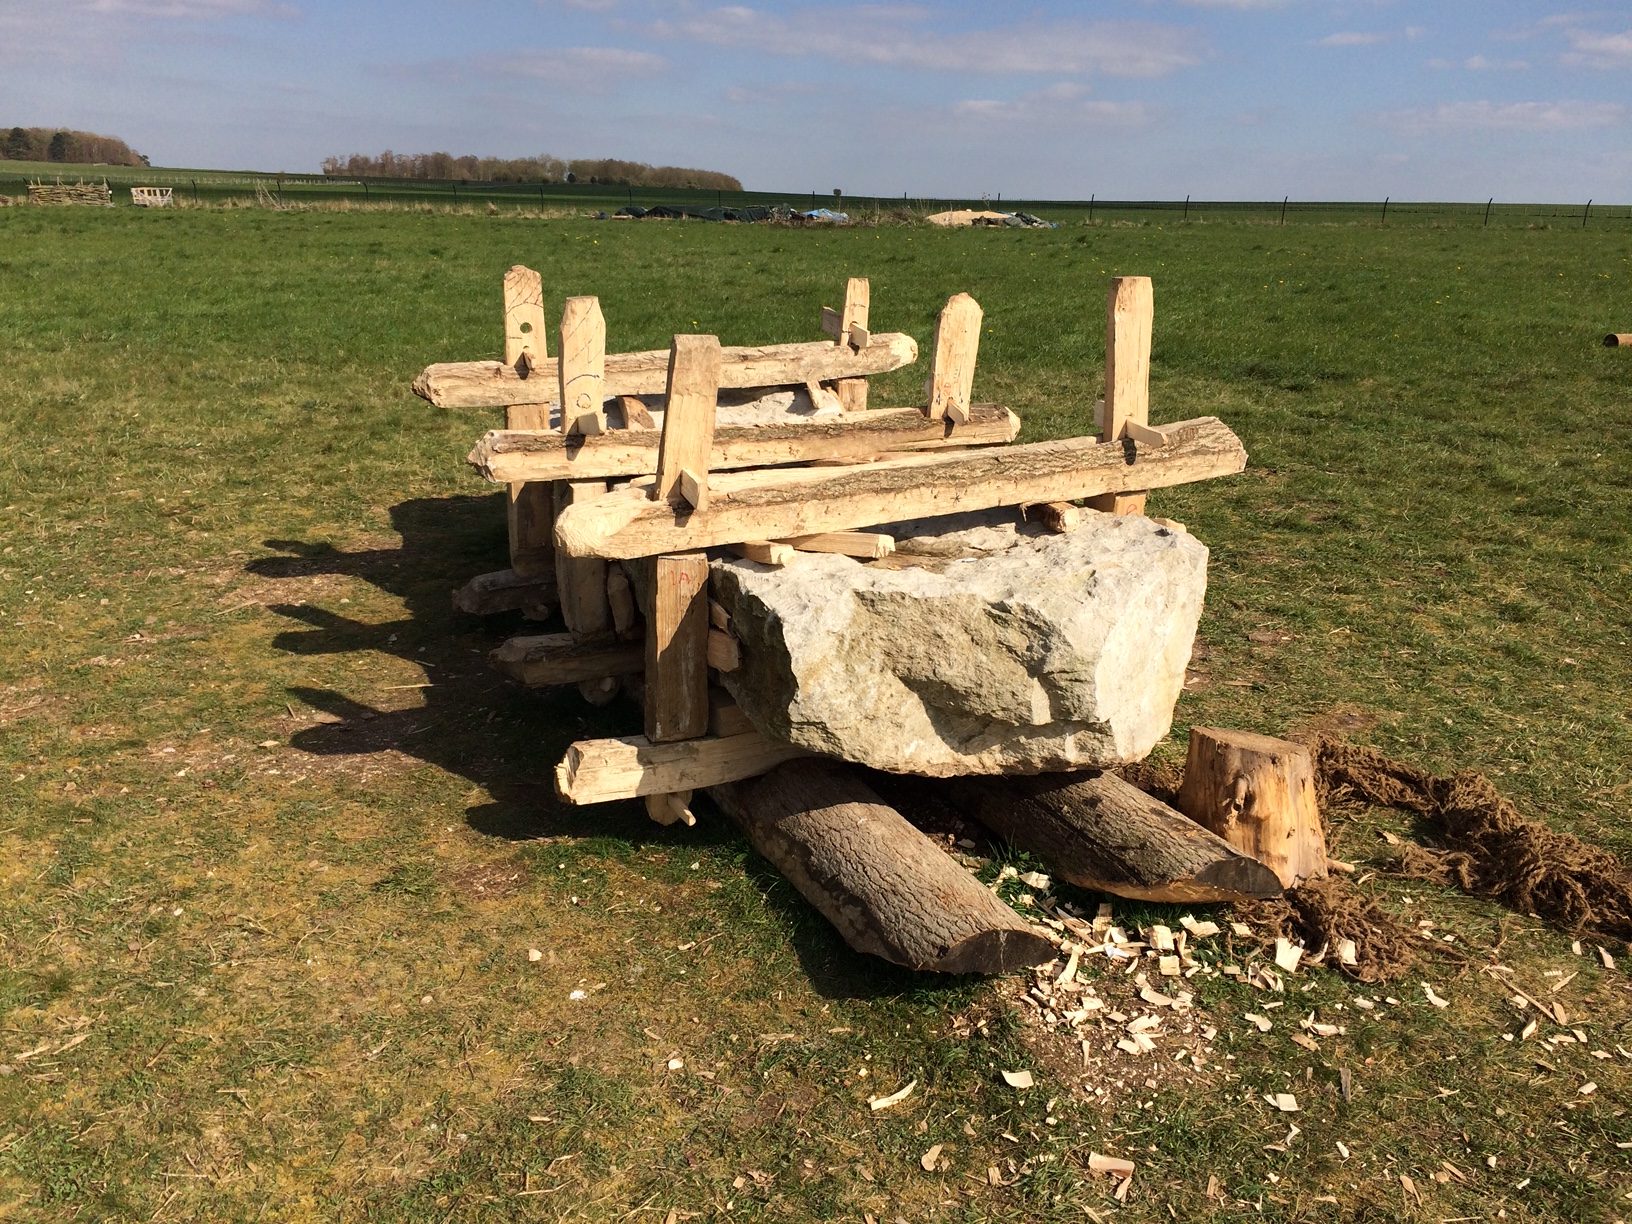
The construction of a timber cradle to house the monolith had various considerations from the outset, some of which had accidental consequences for the following project,
- Constraints of time and volunteer familiarity with stone and bone tools limited the refinement of the timber elements (this may form the basis of future work for the volunteer teams) of the sled, and the finished elements are functional rather than beautiful.
- The monolith is unshaped and so the three cradle frames needed to be wedged in place around the stone to form a tight fit. However, this fits at least some of the blue stones from Stonehenge that are unworked – although naturally weathered.
- The skis are not physically attached to the frames, This was designed to allow the skis to fall away from the monolith as it was being lifted to vertical – thus preventing the potential splintering of a jointed ski as pressure would inevitably be distributed unevenly through the frames while lifting.
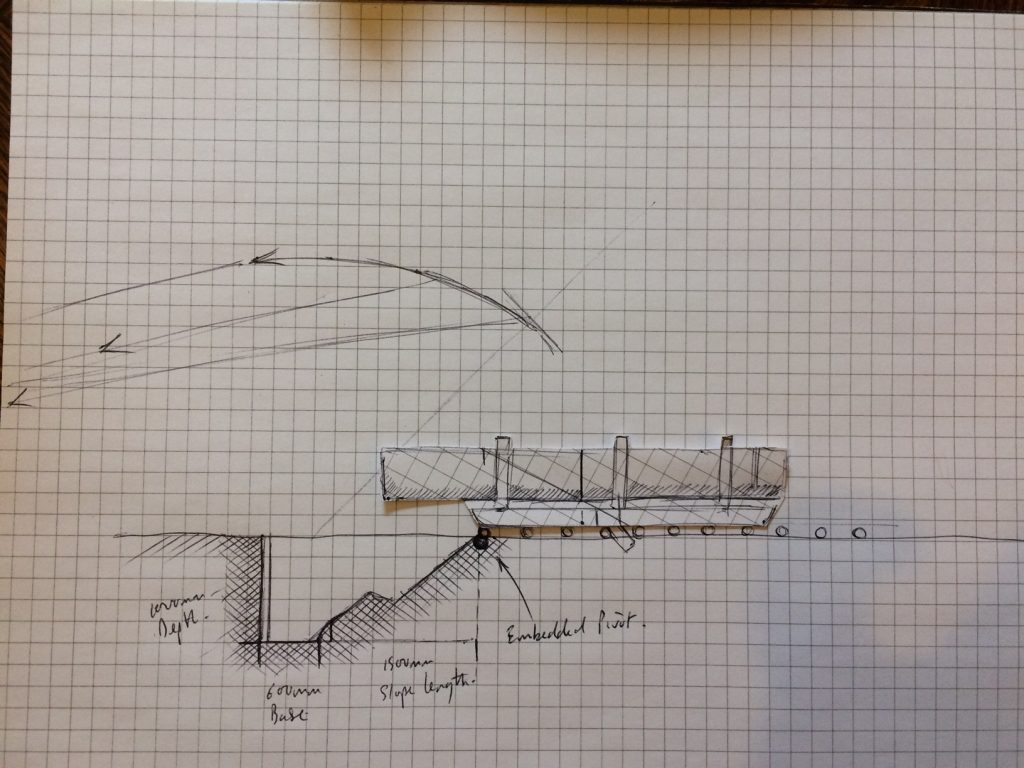
- The centre of the monolith sits to one end of the skis – effectively allowing a 1200 mm portion of the stone to project beyond the skis. This was a decision based on the need to raise the monolith at some point without removing the frames. The projecting stone would site in the prepared hole without the need to remove or move any of the timber frames around the stone, thus making a raising and lowering potentially repeatable without long time delays.
In essence, this project began as a compromise between pulling and raising a 3.5 tonne stone in a repeatable way. This is a point worth dwelling on, as these two operations are very different, and require a very different set of processes and techniques to ensure success.
The question of pulling around 80 bluestones over 120 miles from Preseli in South Wales to the construction site at Stonehenge would require high levels of efficiency and logistical support to achieve. Our stone represents an equivalent weight to the heaviest of these (between 3 and 4 tonnes). The methods that would successfully achieve this feat multiple times must have been well practised and organised over large distances, and avoided, or negotiated landscape obstacles and river crossings. These long distance transport methods and considerations become largely irrelevant once the construction zone is reached and thoughts turn to placement and raising of the bluestones. As we showed last year, the manoeuvring of stones (of this weight) over short distances, and their raising to vertical is relatively straightforward with the simplest of methods. This becomes a far greater issue with the raising of the much larger sarsens (in some cases weighing well over 40 tonnes).
Having said that, no experiment can cover all the bases, and sometimes the only way to know what questions to ask is to try something first, which inevitably throws up many questions that were unforeseen at the start of this project.
Given that this experiment also used the general visiting public rather than professional or trained hauling teams, our collected data would represent comparative baseline information based on inexperienced members of the public with a wide range of fitness, strength and mass. Even so, the results of this 5 day experiment sought to shed light on a simple series of questions.
Experimental Questions.
- Is the investment in sled building offset by efficiencies in moving and manoeuvring?
- What advantages does a sled offer to the pulling of a monolith over distance?
- What are the problems associated with using a timber sled?
- How do different surfaces affect the efficiency of sled use?
- What is the optimum spacing between sleepers for this sled?
- Are rollers redundant when using a sled?
- What are the issues associated with pulling the sled across slopes, up slopes, down slopes?
Project Design
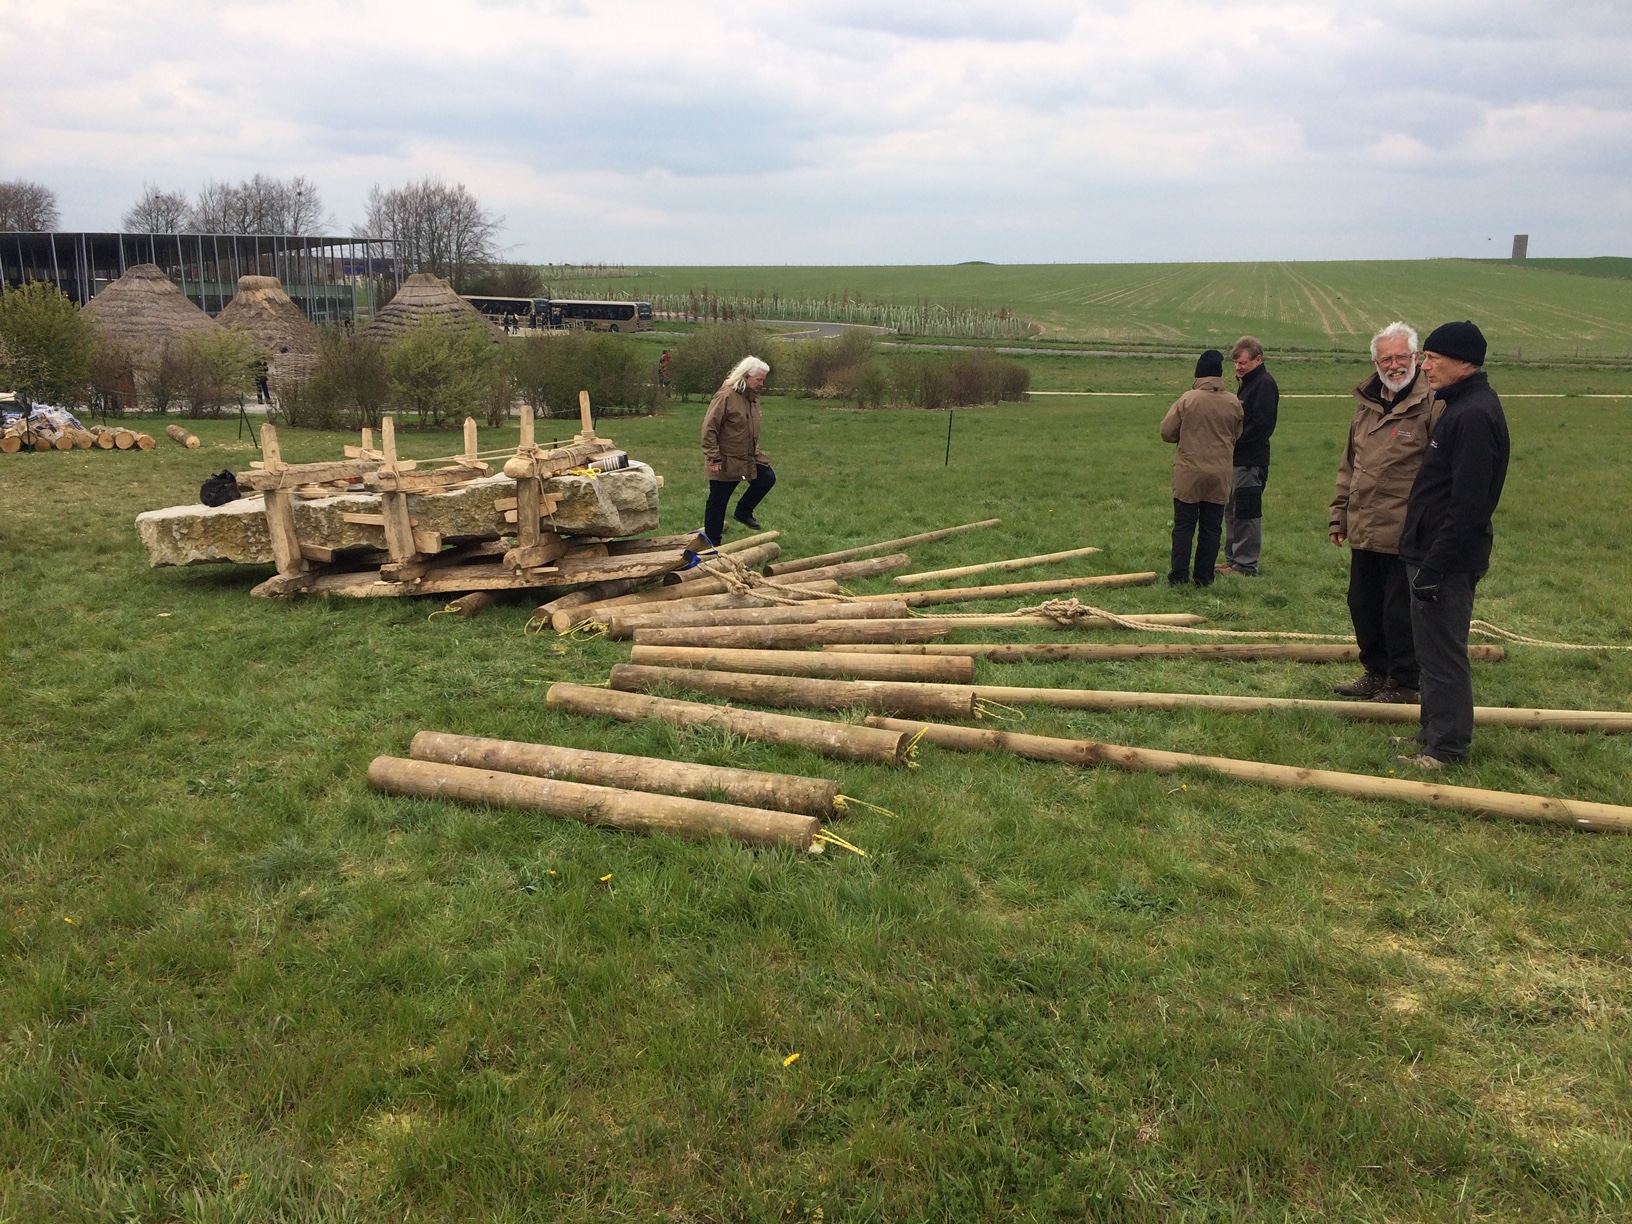
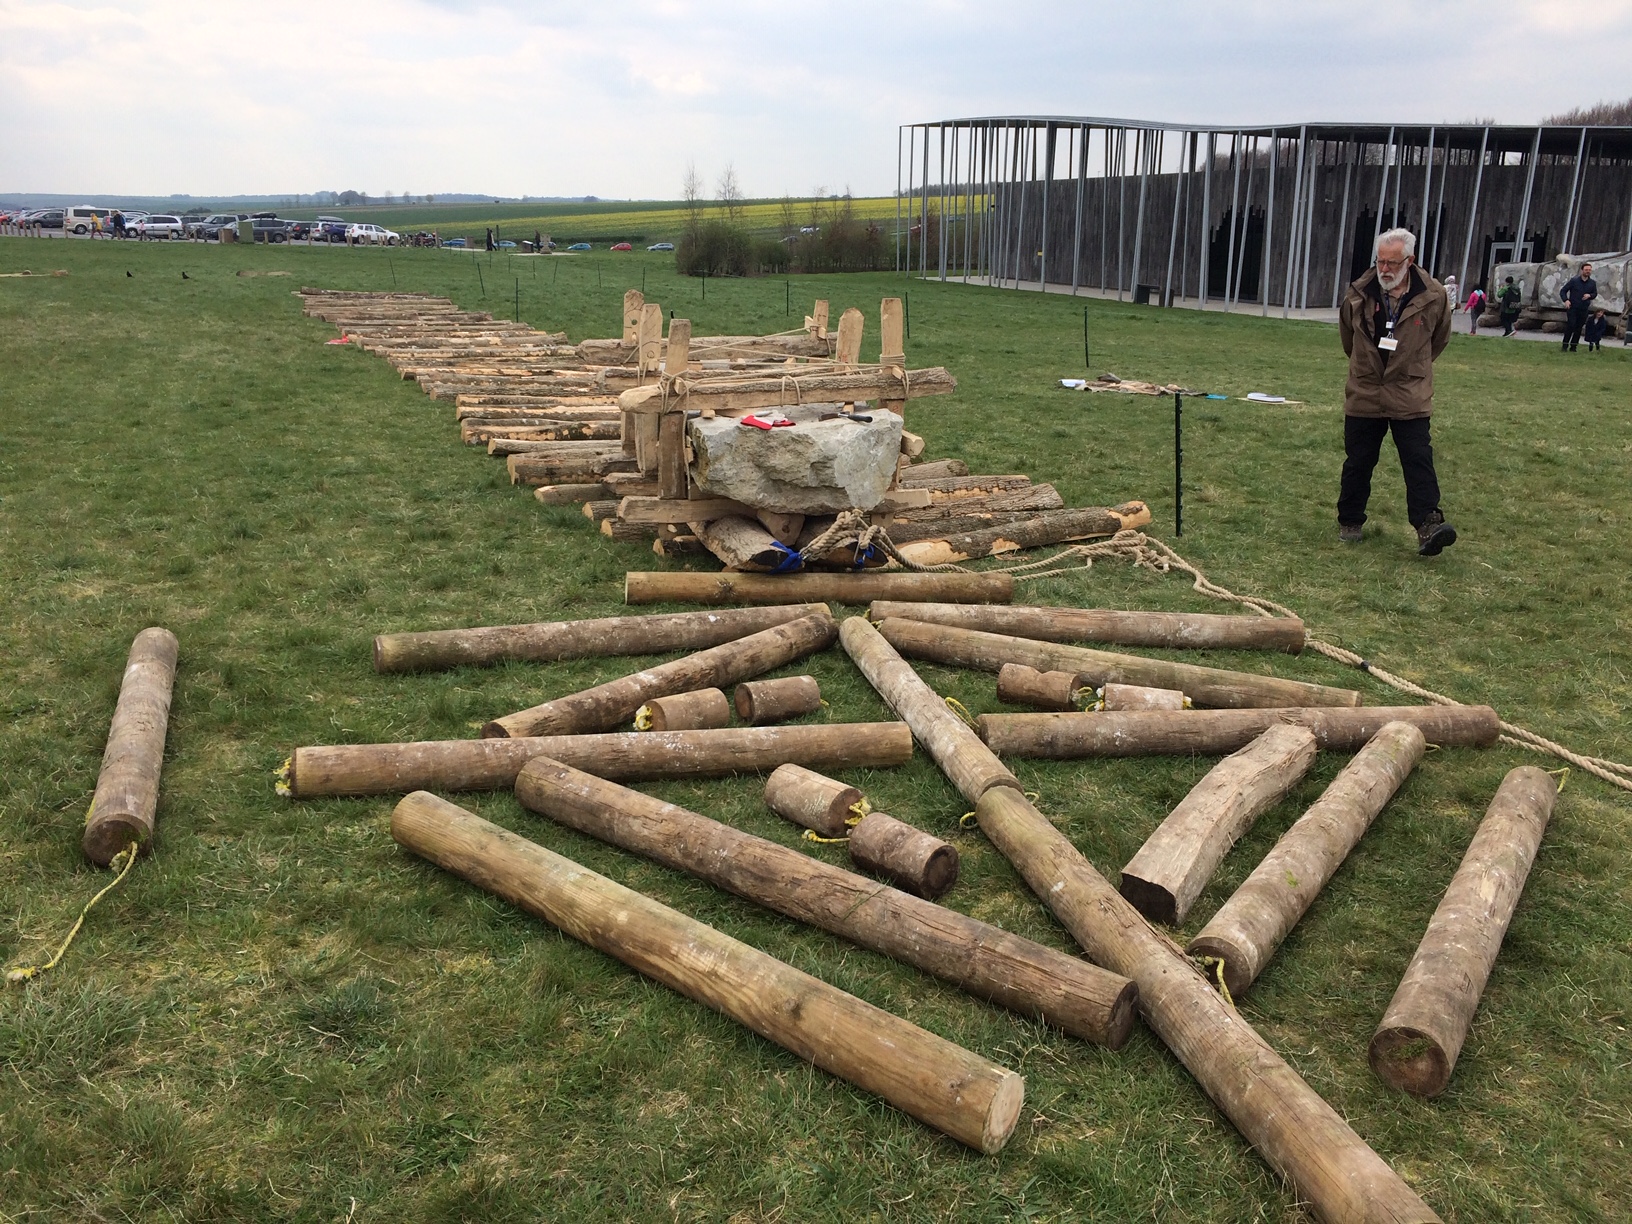
The project sought to test the relative efficiency of hauling and manoeuvring the 3.5 tonne monolith across a variety of courses based on the use of snedded and split Ash timbers. A straight course was laid out that ran across the gentle slope of the Stonehenge visitor centre field. The course was measured and marked at 10 metre intervals and each 10 metre stretch was filled with split timbers at varying distances apart.
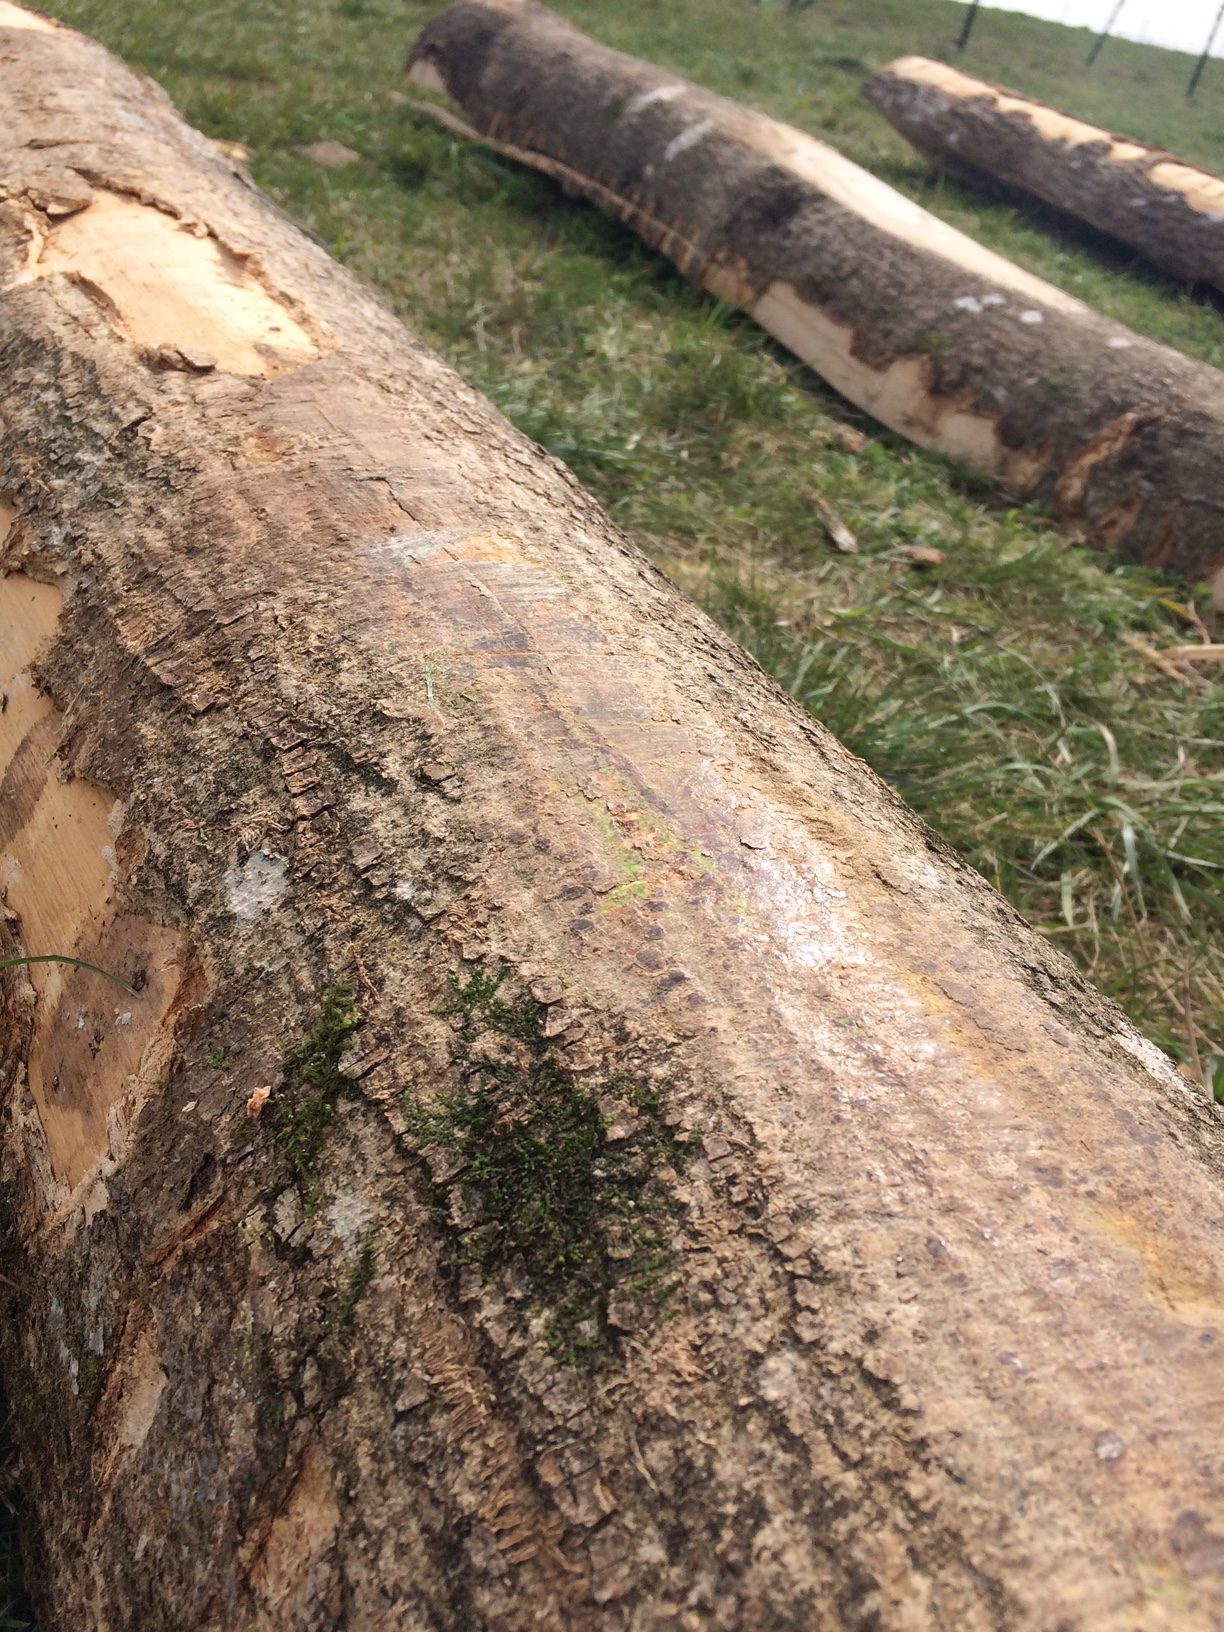
The split timbers comprised of ½ split and ¼ split Ash logs, laid so the split side was downward. For this experiment, the bark of the logs was not removed and no lubricant was used to reduce friction. When laid on the ground, the thicker end of each split timber (the base of the tree) was placed on the down slope side of the course in an attempt to create a more level surface and prevent the sled from slipping down the slope during hauling.
Prepared rollers were also tested in this experiment. The rollers were Pine and machined to 200 mm diameter to reflect the known availability of pine in the Stonehenge landscape during the construction phase of the monument.
The intention from the outset was also to conduct a baseline test of hauling the sled across the medium length grass (mown) without the help of sleepers or rollers.
Housing the Stone
One of the interesting aspects of this project that was unseen by the public was the placement of the stone into the sled. This was achieved using a small number of people, levers and some brute force. My first logic was intent on fitting the frames around the levered stone and then using those box frames to lever the stone onto the skis. It was only after we had got the frames into position that I realised we couldn’t do this without risking the frames destruction as the mortises were exactly on the sheer point of each timber against the edge of the stone. We removed the frames and tried again!
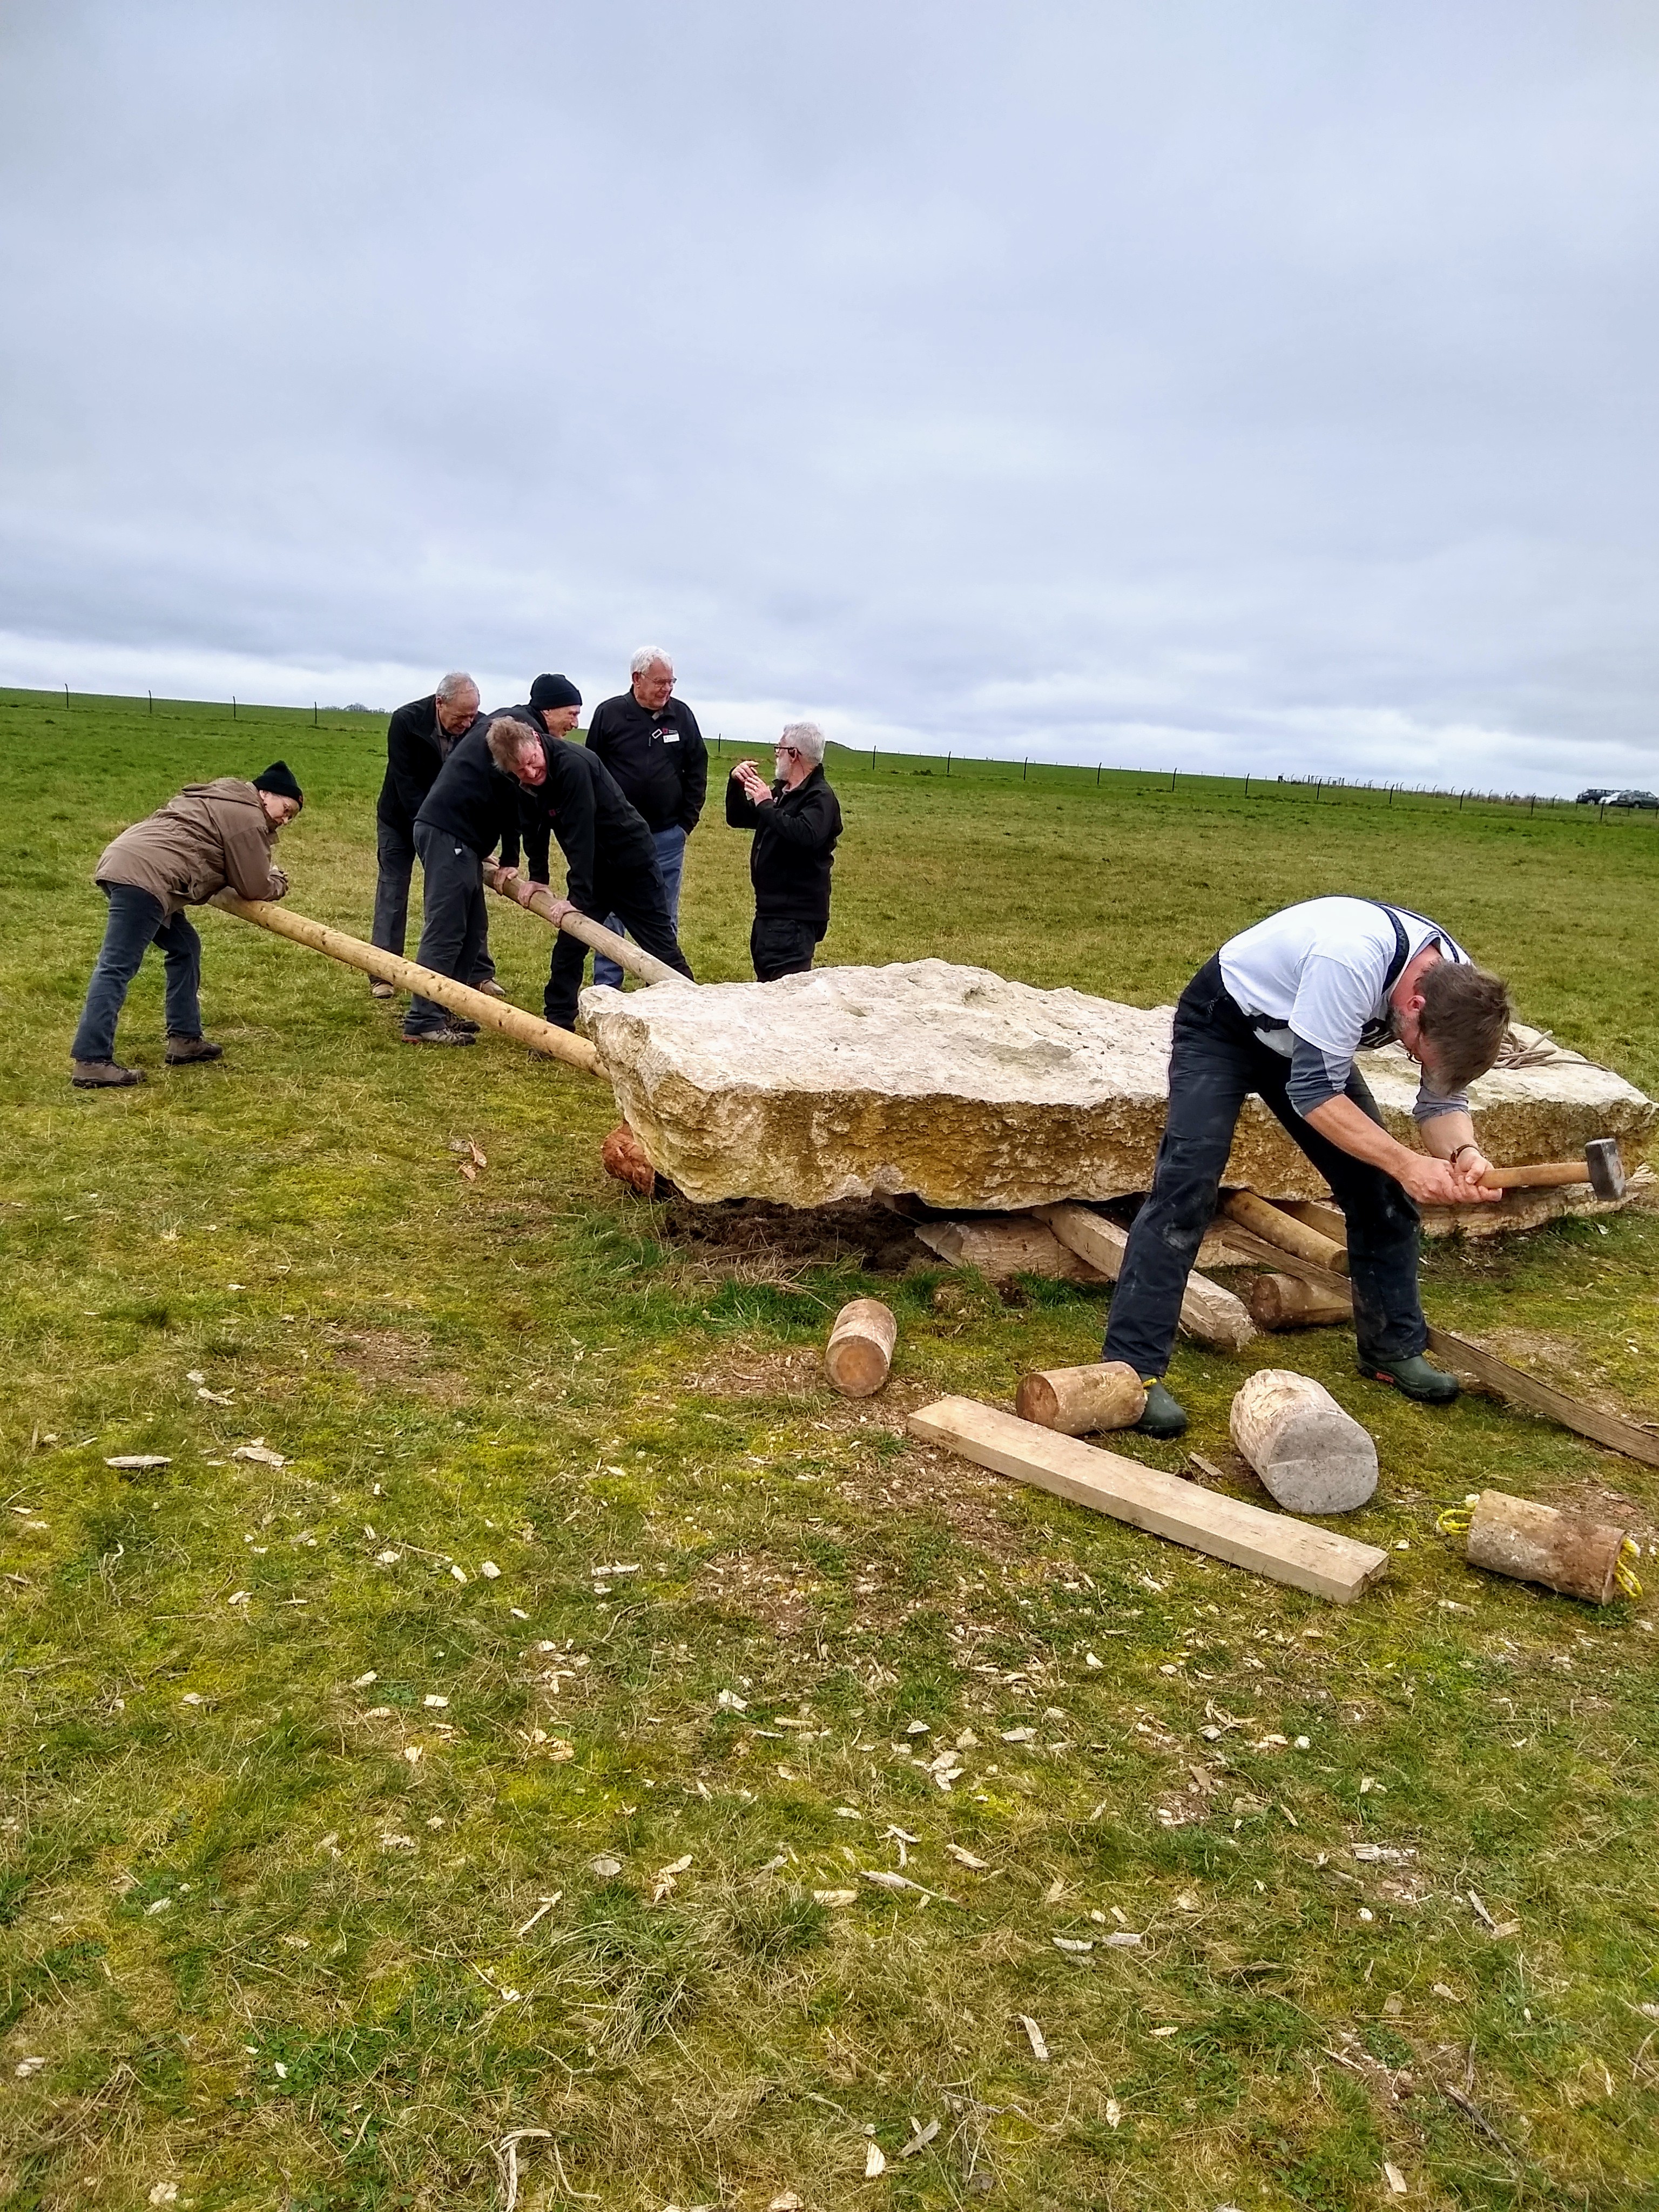
The stone was levered with large fulcrums along one long side at a time. each ski was then physically dragged longitudinally under the stone into position.
When both skis were in position, we levered the stone from either end to allow the box frame bases to be driven into position in their respective notches on the skis.
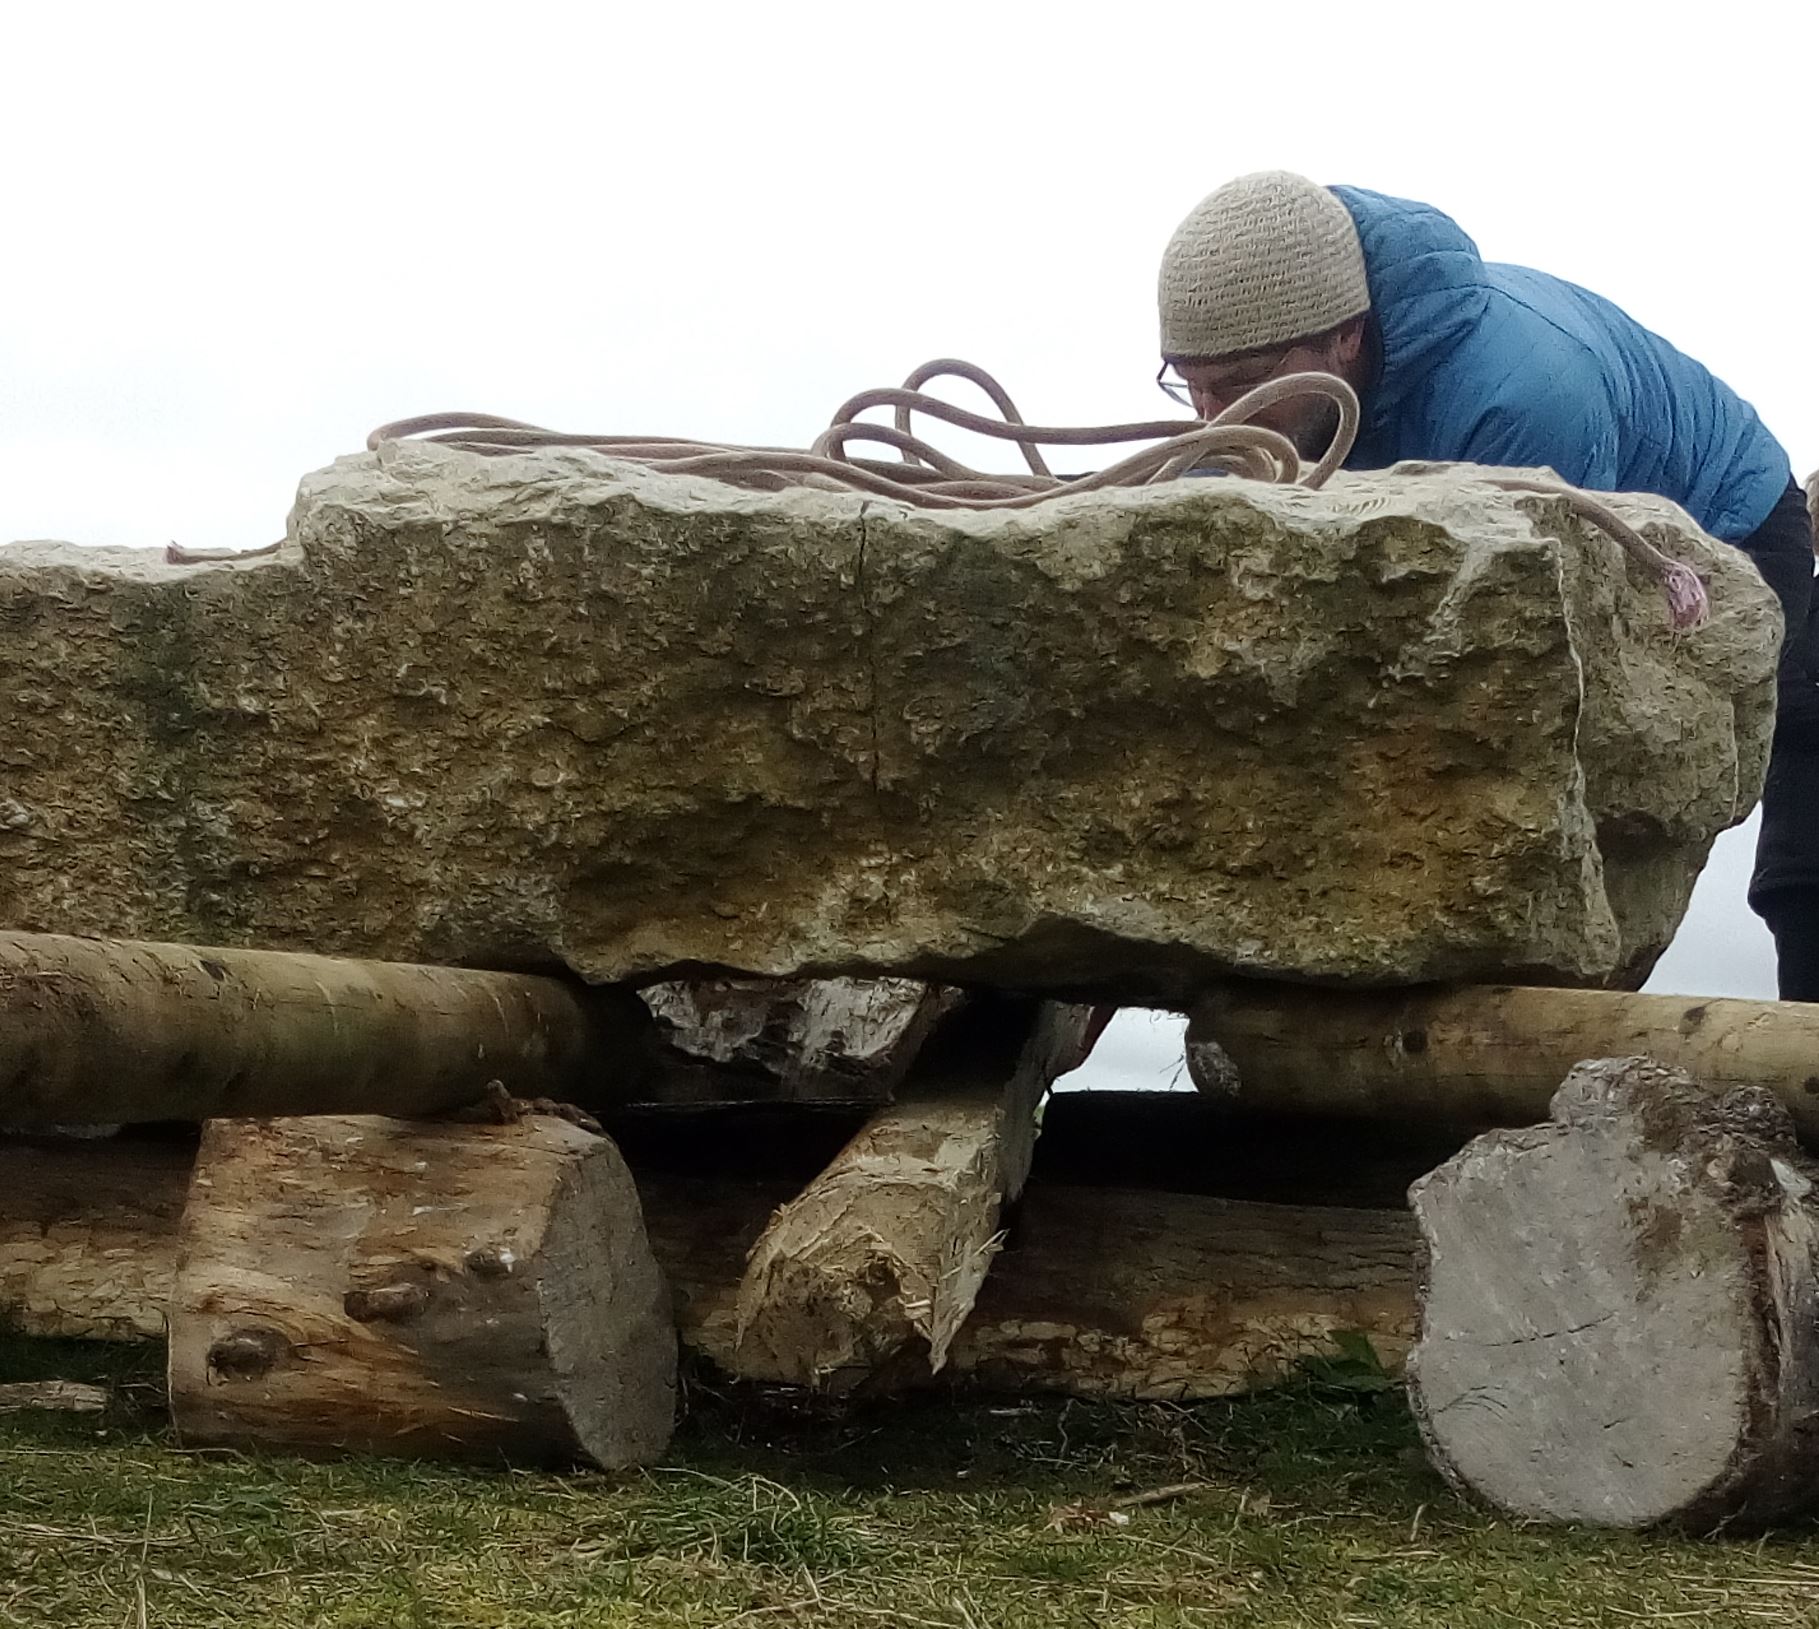
Once the three box frame bases were in position, the other frame elements were dropped into place and pegged. Wedges of various sizes were then driven between the frames and the stone to hold them firmly in the correct positions. Particular attention was paid to ensuring each frame base was fully located into the ski notches.
Only 2.5 hours of problem solving and eight people! – Oh, and some long levers!
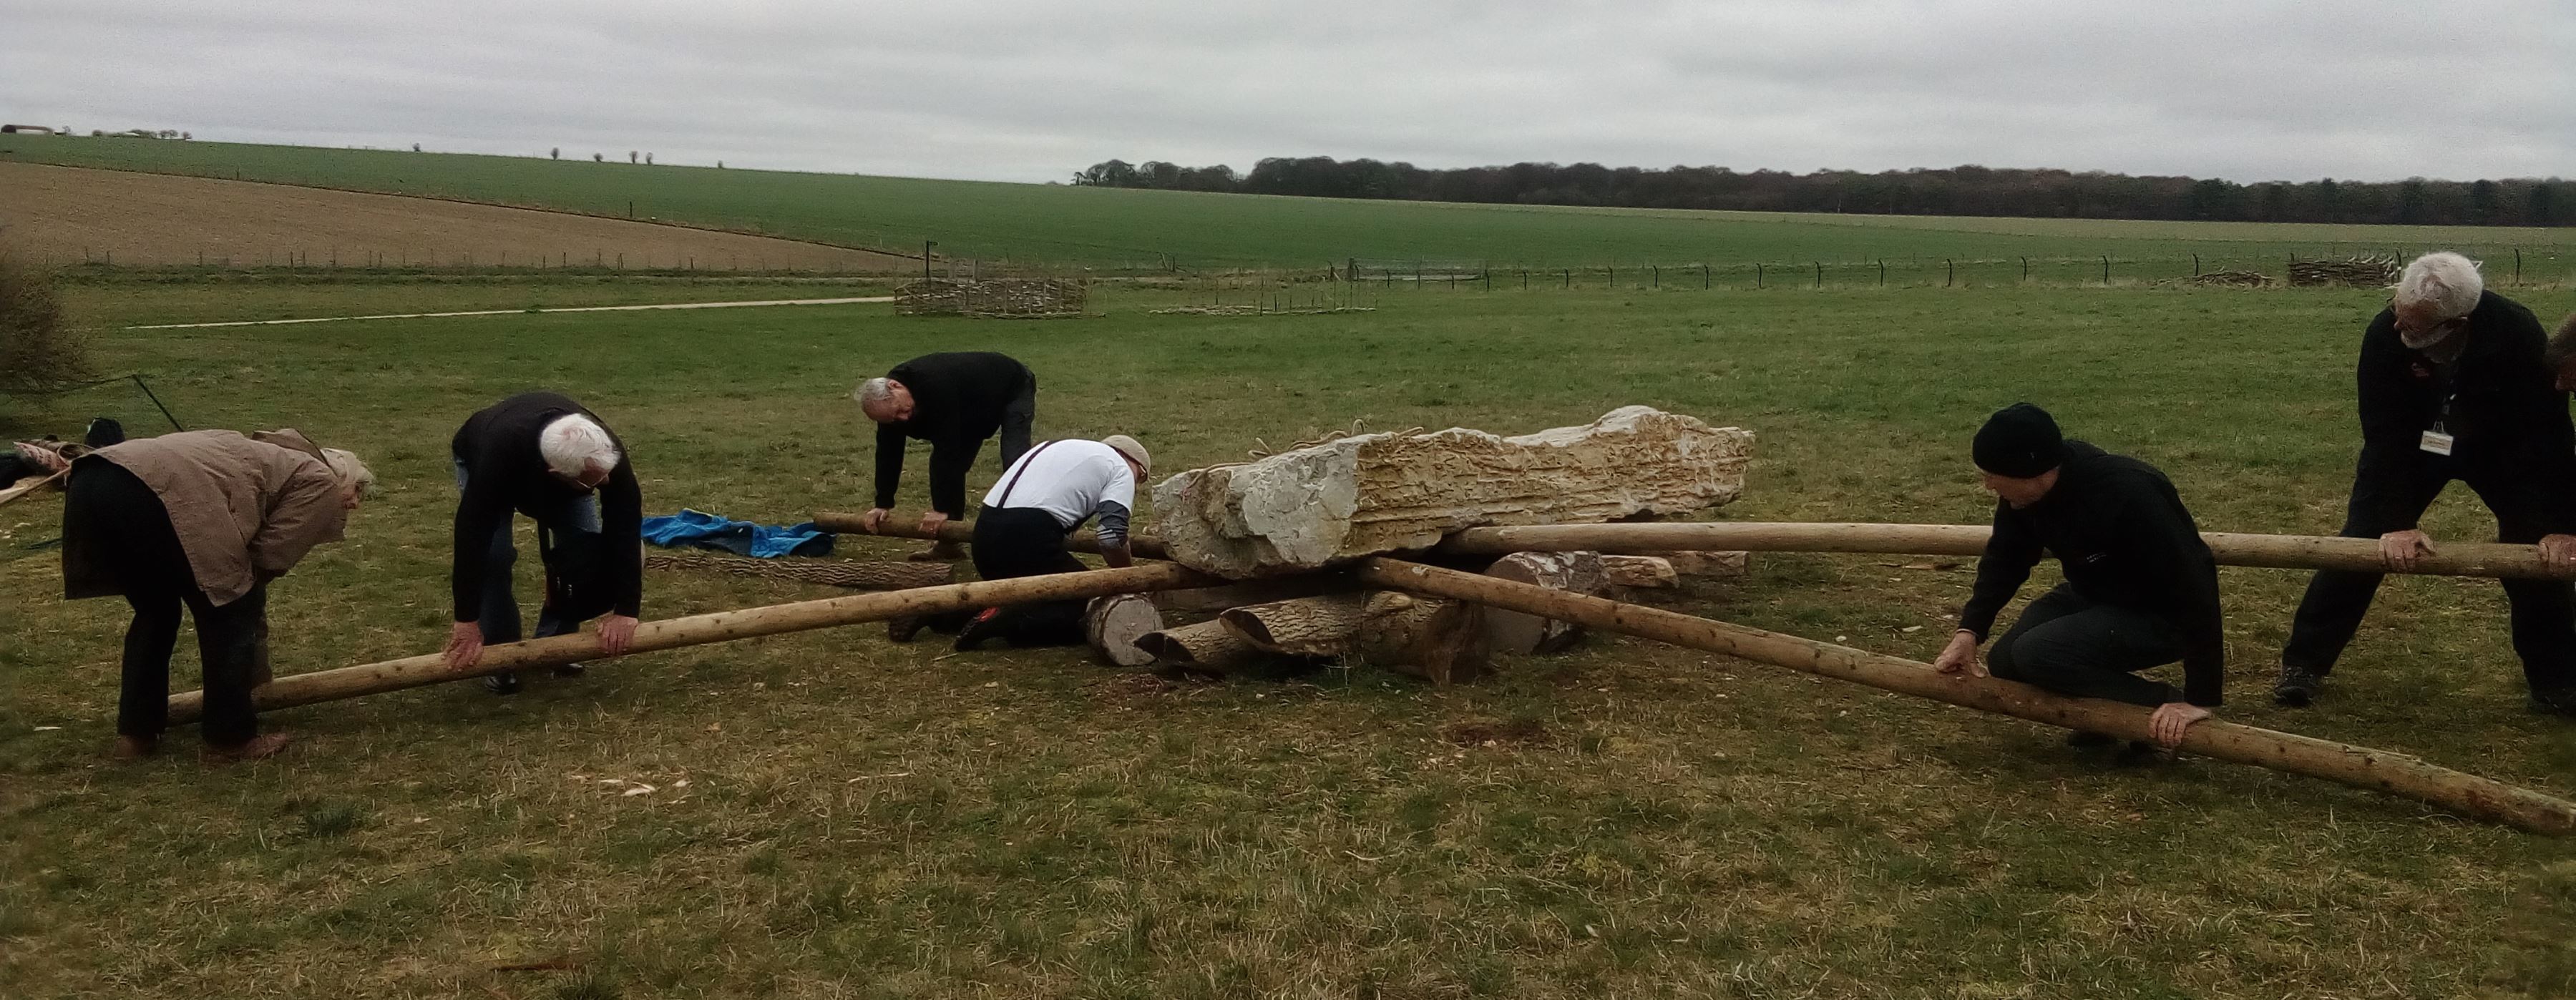
The next stage (pre public involvement) was to get the sled onto the first section of track way. Initially, this was achieved with levering and sliding the sleepers beneath the skis. It worked but was time consuming and awkward. later on we attempted to refine this process by placing thinner timbers (40 mm hazel sticks) under the tip of the skis and then pulling the sled with brute force up onto the larger timbers of the track way.
Sled Testing
Testing was conducted over several days in April after a spell of dry weather. The ground was damp unlike the very wet and muddy conditions of last year.
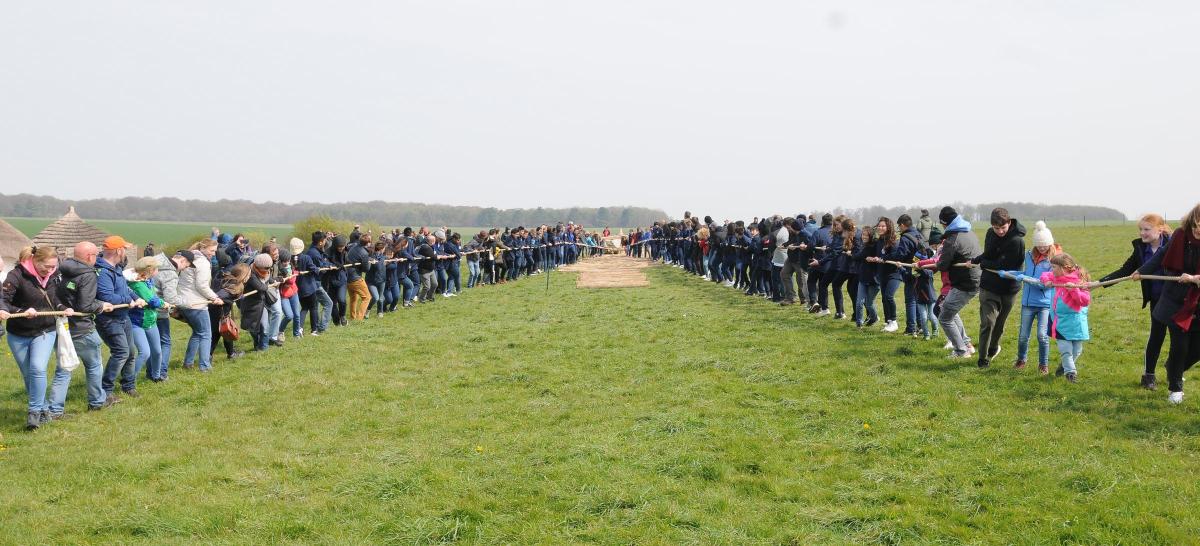
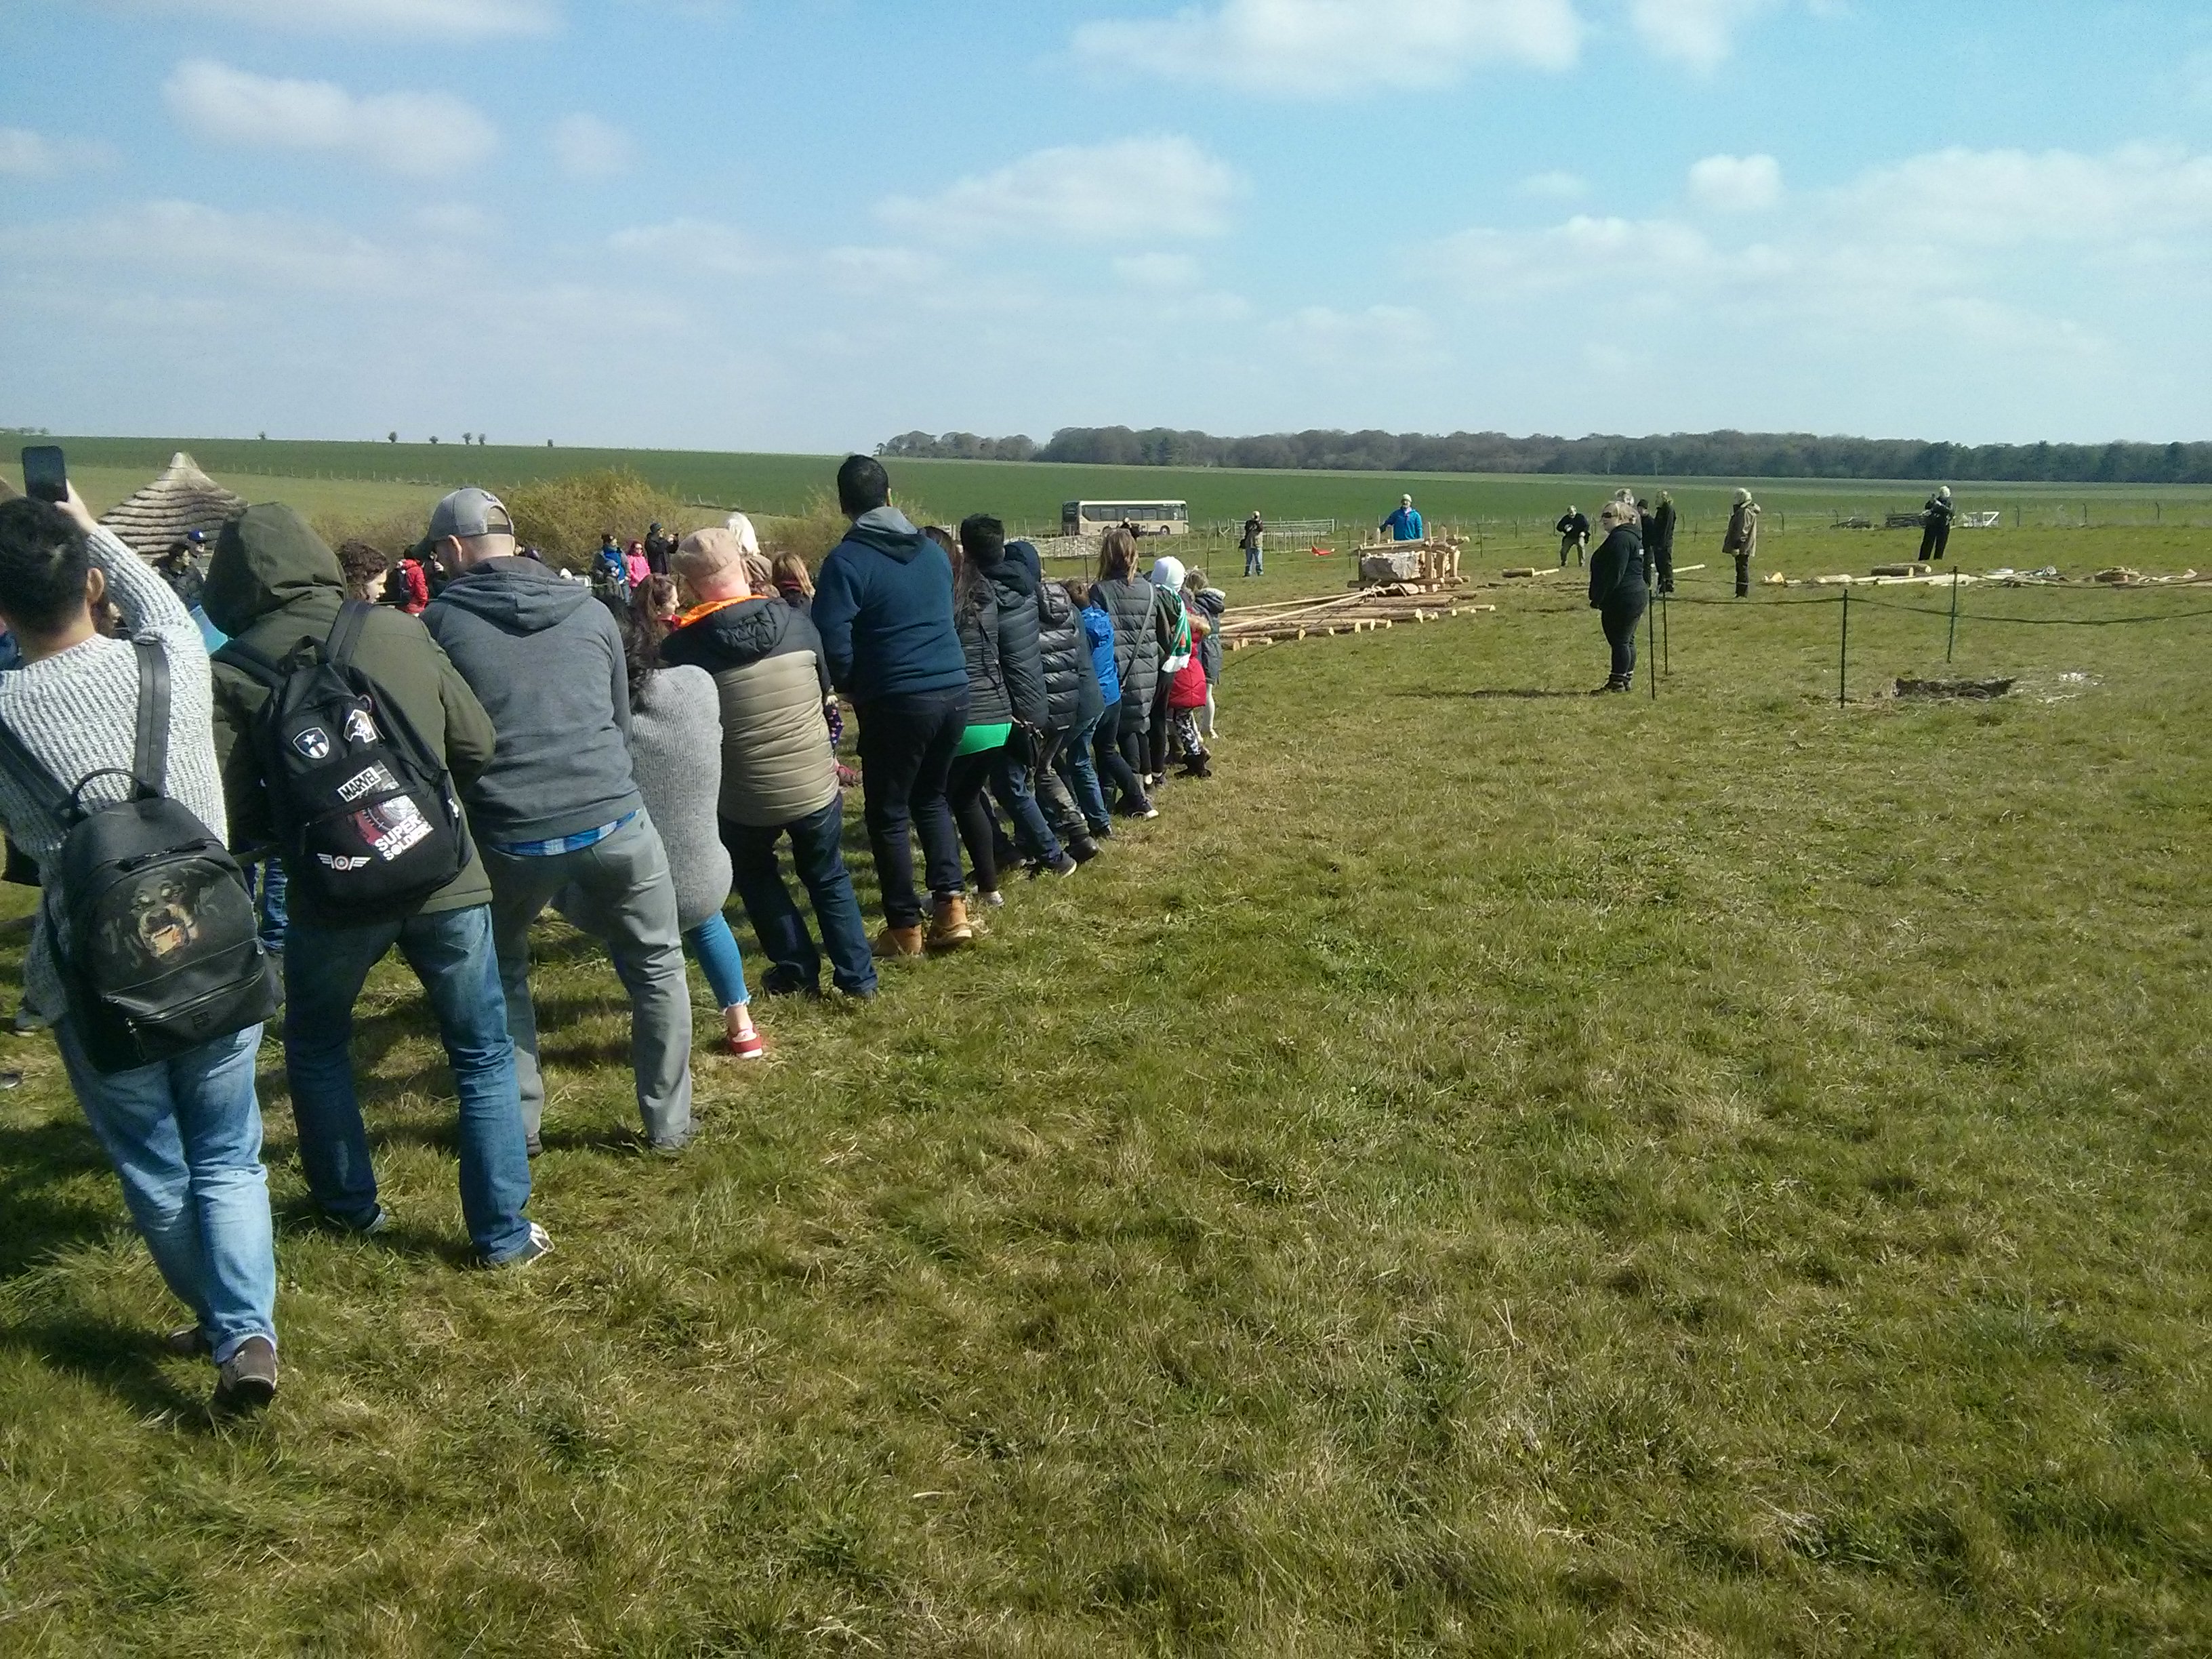
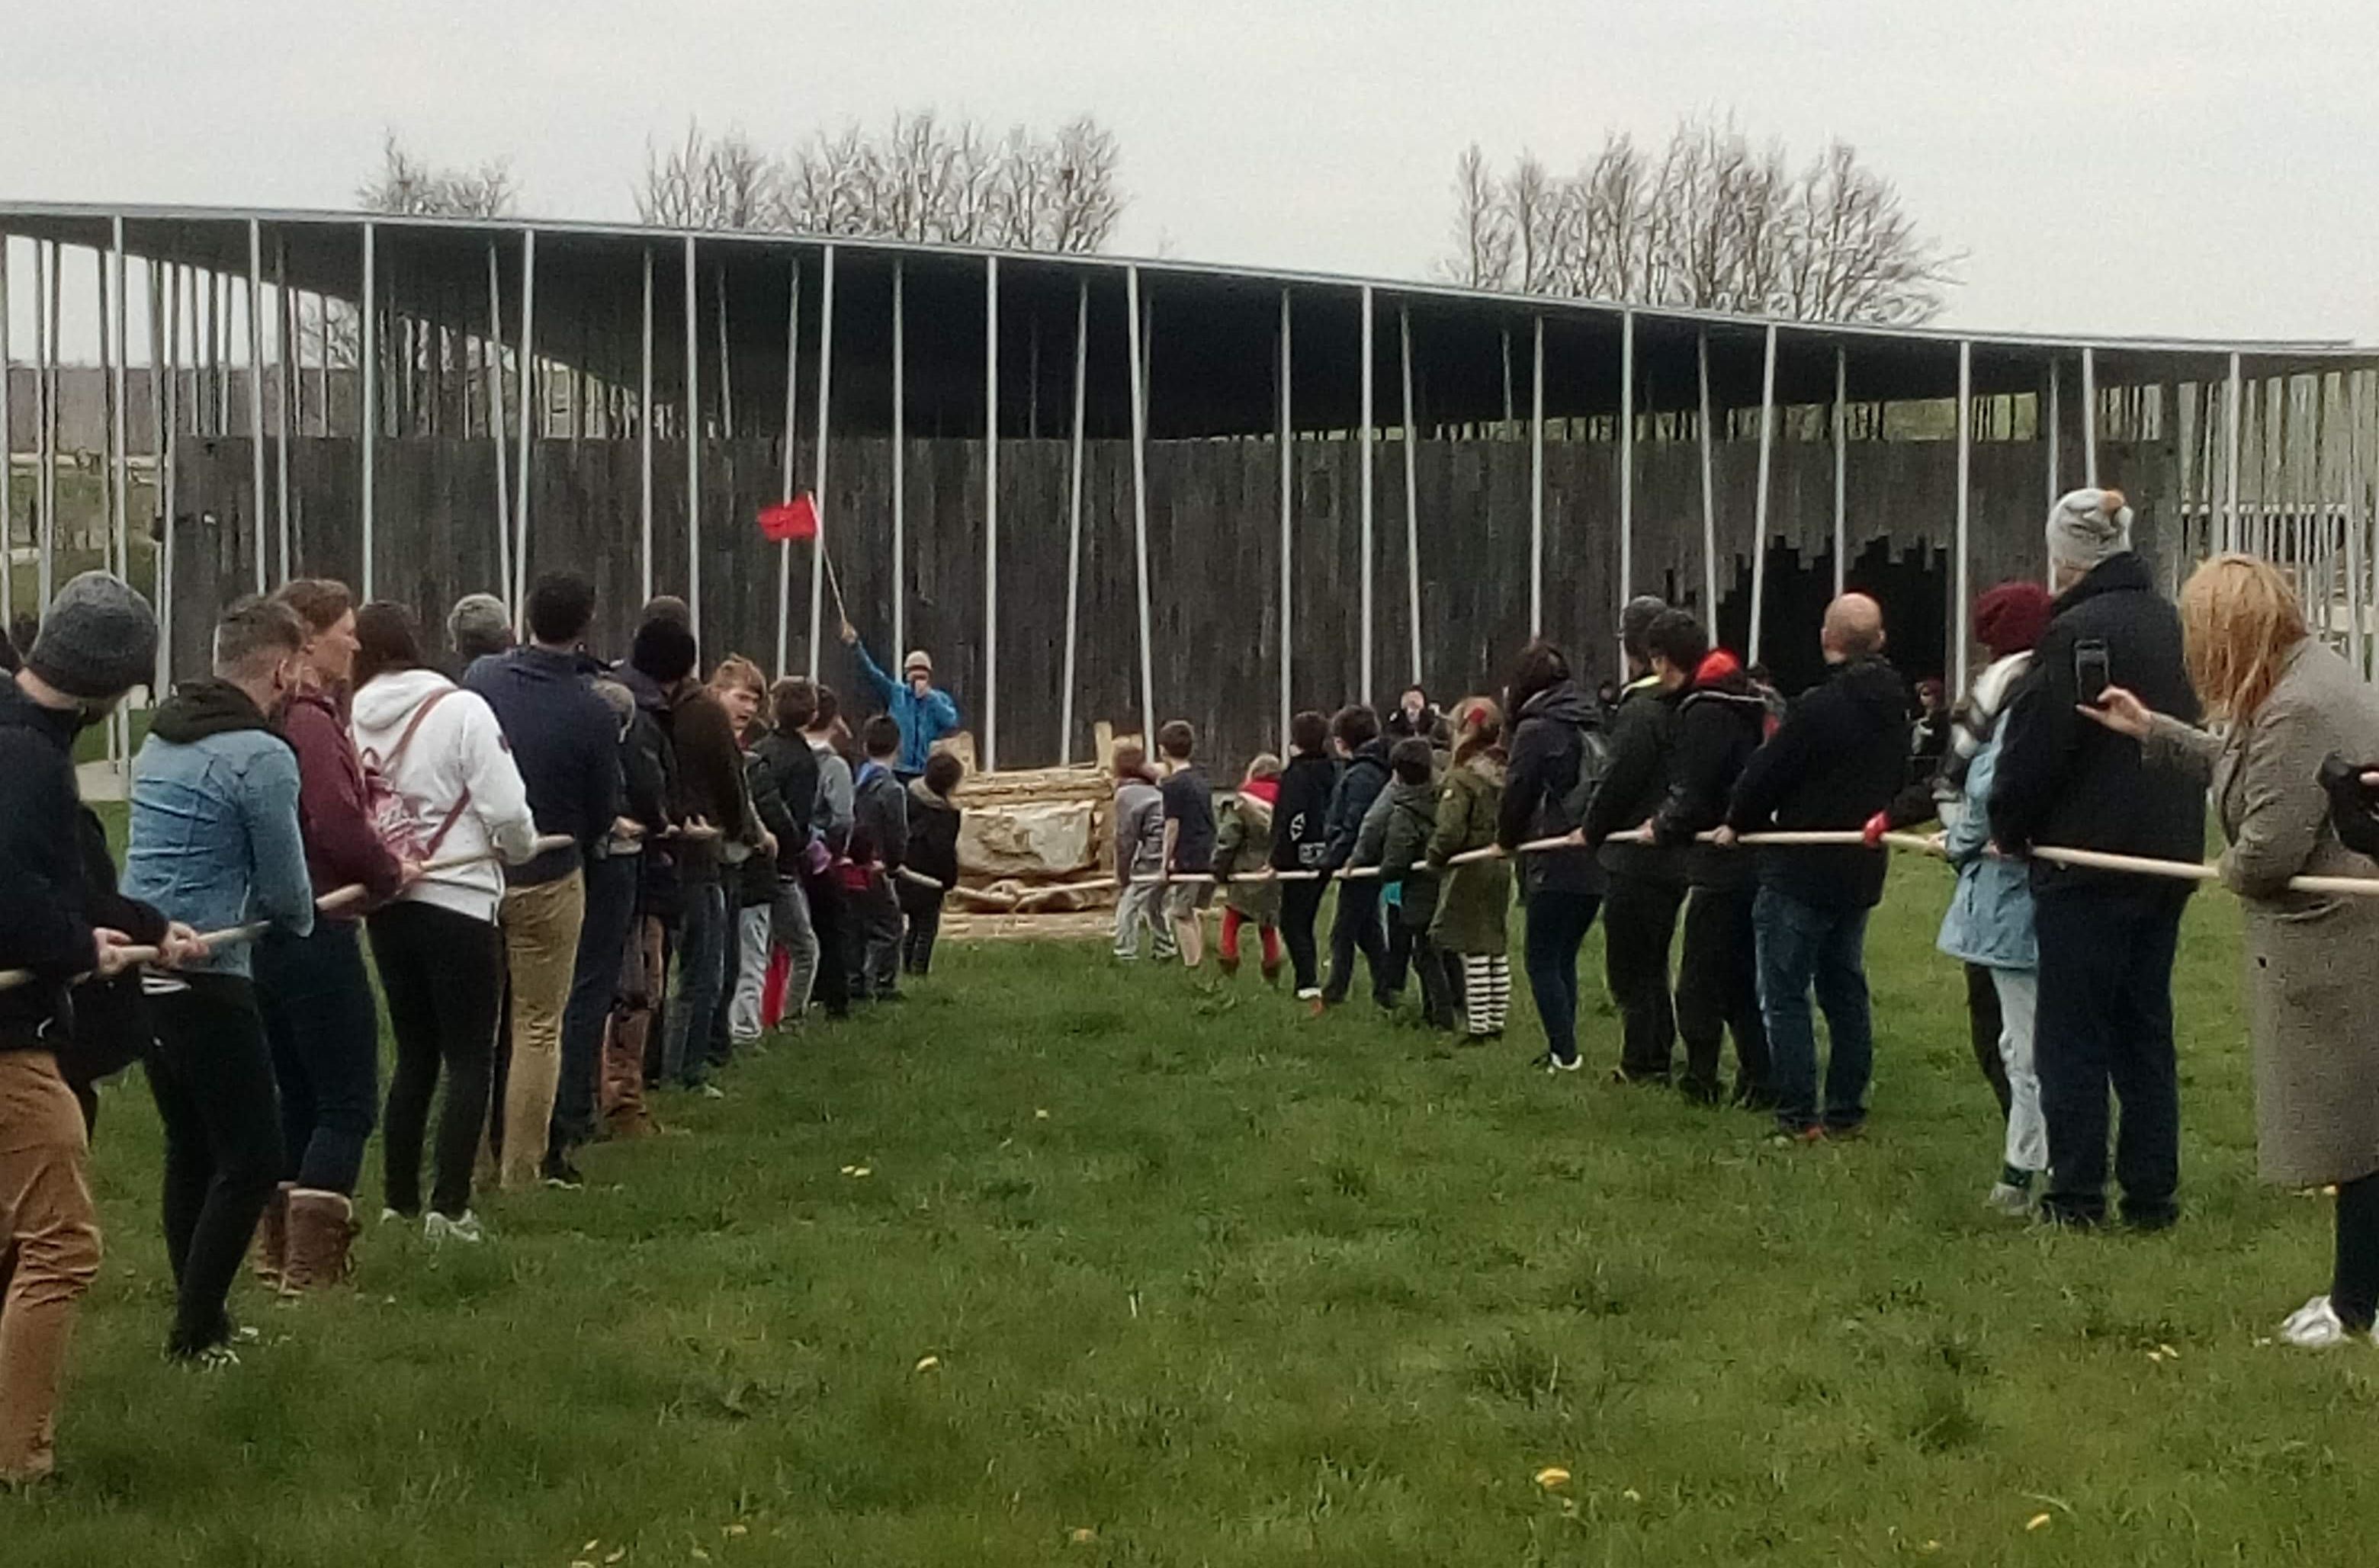
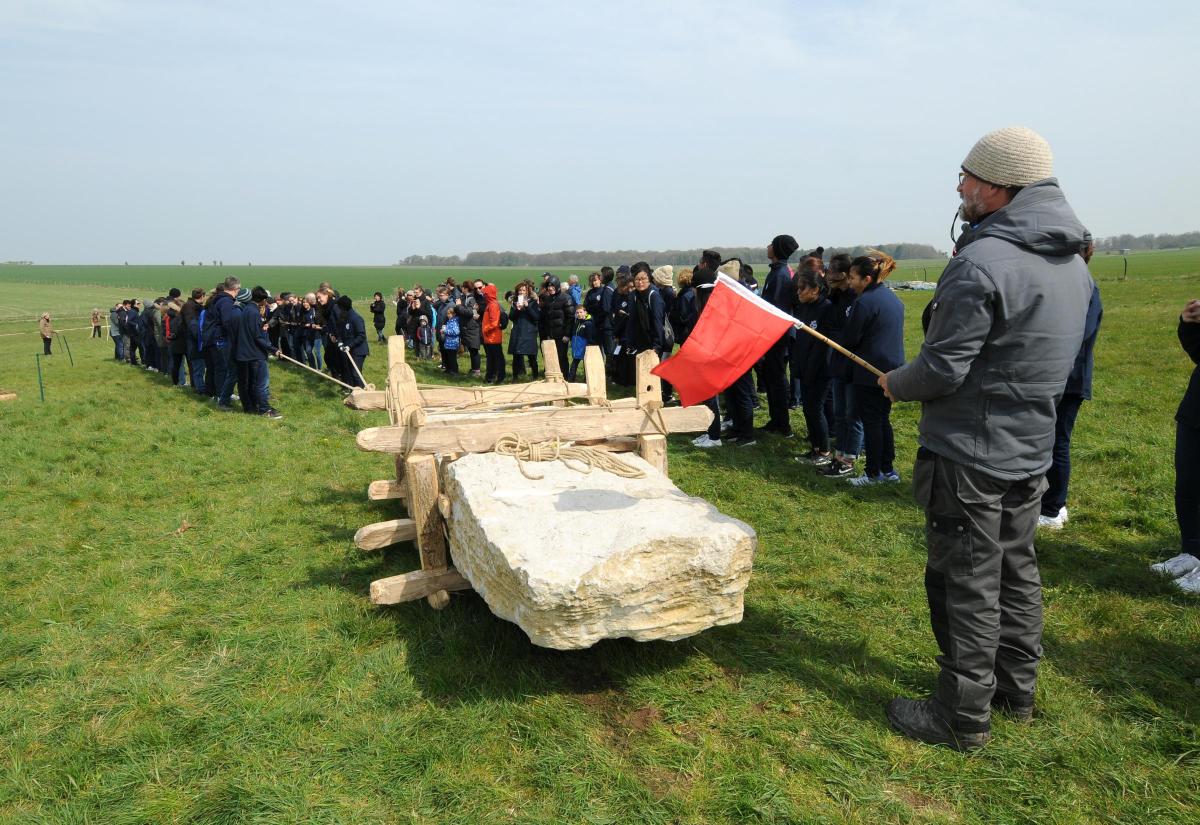
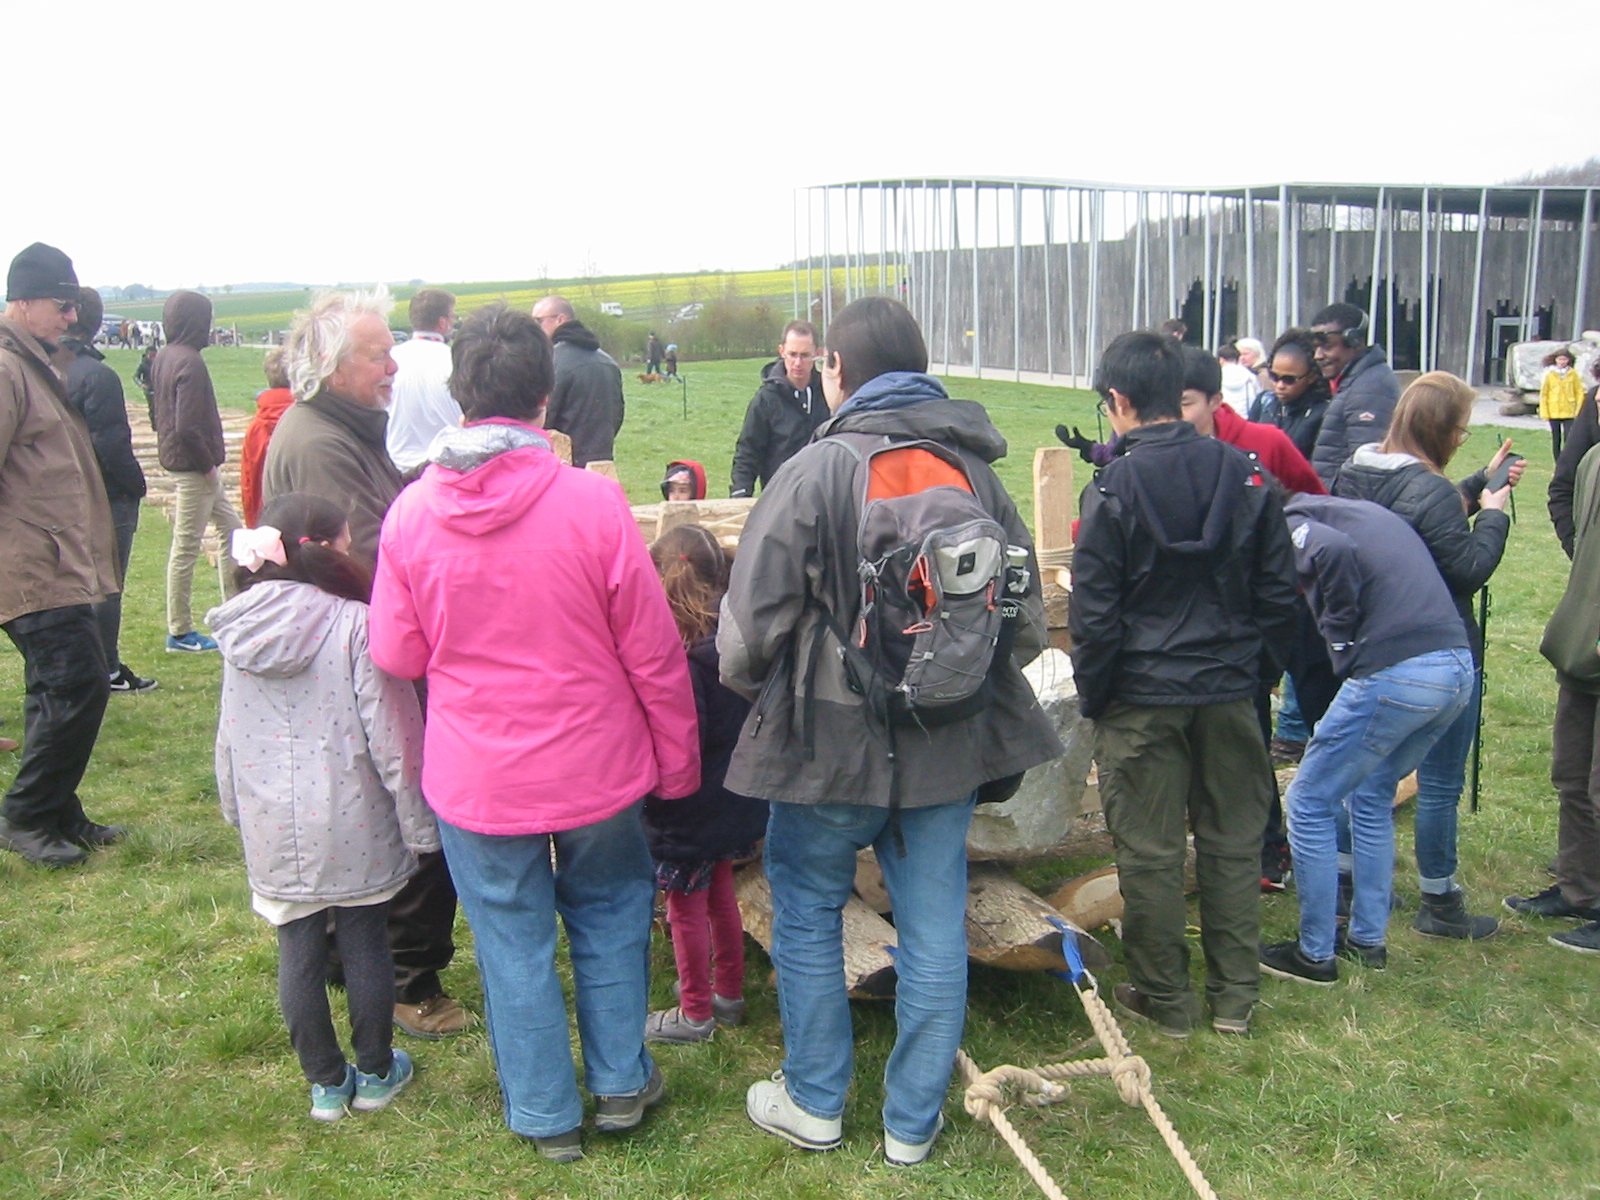
Each test was conducted after an initial recruitment of volunteers from the visiting public. Each group was counted (adults and children) and given an introductory talk from Julian Richards – focused on what we do and don’t know about how Stonehenge was built. each group then received a safety talk from me including clear instructions of how to pull and when to stop.
It is worth noting that this experiment used a “Tug O War” method of pulling which produced results over short distances, but does not lend itself to long distance pulling.
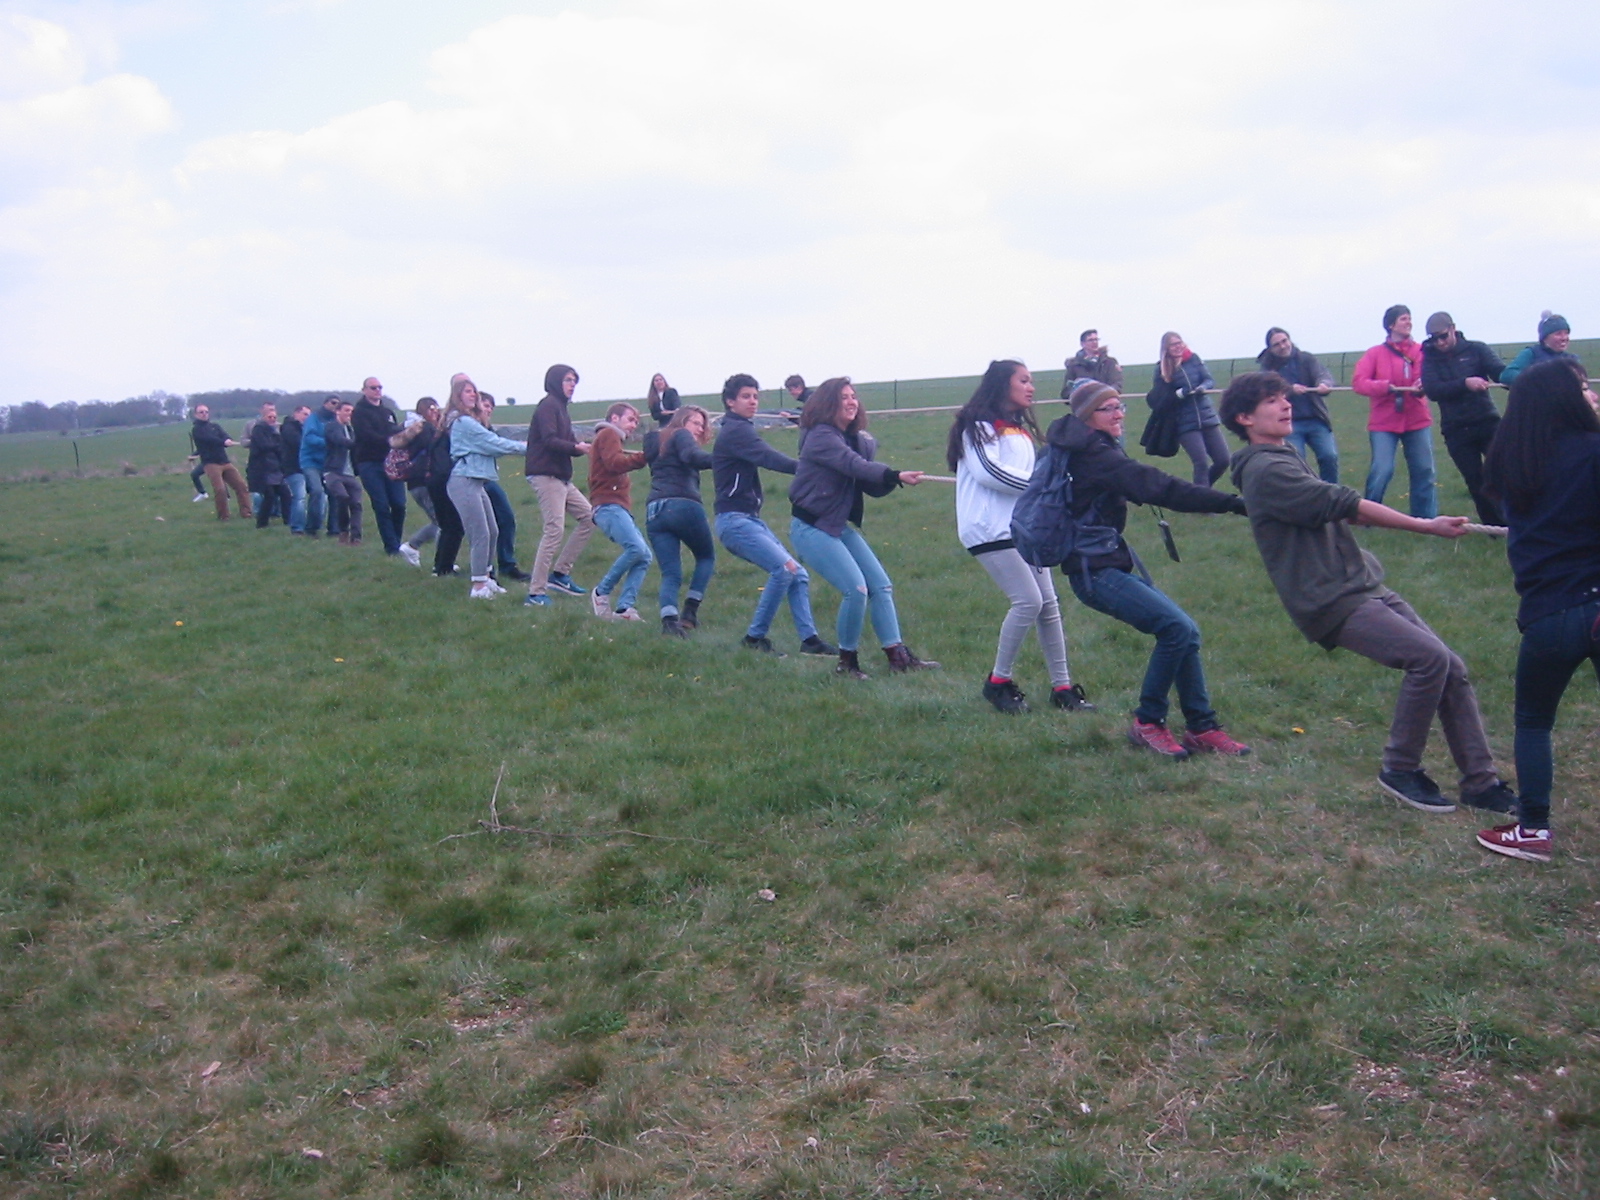
Each team pulled the sled over a range of track ways so comparative timings could be taken with the same pulling teams. Times were taken for given track distance and simply extrapolated to an arbitrary 1 Kilometre time. This time does not allow for fatigue over greater distance but gives an idea of track efficiency and sled behaviour.
Sections of track way were split into the following types.
A. ½ split 250 mm Ash @ 500 mm centres spacing- initial sticking point – but movement was smooth and steady once this was broken. 3 sleepers “rolled” with the skis and created an uneven pull with more friction at corners.
B. ½ split 250 mm Ash @ 800 mm centres spacing – obvious rocking and rolling movement in the sled. This rise and fall put shock through the frame joints and resulted in some wedges loosening after only 10 metres.
C. ¼ split 250 mm Ash @ 500 mm centres – the ¼ splits acted as faceted rollers – making for an uneven ride – but enabling good control.
D. Rollers 200 mm Pine @ 700 mm – easy movement but with some lateral slewing. Seems to be more suited to level ground.
E. Rollers 200 mm Pine @ 500 mm – easy movement but with some lateral slewing. Some bunching of rollers over uneven ground.
The split timber sleepers gave very good control during pulling, with no risk of the stone running with the pulling teams. The sled dis not slew downhill on the sleepers, enabling good control over lateral movement. Moving across slope, the pulling teams were positioned slightly up-slope to control lateral movement. The friction between skis and sleepers was enough to stop down slope lateral movement.
Cornering and steering was attempted using various sleeper arrangements, but it was much simpler to make an abrupt turn to line up for the next straight pull rather than attempting a graduated sweeping turn.

Abrupt turns were achieved by moving the pulling teams to the new direction and pivoting the sled on an arrangement of sleepers or rollers.
180* turns were achieved in two stages by moving the pulling teams to 90*, pulling to slew the sled, then moving them again to 180* to make the final alignment. Sleeper and roller arrangements were problematic and no configuration assured success. The rotation was paused several times to enable the re-positioning of sleepers to avoid the sled slipping off its supports.
Moving Up and Down Slope
The gentle slope at the visitor centre (around 5*) offered opportunities to test issues of moving the sled on other than flat ground. Although this is not as extreme as some of the gradients encountered by the ancient stone movers, it has the potential to hint at issues on a small scale.
Up-slope experiments demonstrated pronounced slewing issue unless the course was laid parallel to the incline. Several adjustments were made to the pulling teams to keep the sled on course.
Down-slope pulling on sleepers and rollers highlighted some significant slewing issues with the sled wanting to find its own way down the course. A brake team was put on a rear rope to add control when required. At no point did the sled gain enough momentum to require active braking, but this would undoubtedly be a serious issue on steeper inclines.
Some of the slewing issue may have been due to the mounting of the stone off its centre of gravity. The projecting stone (intended to fit in the pit during raising) effectively made the sled back heavy or front light. Up-slope pulls would exaggerate this effect and allow the tips of the skis to wander more easily. However, this doesn’t explain the slewing on down-slope pulls, where the gradient would be expected to counteract the imbalance of the sled and stabilise it.

Experiment Timings
Moving Trackway Test @ 800mm spacing
Pulling Team 78 (plus 10 moving the rollers or sleepers )
- 10 metre sections, Rollers = 93 seconds = 155 minutes per km
- 10 metre sections, ¼ split = 55 seconds = 91 minutes per km
- 10 metre section, ½ split = 43 seconds = 71 minutes per km
Sleeper Trackway Test @ 800mm spacing
Pulling Team 105
- 15 metre section, ½ split = 24 seconds = 27 minutes per km.
- 10 metre section, ¼ split = 25 seconds = 41 minutes per km.
½ Split Sleeper Trackway Test @ 700mm Spacing
Pulling Team 100
- 30 metres, ½ split = 32 seconds = 17.5 minutes per km.
- 20 metres, ½ split = 15 seconds = 12.5 minutes per km friction smell!! – cracked vertical tenon
Roller Track way Test @ 700 mm
Pulling Team 150
- 10 metre section, 14 rollers = 18 seconds = 30 minutes per km.
- 10 metre section, 14 ¼ split = 20 seconds = 33 minutes per km.
- 20 metre section, 28 ½ split = 24 seconds = 20 minutes per km.
Grass Baseline Test
To offer a baseline comparison to the various sleeper and roller tests, this experiment had always included an attempted pull on grass. It was intended to show the efficiency of using a track way but the results were unexpectedly exciting and contrary to what we expected (which is why full scale experiments are so useful!)
It should be noted that the ski bases had become compressed and polished from their pulling over timber sleepers, the grass was short (50 – 80 mm) but green. We did not adapt our pulling style in any way from the method used in our track way experiments.
The first pull on grass came about when we pulled the sled off the sleepers at one end of a sleeper run. The ski tips dug in slightly on leaving the sleepers and the pulling teams ground to a halt. but with encouragement, they actually succeeded in moving the sled perhaps 6 metres.
Encouraged, I set up a pull to run alongside the sleeper track way. This pull confounded us all with its apparent ease and speed.

Grass Baseline Test
Pulling Team 150
- 56 metre section, dry grass, polished skis = 59 seconds = 17.5 minutes per km
Grass Uphill Test
Pulling Team 160
- 43 metres, dry grass, polished skis = 55 seconds = 21 minutes per km
- 21 metres, dry grass, polished skis = 25 seconds = 20 minutes per km
Grass Uphill Test
Pulling Team 42!
- 33 metre section, dry grass, polished skis = 65 seconds = 33 minutes per km – unsustainable for distance.
Grass Pull, Minimum Number
Pulling Team 38 to physically move the stone 5 metres
Damp Grass Pull
Pulling Team 48
- 8 metres, damp grass, polished skis = 15 seconds = 31 minutes per km. Skis seemed to lose silica polish from dry grass pulling. The timber grain was raised by the damp.
Damp Grass Pull
Pulling Team 100
- 55 metres, damp grass, unpolished skis = 56 seconds = 17 minutes per km.
Damp Grass Pull
Pulling Team 110
- 36 metres, damp grass, unpolished skis = 34 seconds = 15.6 minutes per km
Test Observations
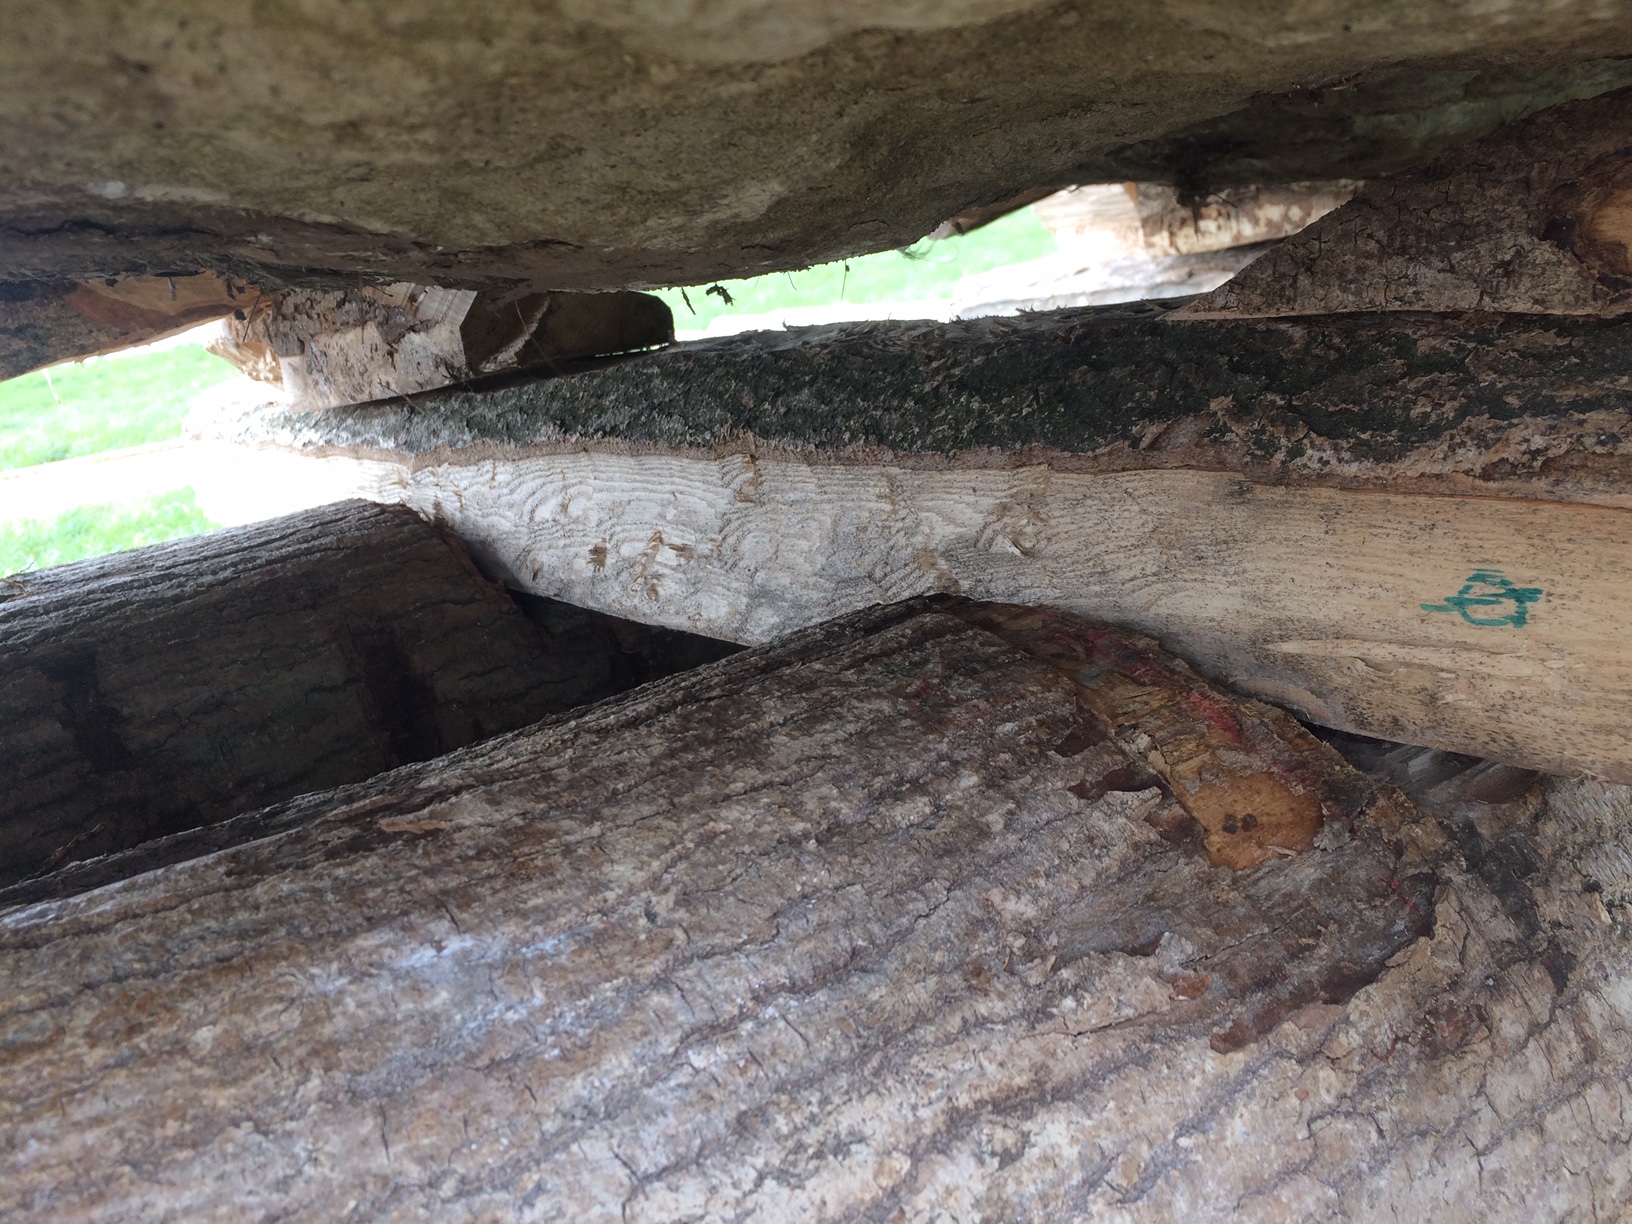
- Sleeper spacing is critical to maintain a smooth passage of the skis over the track way. 800 mm centres creates a rocking motion in the sled that stresses the timber joints and resulted in one cracked tenon. Spacing of between 500 mm and 700 mm enable an efficient pull without incident. The wider the spacing within this range, the less material required to form a track way.
- This experiment used split trees as its sleepers, but the obvious question (regarding materials and harvesting efficiency) is how little harvested material could still improve pulling efficiency? Would it be better to have lighter and smaller diameter materials such as coppiced hazel, or brash from larger tree clearance, and utilise larger timbers for more structural tasks in the landscape?
- ¼ split timbers work as sleepers with a reduced efficiency in pulling, but they can “roll” beneath the skis, and cause potential jamming issues. They do increase material harvesting efficiency by 100% and this is worth noting.
- Prepared rollers work well – in terms of pulling speed and efficiency, but they do not allow the control of split timbers or grass. Working up or down slope seems to increase the likelihood of slewing, and on steeper gradients, brake teams or chocks would be required to control movement.
- It would be easy to settle on the most efficient method of pulling as “The” method employed in the movement of the bluestones from Preseli to Stonehenge, but we must remember the sheer scale of that challenge. Well over a hundred miles of varying landscape, geology, obstacles and locally available materials, not to mention the cultural navigation required to cross boundaries and tribal areas. It is over simplistic to settle on a “fix all” remedy for this question. In my opinion, a variety of tested and untested methods may have been used to negotiate the route. It is clear that a permanent track way of laid timber or other materials would be an enormous drain on human and material resources. That said, I can foresee the need for stretches of well engineered permanent track ways to solve landscape obstacles such as steep slopes, wet ground, or excessively stony ground. It may have even been necessary to modify some of these areas with permanent landscaping or shaping. However, we have shown, that in flattish or mildly sloping areas of grassland, a well designed sled could be used alone to transport a bluestone. All of the methods require sufficient numbers to achieve more efficiency, and although our teams ranged from 40 to 150 people of all ages, if we doubled or trebled that number, and they were trained, fit and active people, I suspect a good mileage could be achieved every day.
- The question of sleeper “kits” has been raised by this experiment. The production of well shaped, lightweight sleepers that would be easy to lift and carry, would enable a slow walking pace to be maintained across more problematic land, although this would require extra teams of movers to achieve a flowing placement of the movable track way ahead of the sled.
- Professional pulling teams would improve efficiency dramatically. In this experiment, we used a traditional “Tug O War” methodology to pull, facing backward. Appropriate harness technology exists from this period in the form of rucksack frames and cordage to produce well fitting harnesses that would allow any number of pullers to be attached to the main ropes facing forward, using their body weight to move the stone, and their arms to maintain rhythm and drive. It would be really interesting to try this methodology with teams of physically strong and fit people who are used to working hard for sustained periods (sports teams etc).
- However the teams were formed, whether from locally recruited people, or by permanent teams that moved with the stone across the landscape, what is clear is the need for a substantial and sophisticated support framework that would shelter and feed them during their journey. Perhaps tribal teams took over from each other at cultural/geographical boundaries, or the permanent team was supported by those diverse tribal communities. What is clear, is the level of communication and cultural bonding that would have been required to take 80 such stones across 120 miles of landscape.
- The initial design and concept of the bluestone Phase at Stonehenge also has a direct bearing on the methods used to move the stones. If the project was conceived as the movement of 80 stones to form a single monument, then I suspect, the landscape engineering and track way manufacture would be a primary focus in order to move the stones as efficiently as possible. On this scale, I could envisage rest stops, semi permanent shelters, timber harvesting and processing areas, landscaping, bridge building etc. If however, the project grew from small beginnings, and developed over time, then the initial investment in engineering and material gathering would not have seemed worthwhile, and solutions may have been more contingent.
- By accident, the notched skis of our sled worked very well across most surfaces (apart from sleepers with 800 mm spacing and above). The flexibility of the skis, their ability to move independently of each other and their location with three box frames, ensured that they never became disengaged from the frames entirely. On the one occasion when they became entangled with a short length of timber and crossed, they were simply pulled apart and the pulling continued. The split surfaces were placed toward the ground and hewn to remove serious irregularities. During use, these surfaces were compressed and polished by their movement over grass. The width of skis spread the stone weight over a broader area and left no trace on grass and damaged the ground very little in areas of bare earth. It would be worthwhile to make other sets of skis with different profiles in order to see if efficiency could be improved. I could envisage each sled having two or three sets of skis carried with is to tackle specific ground/surface types during a long journey.
- Although this experiment set out to test timber track ways, we were all surprised at the performance of the sled on grass alone. Although early spring, the experiment was carried out after a period (1 week) of dry weather. The grass was roughly mown and the ground not prepared in any way. What was surprising was the relative ease with with the sled moved and steered across the ground. The skis became heavily polished with what I assume was a silica sheen from the grass (this could be tested). I suspect that the same tests conducted in late summer, when the grass is long and very dry, would produce even more impressive results.
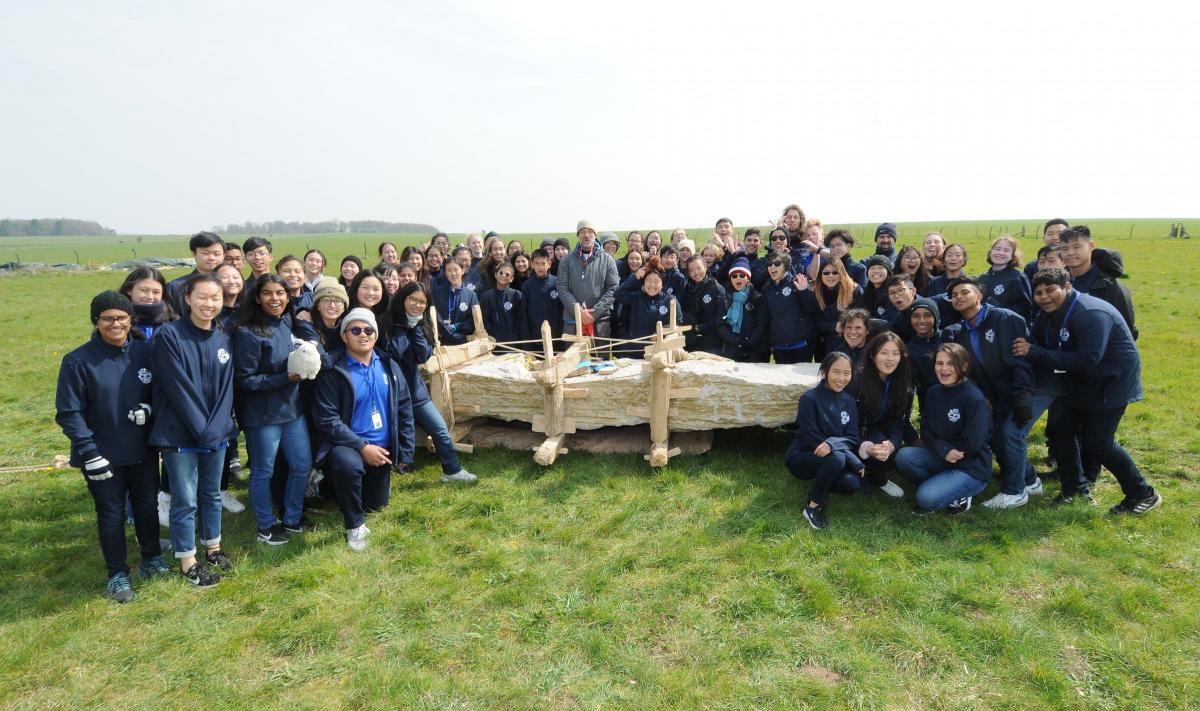
This project was designed with public engagement in mind. The importance and insight of recruiting members of the public to take part in projects like this cannot be overstated, in terms of monument interpretation, insight and empathy with past cultures and their achievements. It is tempting to only look at the hard facts of engineering feats like this. How heavy the stone is, how far was it pulled, how many people were required to move it, how many trees were felled to produce materials etc, but this ignores the value of these projects to those involved. Even a project of this small scale begins to point to the immeasurable aspects of ancient monument building, such as how it feels to be involved in something greater than oneself, or to help create a monument that will outlast your lifespan, or your children’s, and is larger than any one person or group could ever hope to build. Projects like this can also point to the use of the process to unite factions or cultural groups, or geographical areas in the past. And of course they hint at the social and logistical organisation of societies in the way large groups of people must have been directed to achieve these feats.
And, although hard data may suffer as a result (in terms of bio-metrics), the value including the public in this kind of project was clearly demonstrated by the hundreds of people who voiced their newly found appreciation of those ancient builders. In their minds, this project was easily extrapolated to bigger stones, larger distances, more people, and other methods.
Results
To return to our project questions,
1. Is the investment in sled building offset by efficiencies in moving and manoeuvring?
Clearly it is. The construction o a sled is a serious investment in work and time, but the efficiencies it offers over track ways and on grass alone would be invaluable during a monolith pull of over 100 miles.
2. What advantages does a sled offer to the pulling of a monolith over distance?
The sled create options and flexibility when negotiating a landscape. Track ways can be utilised using many local materials from brash, straw, and larger timbers in places where the ground requires it. In flatter areas with grass or bare earth, the sled is a stand alone solution that has good efficiency.
3. What are the problems associated with using a timber sled?
A sled required maintenance over distance. We had two minor issues (the tail of one ski splitting and the end of a frame base splitting to the mortise) that were solved, but over time and rugged landscape, these issues would be multiplied. Route finding and landscaping of obstacles would be essential to make the journey feasible.
4. How do different surfaces affect the efficiency of sled use?
The figures speak for themselves. The most efficient surface was the half split Ash sleepers (12.5 minutes for 1 kilometre) – although this pull resulted in the cracked frame member and was (i would suggest) unsustainable over any distance.
The next fastest time was 17.5 minutes per Km on ash sleepers – but this was equalled by the sled on grass alone! One requires a track way of timbers, the other – nothing but the ground! This is even more impressive when we consider the likelihood of there being a permanent track way from Preseli to Stonehenge and the material/labour that would require. If we assume that was not the case, then the sleeper experiment would require the timbers to be moved in sections to lift the old track and replace it ahead of the sled. Our experiments have shown the significantly slower times of between 71 and 155 minutes per Km.
5. What is the optimum spacing between sleepers for this sled?
For this sled, the optimum distance for sleeper spacing was 700 mm to achieve good speed and minimise the use of sleeper material
6. Are rollers redundant when using a sled?
It is easy to make generalisations in experiments, so I won’t. I can foresee a use for rollers somewhere in a 100 mile journey, but they are certainly not essential to move the sled efficiently and would be a disadvantage on steeper slopes where controlling the movement of a heavy object would be paramount. What we have successfully shown however, is that no rollers or sleepers are required to efficiently move the sled on grass in winter.
7. What are the issues associated with pulling the sled across slopes, up slopes, down slopes?
The main issues of pulling up and down slope seemed to centre on the slewing of the sled away from its intended course. I suspect on steeper gradients, brake ropes and lateral stabilisation ropes would be required to control these movements. Again, the usefulness of a box frames come into their own for attaching such ropes without interrupting the underside of the stone and skis.
Next?
These are preliminary results and are general. I have more work to do on the data I took, but in general, the experiments have thrown up further questions and suggestions. An obvious next step would be to explore the potential routes from Preseli to Stonehenge and to examine the extremes of landscape obstacles on those potential routes. A meaningful experiment would be to attempt to negotiate those features with a stone of the right dimensions and weight – knowing what we now know.
More experiments would include serious refinements of the pulling system over distance. A heavy object can be moved inefficiently over short distances, but it takes refinement to be efficient over distance. I would like to see the use of trained teams, using appropriate harness technology while pulling forward (like a truck pull in Worlds Strongest Man).
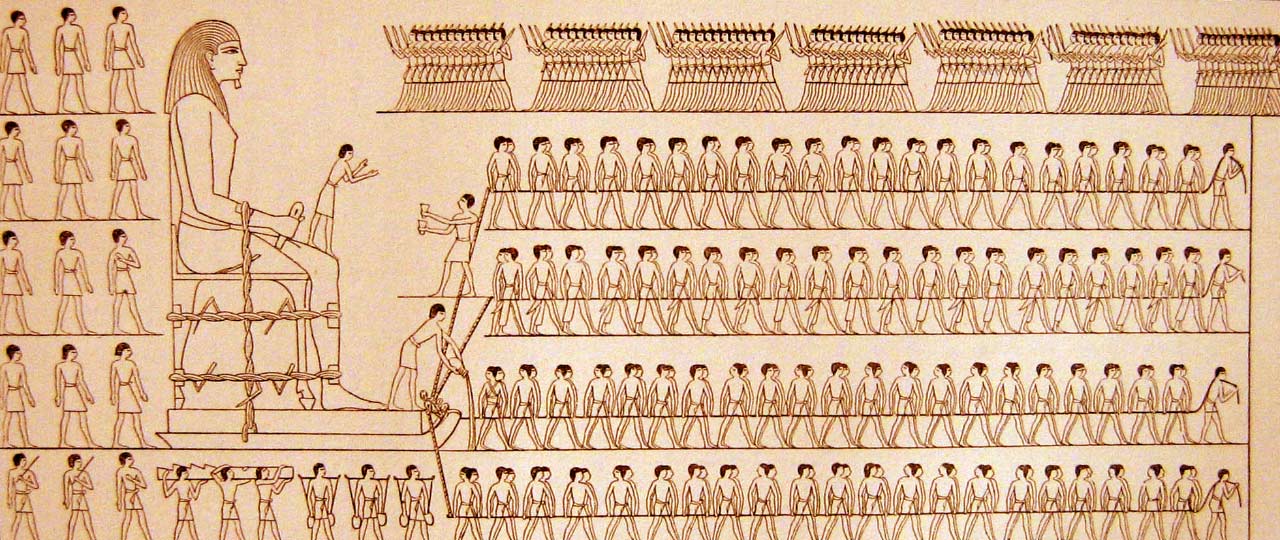
I would also like to test a very wide variety of materials as potential track ways over different ground types. Straw, brash, hay, bracken, heather, to name a few, might offer lightweight and easily transportable “track ways” rather than the persisting notion of large and heavy timbers. It is interesting to note that the few pictorial representations we have of heavy objects being moved by sled in the past (on flat ground) are not shown to be on sleepers or rollers.
Many thanks to English Heritage, their wonderful and committed volunteers, Julian Richards for his knowledge support and enthusiasm, and of course to the may hundreds of people who came and pulled the sled!