Neolithic Longhouse; October 1st – 5th 2018

Monday 1st October 2018

The mornings are darker and the evenings are drawing in.  Winter is coming! The project enters its final stage with a dual focus this week.  

Daubing is now a race against time.  It it important to get the walls covered in order to protect the building from the inevitable wind and rain that will come with the onset of winter.  Today our trusty volunteers are carrying on with this task. Daubing is a labour intensive job that involves the digging, mixing, and applying daub of just the right consistency to the willow and hazel wattle panels.  Issues and questions of colour can come later; but for now we have to push on with covering the walls.

The roof also enters a final stage.  Thatching layers 1-6 are complete and we now turn our attention to the ridge.  Volunteers are creating thatch rolls to fit between the crucks of the rafters. This roll will support the final ridge and create a mass of reed that will stop any wayward drips from entering the hall itself.  It will also give us a mass of material to peg or tie the final ridge covering to.


Tuesday 2nd October 2018

The first section of 6 metre thatch roll has been placed at the top of the ridge.  This forms a depth of thatch to stop any wayward drips, but crucially creates a high point that increases the pitch if the thatch that overlies it.  The ridge of the rood must shed water as quickly as possible to minimise its ingress into the building. Thatch layer seven has begun, This is the first of two layers that will rest on the thatch roll.  The ridge is now being worked in 6 metre sections to allow us to problem solve as we go. There are any number of ways to create a weather proof ridge, but each one requires skill and care to do properly.

Elsewhere on the building, Derek is working on fitting a latch to his beautiful shutter.  Edward is working on fitting window frame 2 in the livestock end of the building while Franco is doing the same with frame 4 in the main hall.  The last “tie beam” is in place in the building and the livestock mezzanine floor can now be extended over the passageway.


Wednesday 3rd October 2018

Today sees the thatching of layer 8 on the first section of roof.  The reed is now shooting beyond the thatch roll at the top and creating good coverage at the peak.  

We have extra volunteers today to help with our daubing challenge!  We still have many panels left to do – but even two panels a day (which is a good amount of work for 6 people) adds up to an important contribution to the project.

Window frame 4 is being fitted and Edward is nearing the completion of his shutter.

We are also taking the opportunity in this fine weather, to have a good site tidy.  The thatching process tends to leave a fair bit of waste material around the building, but a carefully controlled fire deals with it pretty rapidly.

We have decided to proceed with thatch layer 9 on the north side of the building.  The idea is to create a thickness of reed at the ridge on the lee side of the prevailing weather.  This can then be trimmed close to the thatch roll and over lapped by three layers of thatch on the south side of the roof.

Thursday 4th October 2018

This morning we have two thatching teams on the roof.  Team 1 (Astra, Iris and Tim) are working on layer 9, while Team 2 (Pippa, Mike and Bill) are working on layer 7 in the middle section of the roof.

The last thatch roll is made and ready for positioning at the top of the roof.  The rolls are made by estimating the thickness required (in this case, thick enough to fill the cruck between the overlapping rafters at the top of the roof), and then measuring out the length required on the ground.  

Pairs of pegs are then tapped into the ground to contain the thatch as it is sorted. The ridge roll has 1 ½ bundles of reed per metre of its length. The bundles are laid out between the pegs and overlapped to provide the correct volume.  Their ties are then cut and the reed sorted to avoid abrupt joins. The thickness of the potential roll is continually confirmed during this process to avoid the roll being excessively thick or tin along its length. Once we are happy, the bundle is lashed (I prefer a blanket stitch) to maintain its shape and enable it to be carried up onto the roof.

The third 6 metre thatch roll forms the ridge shape at the livestock end of the building.  This end of the roof is relatively complicated, simply because we don’t yet know if we will need a smoke hole in this position or not.  From the start this build has had to change at times as each new stage unveils questions and answers that were impossible to foresee at the design and model stage.  One of the more obvious questions concerning houses like these is “Did they have smoke holes in the roof?” The short answer is that we simply don’t know! But before we leave it at that, why don’t we ask “what do we know?”  Experimental archaeology has tried many options for ventilating smoke in replica buildings. My own experience in the construction and use of many different “traditionally” built houses is that smoke holes are sometimes required and sometimes not.  The type of roof covering, size and shape of building, surrounding vegetation, orientation of building, the type of fire used in the structure and even the species of timber being burned, all have critical influence on the decision for, or against, smoke holes.  This building is being thatched with water reed, and in relatively light layers (compared to modern thatched roofs).

The goal is to allow the smoke particles from a cooking/heating fire to percolate through the thatch layers (driven from beneath by the heat of the fire).  My experience tells me that we “shouldn’t” need a vent in the roof. However, this is a longhouse – and my experience of building Viking Age longhouses with shingle roofs and central vents tells be that any smoke from the fire that misses the smoke hole cools and lingers in both ends of the building unless there is some kind of vent in the apex of the gable ends.  Returning to our Neolithic Longhouse; given its length, if all the smoke is not driven through the central portion of the roof by the fire beneath, I suspect it may linger – especially in the entirely enclosed “livestock” end of the building. Our solution to this currently unknown issue is to create the potential for having a smoke hole in this end of the roof. When we eventually test the fire, we will have to option of opening a smoke hole without the need for retro-engineering.  Of course, ancient builders would not have had this issue as their experience in seeing and building successful houses would have answered these questions before they started building. This entire discussion is a product of trying to re-invent the process of Neolithic house building.


Friday 5th October 2018


Another fine and warm day has dawned at la Hougue Bie.  The teams are in for the last session of the week. Work continues with two thatching teams.  Team one is working on layer 7 while team 2 works on layer 8. Today works also starts on a rough levelling of the floors in the house.  The house frame has been built “by eye” with no use of levels. What has become noticeable as the frame has been finished, is the unevenness of the floors in places.  The floor still has to be constructed properly – but at this stage we have begun to remove soil from the high point and deposit it in the low points.

More shutters are being made to finish the window frames.  Steadily, the building is beginning to reveal some of its beautiful detail!

A week of unseasonably warm weather has come to an end and we have cracked the technical detail of the roof ridge.

Well done to the team!


Neolithic Longhouse; September 10th – 15th 2018

Monday 10th September 2018

We are back at work after the summer break.  Everyone is refreshed after their break and what an amazing summer it’s been!

It feels like we are on the last leg of this fantastic project.  The next few months will see the building finished as a blank canvas, with, frame, roof, walls and floor complete.  The next few weeks will see discussions between our fantastic volunteers and to identify the first series of tasks that will start to fit out the building (in terms of beds, storage, upper floors, shelves) and will form a range of activities and tasks that turn the building into an interesting attraction for visitors.

Today we press on with thatching the roof.  We have around one more layer of thatch to put on before we then have to start working on the ridge.  The ridge will consist of several thatch rolls that fill the cruck between the rafters and form a dense mass of reed beneath the finished ridge.  We then need to trim the rafter ends and thatch the final two layers over the top. The final touch will be the addition of a cap – that may be reed, wheat straw, bracken or even turf.

We are also marking out and de-turfing the ditch that will run around the building.  This ditch will act as a drip trench to soak away water rainfall from the roof – but will also double as a robber trench to get our daub material from (topsoil).  


Tuesday 11th September 2018

Today sees the start of daubing at a determined scale!  Our test panels have had several months to dry and endure the weather, giving us time to see how well they work.  The results are positive. The local soil sees to produce a fine grade daub that resists weather well, is relatively easy to mix and apply and gives a good surface finish.  The key to mixing daub is ensuring a high fibre content to prevent excessive shrinkage and cracking.

We are using hair and hay as the fibre for our daub.  Clay is commonly used for daub (in clay rich areas) and animal dung can be used as the fibre element as the digestive system of the animal processes the plant fibres to a high degree, but our testing has shown that the local loess soil is a very good daub material when mixed with amble fibre.

We have extra help today from a group of volunteers from Lloyds Commercial Bank.  They are really getting stuck into the task of daubing and the walls are becoming dark and solid from the ground upwards!

Today we have also started giving serious thought to the second mezzanine floor.  This floor will be installed at the main entrance end of the building and enable further storage of tools, repair materials, harvest and fodder crops.  We have thought long and hard about how this floor will function and how best to enable light to access the heart of this end of the building.


Wednesday 12th September 2018

So, an interesting day today.  Teams have carried on with thatching (of course) while Bill has been fitting and securing joists for the mezzanine floor above the livestock end of the building.  The tie beams and joists for the second mezzanine floor have also been shaped and positioned ready for fixing.

James Dilley (flint knapper and ancient technologist) was here today to be filmed making a Neolithic Flint Axe rough out.  It was great to see James again and great for the volunteers to see outstanding knapping skills at close hand. The sound of a real Neolithic skill filled the longhouse – a sound that was undoubtedly heard in building like this 6000 years ago.

This afternoon, between jobs, our volunteers met with Jersey Heritage staff to discuss ideas for the exciting future of the building.  From the very beginning, this project was as much about the volunteers as the building, and it is great to see them putting forward great ideas for the kinds of crafts, skills, maintenance and improvements to the longhouse and its environs.  This project will clearly go from strength to strength when the building is “finished”.


Thursday 13th September 2018


After rain last night, the site is damp and autumnal this morning.  Iris, Danny and James are thatching this morning in an attempt to get closer to finishing layer 6.  I am dressing the thatch on the south side – making sure each layer is the correct distance from the previous.  Dressing involves the use of a leggit or paddle that is used to pat (sometimes harder!) the ends of the reed upwards towards the roof ridge.  This process neatens the roof, but critically also tightens the reed beneath the sways that clamp it into position.

Bill and Mike are finishing lashing the joists in the first mezzanine floor so we can proceed with making it a usable and safe surface for storage.

Derek is coming to the end of his task to make a shutter and window frame.  We have all had brief glimpses of it partially fitted – and it is clearly a fine piece of work using known Neolithic carpentry construction – can’t wait!

The tie beams in the entrance way mezzanine are now being lashed to the posts using some of the fantastic cordage Astra has made.  There are three uprights tie beams and we have decided to lash each one with a different type of cordage, Nettle, Sweet Chestnut, and Willow.  This is a lovely piece of detail that will be clearly visible to visitors.


Friday 14th September 2018

Layer 6 is nearing completion and we are taking some time to dress and organise the thatch that is already on the roof.  The next phase involves working on the ridge of the roof. The finished thatch ridge will bear the brunt of the weather and accordingly, needs to be substantial, secure and water tight.  Our plan is to create several thatch rolls that will lay along the ridge line and create a depth of thatch at the very peak of the roof. The final two layers of thatch will then overlay these rolls and be trimmed off.  The final stage is to then attach some kind of cap to the whole mass.

Saturday 15th September 2018

A calm sunny morning heralds the end of another week at La Hougue Bie,

Today we are continuing with dressing thatch layers 1-6 in readiness for the final two layers that will run up to, and over the ridge of the building.  We have an enthusiastic team of daubers in the form of Andrea, Anya and Ruth who are mixing and applying our own unique blend to another of the many willow wall panels.

Derek is nearing completion of his amazing shutter and frame, is is impressive to see his commitment to accuracy and finish.  

His standards set the benchmark for other projects on site. Interestingly i don’t think it is in anyway out of place. Existing and new evidence for crafts and carpentry in the Neolithic Period show high levels of finishing and sometimes unnecessary complexity.  Well linings from Germany show the presence of mortise and tenon joints where simple overlapping joints will suffice (as demonstrated in other well linings). The planks are split and shaped but not refined (the well lining was intended not to be seen after all) but the level of sophistication can only hint at the level of finish and refinement that would have been invested in visible items of furniture for example.  

From the start of this project, our mantra has been one of expelling the commonly held belief of the Neolithic as a time of rudimentary adoption of agriculture, all of its associated trappings, and its struggle, almost kicking and screaming into modernity.  Each new discovery confirms to us that this period, coming right at the end of the Stone Age, is abundant with sophistication and a knowledge of materials and their properties that we will never attain again.

Neolithic Longhouse; July 9th – 13th 2018

Monday 9th July 2018

Wow! Summer is definitely here and the sun is baking the volunteers on site.  Apart from thatching, which necessarily has to be exposed to the worst of it, other jobs have retreated to the shade of the trees.

Today sees help on the project from HSBC, who have sent us ten of their best to help out.  The mission today is to move some of the thousand bundles of thatch that were delivered two weeks ago.  We are separating them into short, medium and long bundles and piling them on either side of the roof to enable faster thatching.  

Two thatching teams are continuing work on the roof – we have a large amount of work each week to get the roof in place before the worst of the winter weather rears its ugly head!

We have teams working on peg making, preparing internal timbers for the building, and finishing the last few sections of woven walls before our next visit (which will focus on daubing).

We also have schools on site today – looking at the Neolithic Longhouse and exploring the methods behind its construction.

The ambitious timetable for thatching is to complete two layers per week.  Ironically, this super warm weather will affect this goal as the roof is a pretty hostile and energy sapping environment in full sunshine.  


Tuesday 10th July 2018

A grey start to the day has given way to glorious sunshine again.  The very busy site of yesterday has returned to the familiar murmur of voices and the tap tap tap of chisels on wood.

Today we are focusing on thatching once again.  Two teams are working methodically along each side of the roof.  Working on the second layer of thatch is proving to be far trickier than the first.  This is due mainly to the difficulty in positioning ladders in ways that do not hinder access to the thatch and sways.  Volunteers are being careful to stick to the correct thatch thickness (6 bundles per square metre) in order to create a roof that will allow smoke to escape.

We have created new devices to help the thatching process.  Needles have been produced from thinly split chestnut – with long eyes created by boring two holes a few centimetres apart and then cutting out the groove between them to make a slot.  

They are proving to be efficient and certainly possible to make with simple flint tools. The second device supports the thatch while it is being positioned. This plank with a pole attached hasn’t yet got a name – but it is enabling the thatchers to think about one less thing during the complicated process.

Franco, Rosie  and Daryl are working on the  window frames that will be slotted into place.  Edward has begun the second shutter – based on Derek’s first version, which has set the bar extremely high for those following!


Wednesday 11th July 2018

Another incredible day of sun at La Hougue Bie!

Our thatching teams are now well into their groove and they are really starting to refine the basic process of thatching into a skill.  The subtleties of thatch thickness, lashing position, dressing and sway thickness are being mastered and the roof is starting to look amazing.  

Layer three has started and our ambitious timetable of two layers per week seems to be possible!

At the gable end, we have put in some temporary barge sticks (a barge board usually faces the end of a roof and contains the roofing material and stops the wind and weather from driving in beneath).  Our barge sticks are lashed to the frame beneath and provide a working edge to the roof. Time will tell if these become permanent features or not. Layer three is now covering the roof to above the purlin height and marks a third of the roof covered.


Two window frame are now built and we begin the task of fitting them between pairs of wall posts.  Again, we are exploring different ways of doing this. One method is to “simply” cut notches in the posts to house the ends of the frame sill and lintel – allowing (at least theoretically) the frame to be inserted into the space as a unit.  Another way is to cut mortises into the posts at one end of the sill and lintel and to then push in the other side into locating notches.


Thursday 12th July 2018


Another astounding day of warm sunshine and clear skies today!

Both thatching teams are working on the third layer – moving from the gable end of the house towards the livestock end of the building.  The slightly more complicated method of working from ladders is well embedded now, with each team finding their own particular rhythm and routine for thatching.  It should be said that working with a regular team greatly improves efficiency. In line with all of the other tasks on this build, by the time the roof is finished, the thatching teams will have learned a method and refined it to a degree where they could thatch the same roof again in two thirds of the time!

The biggest issue we face this week is the heat!  Regular breaks are being taken to ensure we are drinking enough and finding shade.

Friday 12th July 2018

A hazy start heralds the last work day of the week.  The sun is due to shine again at lunchtime, so we have a few precious hours of coolness before the summer continues.

Thatching is the obvious priority again today with a obvious target of trying to finish layer three.  

We are also looking at tidying the site in preparation for possible public involvement during our next visit.  

Ideas are beginning to come in from our volunteers regarding the shutters that are/will be built.  It is interesting to see how the original evidence (in this case, a three plank door from Zurich) fuels a range of other options.  Derek and Edward are making shutters that reflect the Zurich door by having hinge pegs integral to the first plank of the shutter – this enables the shutter to open like a door.  Alternative suggestions have been made however, using the same principles, one of which sees the hinge peg in the centre plank of the shutter, thus enabling the shutter to pivot at its centre – allowing light and air to enter the building without requiring much opening space into the building.

This has been the most incredible week of fine weather and the building has moved on again.  


Jersey Neolithic Longhouse; June 4th – 9th 2018

Monday 4th June 2018

After a blazing week of sunshine, Hougue Bie sees some light rain this morning.  

The project is entering a new phase of construction this week with the beginning of thatching.

The volunteers will be taken through the process of this task during the week and have enough hands-on experience to set the method in their minds.

The first stage of the process is to make and attach a thatch roll that sits along the first batten (at eventual eave height).  This is formed by laying out three thatch bundles on the ground, cutting their ties and merging them to form a continuous “sausage”.  The roll is lashed and then attached to the batten using slip knots.

The aim of this roll is to create some height at the eave that forces the subsequent layers of thatch to bend and kick out at their base.  This builds tension into the thatch and helps it to stay in place.

In the afternoon, the first willing volunteers learned the basics of thatching.  Nicky, Tim, Mike and Jane formed a team and learned the knots, the process and the subtleties of placing bundles on a roof.  There first section is 6 metres long and has 18 bundles of thatch in in. A great first go and what will become very familiar territory over the next few project weeks!

Tuesday 5th June 2018

Grey cloud is blanketing Hougue Bie today – but the rain is holding off.  

A range of jobs continue on site.  The main focus this week is to get volunteers up to speed on the theory and practice of thatching.  Tim is transferring his knowledge to Bill and Ed this morning and as the day goes on, we will rotate more people through the process.  Thatching has its own kind of rhythm and often requires more hands than are available. For the straight runs of thatch we are putting 3 bundles of reed on the roof at a time.  Three bundles cover 1 metre of the roof to a depth of around 100 mm (compressed). The process is as follows…

  • Measure a metre on the roof.
  • Attach one end of the sway with a temporary lashing.
  • Roll three bundles of reed under the sway.
  • Clamp the sway in position (with hands or temporary ties).
  • Cut the reed ties (and hold!).
  • Spread the three bundles across the measured metre – ensuring they are untangled and following the rafter line.
  • Thread a thatching needle and push through the thatch around 200 mm from the temporary lashing at the end of the sway.
  • Unthread the needle on the underside – pass the string around a batten and rethread the needle (this is done by someone on the inside of the roof).
  • Pull the needle through the top side and tie the string around the sway – applying as much downward pressure to the sway as possible.  
  • Repeat the last process 3 times to reach the end of the measured metre.
  • Dress the ends of the thatch using a hand or scapula to force it upwards (tightening the thatch and knots) to a finished level.
  • Repeat…

Danny and Astra have finished installing the third wall planks in their respective bays.  Danny has now moved on to trimming the wall plates at the corners of the livestock end of the building.  This is required to allow the roof to curve around the corner rather than make an abrupt turn (making the thatching easier to complete, and importantly, easier to weatherproof.

Astra and Ray are working on the final internal wall sections – using the now familiar wattle technique of horizontal rungs and vertical fill.

Dave is trimming the rafters in the newly thatched porch to stop visitors from banging their heads!

Wednesday 6th June 2018

The grey cloud persists over Hougue Bie.  The first layer of thatch is completed on the north side of the house.  18 metres of the first layer has required 3 bundles of thatch spread across each metre.  This means a total of 54 bundles used so far. This work has been done by one thatching team in a day and a half – while learning a new skill!  Although it looks beautiful and impressive we are all aware that the first layer gives the impression of achieving much in a short space of time, the reality is that there will be another 7 or 8 layers above the first – each taking as long, to reach the top of the roof.  The first 18 metres belies the epic task of thatching a total of 340 metres total length!

Like all of the tasks on this building, an initial learning period is followed up by an impressive improvement in speed and efficiency. By the time we reach the ridge of the building, all of those involved will be competent at making a traditional building watertight.  This style of thatching is simple (that doesn’t mean easy!) compared to the complexity of methods used by master thatchers on medieval roofs.

At this stage the thatch is being stepped in visible layers.  This is a good way of keeping track of each layers thickness as the roof progresses.  Unlike a modern thatched roof (which has a chimney), our roof will need to “breathe” in order to let the smoke from the fire escape through the thatch so the thickness of the thatch is critical.  When the roof is covered we then have the option of “dressing” the edge of each layer to form a constant gradient (as you would see in a modern thatched roof).


Thursday 7th June 2018


A grey start has turned into a warm and brighter day.  

This morning we organised the thatch bundles on site, sorting them into, short, medium and long and piling them under tree cover on both sides of the building.

Today we are attempting to that with two teams on the roof in different locations.  Team 1 is starting the steepest part of the learning curve – working from ladders and still efficiently performing the many jobs that thatching requires!  They are starting layer 2 on the north side of the roof, working back from the gable end.

Team 2 are working on the south side to complete layer 1.  As with all of these tasks, efficiency and refinement can only be gained by doing it!  Each team is rotating to give members a go at each aspect of the job. In this humidity, the work is surprisingly energetic and tends to involve positions and actions that are entirely unfamiliar in modern daily life.

Derek is making great progress with Shutter 1.  Based on the amazing preserved Neolithic door from Zurich, Derek has now completed the mortises in three planks and has shaped and fitted the runners that tap through the mortises to stabilise the three planks and make them as one.


The idea here is that this first shutter will form the model for the remaining shutters to be made.  Even at this stage, the level of carpentry and skill required is plain to see and I am looking forward to the moment our first visitors question the complexity of  this technology in the Neolithic and we can securely tell them that it follows known evidence! It should be a real “eye opener”!

Friday 8th June 2018

A fine day has dawned at Hougue Bie.  Today thatching has paused while we get to grips with other essential jobs on site.  There are still some interior willow walls to construct, wall planks to fit in the end of the building, and joists to fit in the mezzanine floors.  

Derek is also continuing with Shutter 1  – based on the Neolithic door evidence from Zurich.  Derek raised a good point this morning concerning the use of detailed carpentered shutters in the “livestock” area of the building when the “living” space will only have simple openings at the top of its walls.  It is a good observation, and led to the decision to attempt the contruction of several “standardised” window frames and shutters that can be installed in any appropriate wall within the main living space. The question of windows in ancient buildings is problematic.  There is simply no evidence that they did or didn’t exist and so, once again we are left with a decision to make. For me, the Zurich door clearly shows high levels of carpentry employed to fill a hole in a wall (a doorway). Do we really suggest that other holes in walls (windows) would not have been used where light and ventilation was required, especially on those murky winter days when daily tasks have to continue under cover?

 Its a difficult question, and again comes back to questions relating to the purpose of the house and the spaces within it, the prevailing weather conditions and access to direct sunlight, and of course the ever ambiguous cultural considerations of the people involved.

Phil and Alcindo are now working on the first of these “shutter” frames for the building….the idea being that each constructed frame will slot into prepared notches in the wall post that will effectively lock the vertical frame elements in place without the need for pegs.

Iris has taken on the task of fitting planks into the triangular gaps at the end of the building where Derek’s diagonal braces slant from the central to outer posts.  This requires careful work, chiselling an approximate angle and then fitting and adjusting.

Doug is adzing off some of the thicker split planks to allow them to be used in the walls or even to become eventual shutters or furniture.  Ruth, Bill and Mike are fitting the split joists that will support the mezzanine floor above the livestock pens. Each joist is located in the tie beam by cutting a notch and pegging.  

Heather is working on the final internal wall panel – cutting the mortises for the willow rungs into hard Holm Oak.


Saturday 9th June 2018

Thunderstorms and heavy rain are bringing the week to a close.  Unfortunately, this means a pause on the thatching (due to treacherous ladders and sodden thatch).  

Our ever keen volunteers are not put off by a bit of torrential rain and standing water so jobs are continuing under whatever shelter we can find.

Bernie and Murry are pegging wall planks in position.  Derek has started on the frame that will eventually hold his beautiful shutter in position.  Astra, Chloe and Ania are making cordage in the shelter of the site hut (a wise move), while Pippa and Daryl are working on the other shutter frames for the main living space of the hall.

All in all, this week has seen another major push towards some kind of finishing point.  Everyone is impressed with the first layers of thatch and their affect on the look of the building.  The project is now entering the “home” phase, where we put our minds to the question of what goes inside the building!


Jersey Neolithic Longhouse; April 16th – 21st 2018

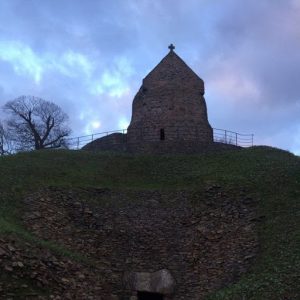
Monday 16th April 2018


Easter has passed and the week has opened with glorious sunshine and the promise of warm temperatures as the days progress!

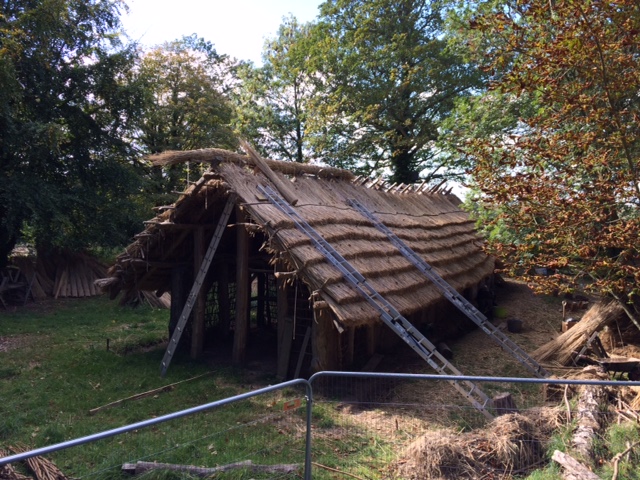
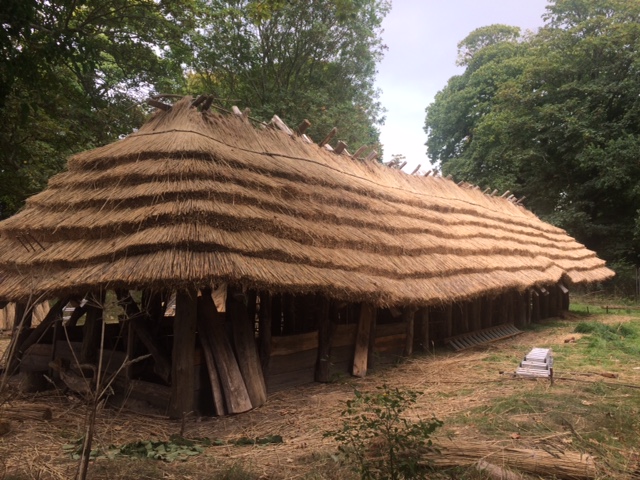
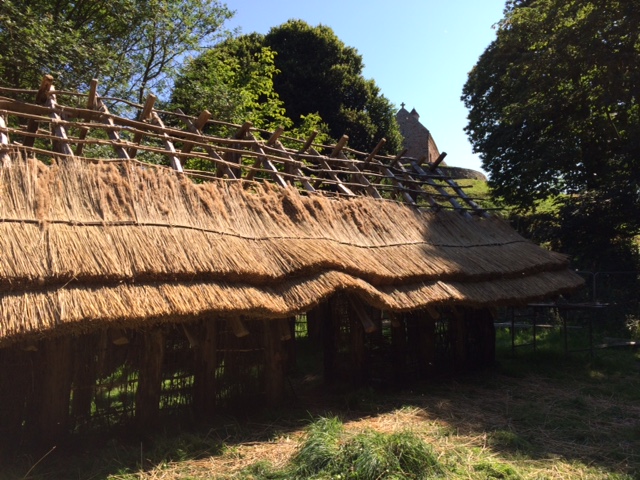
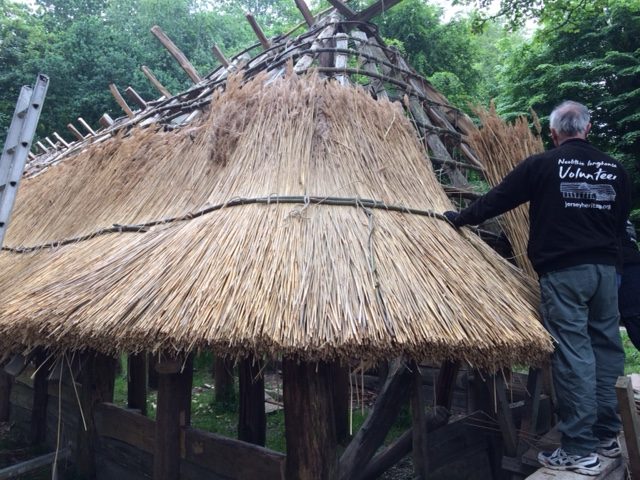
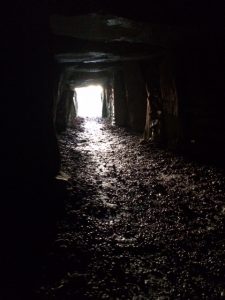
The sound of tools on timber and the burble of voices mingle with the birdsong at La Hougue Bie.  This week we hope to really push the Longhouse on, taking advantage of the weather and a good volunteer turnout.  

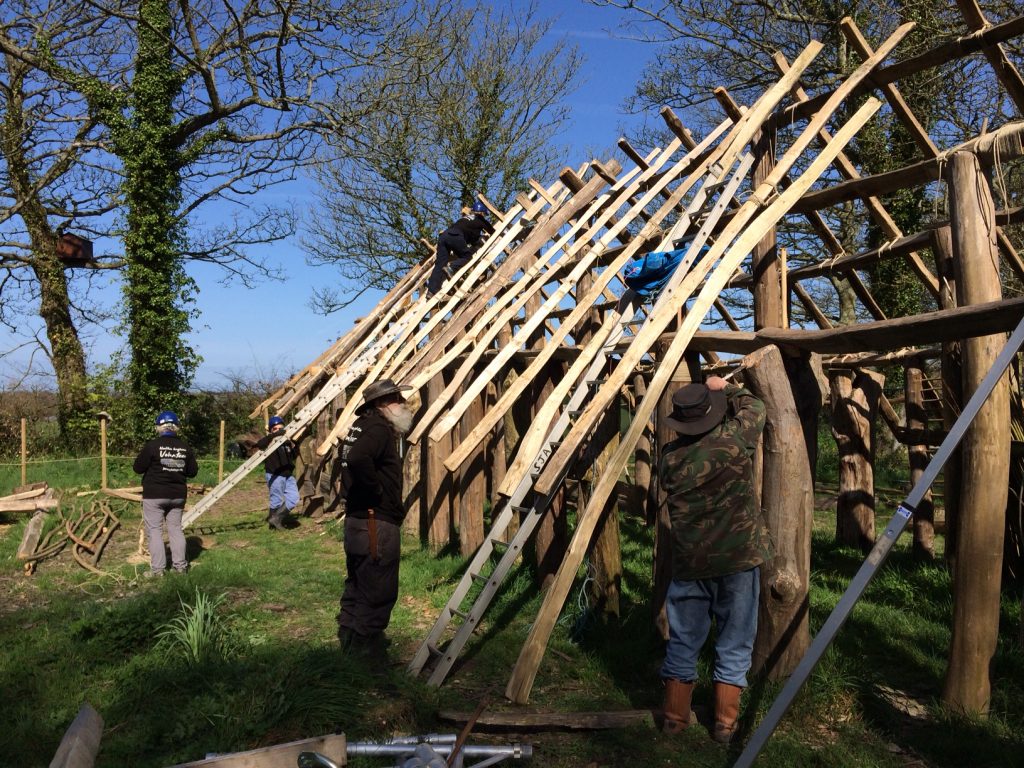
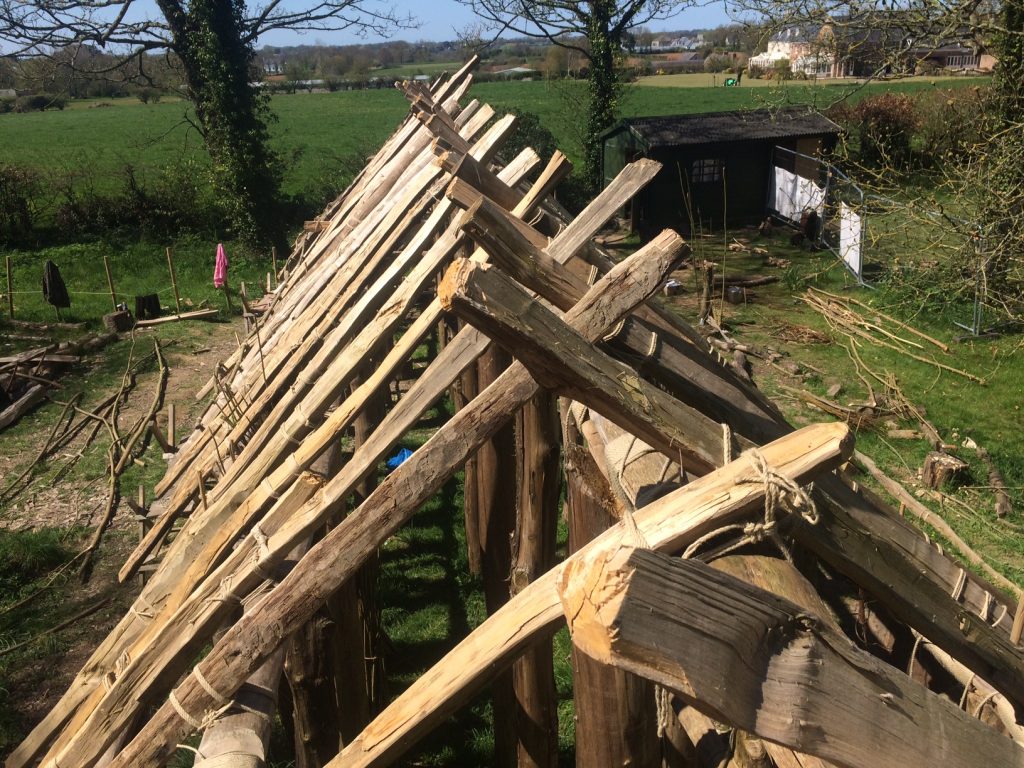
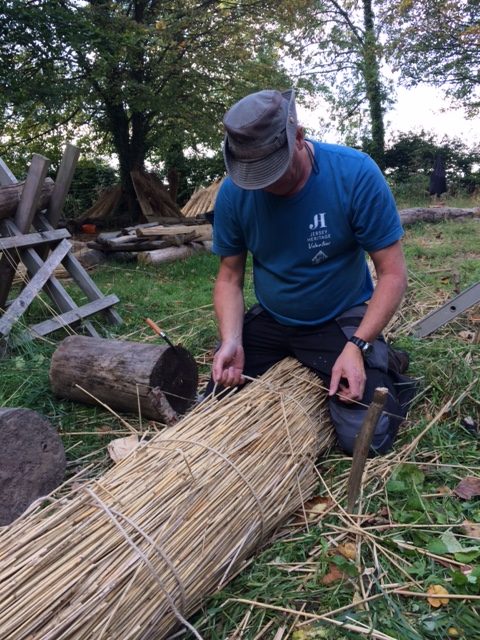
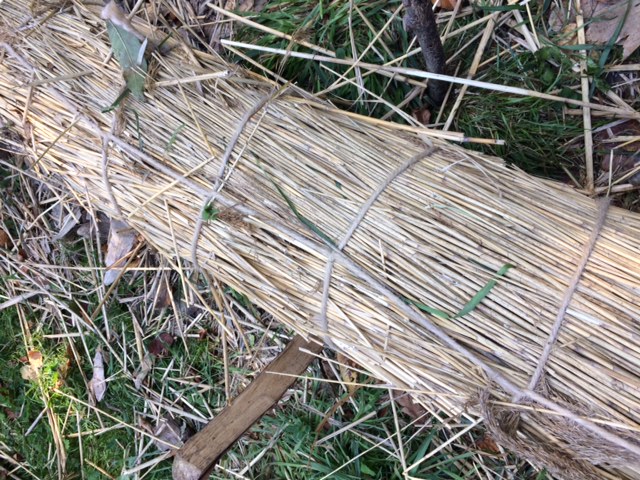
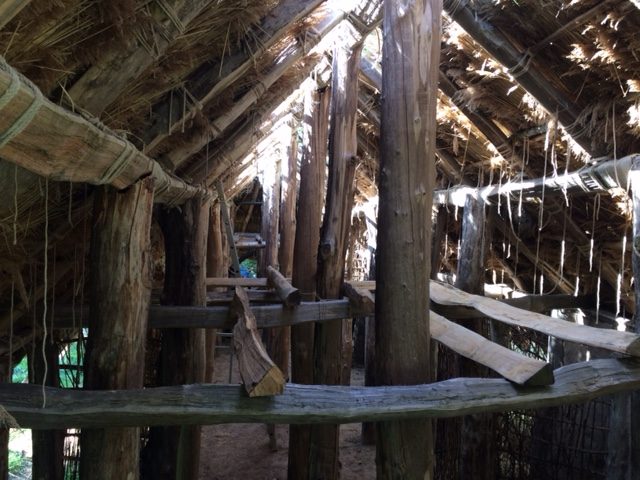
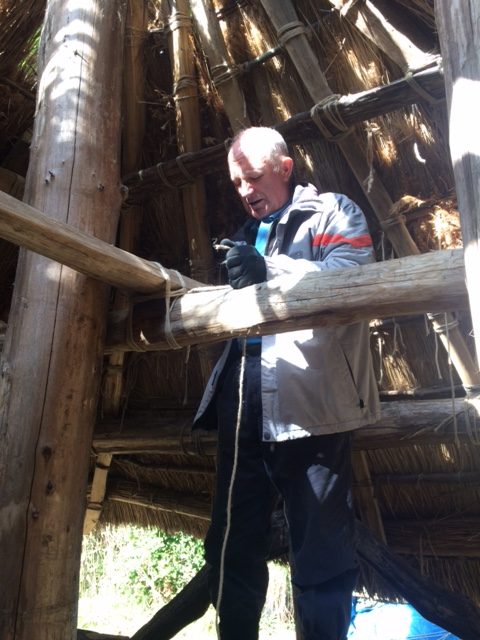
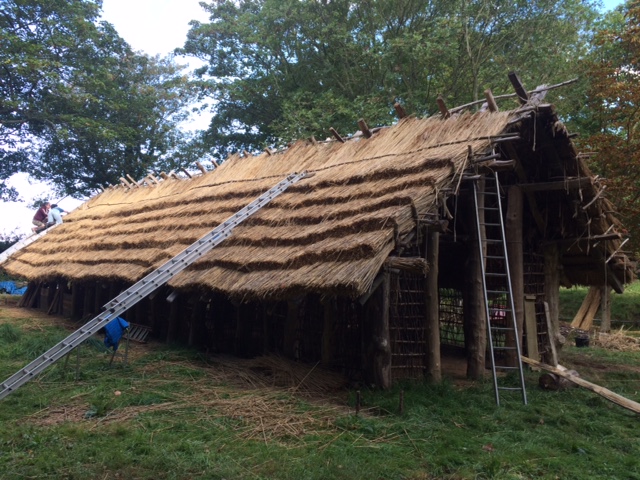
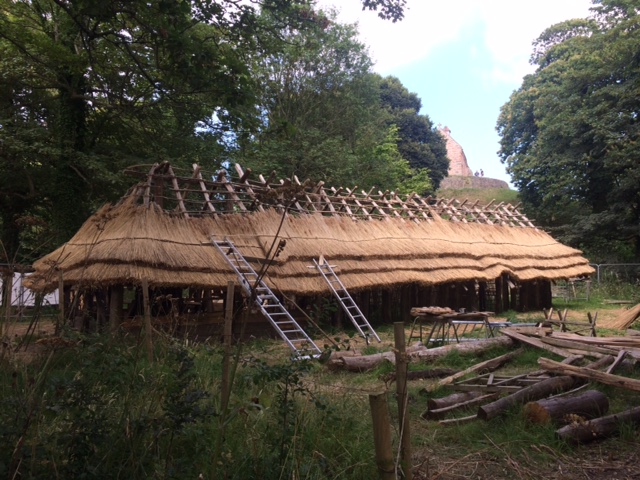
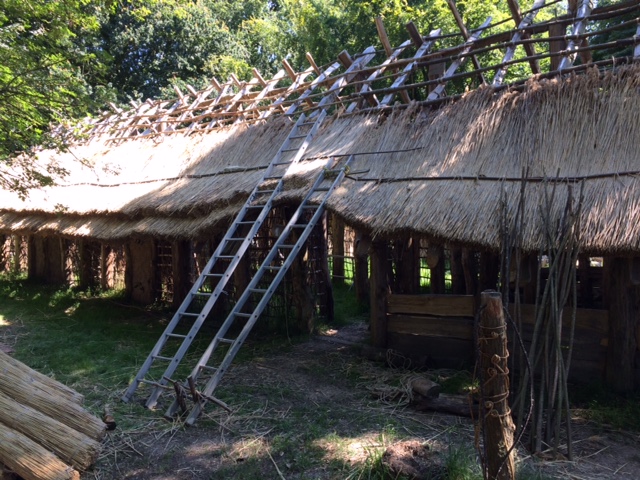
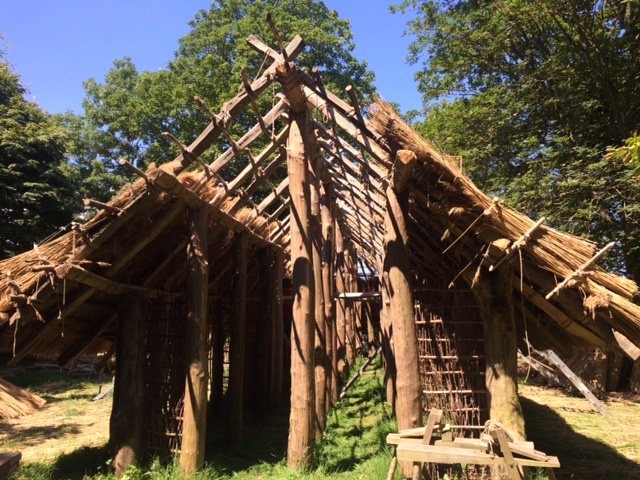
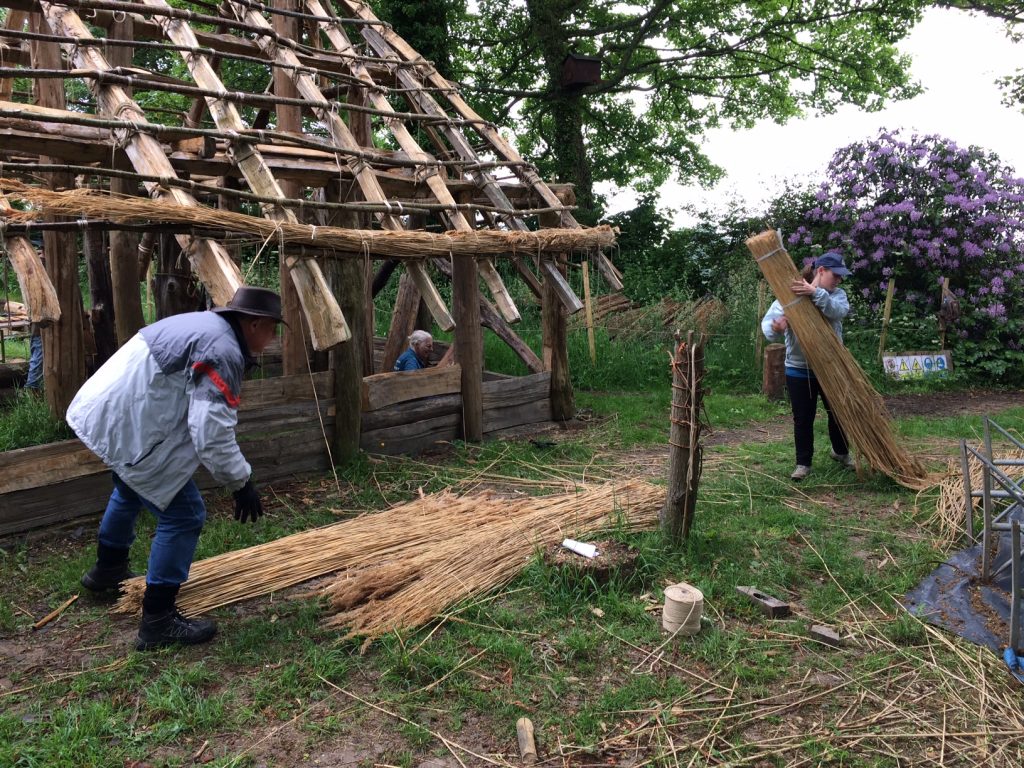
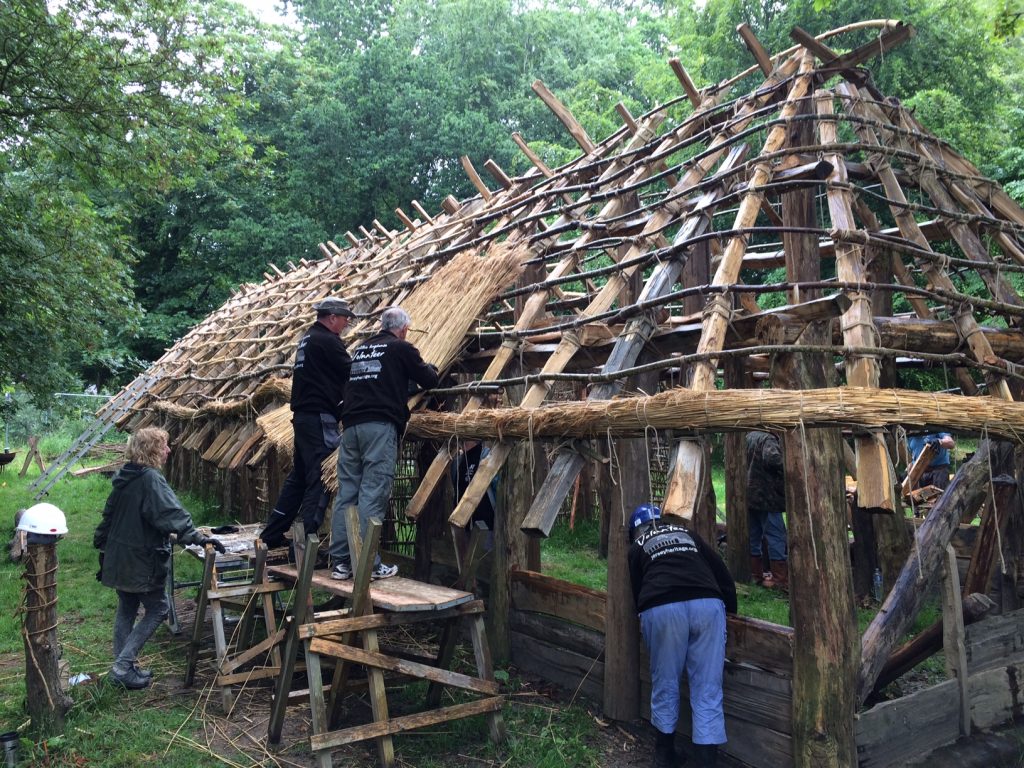
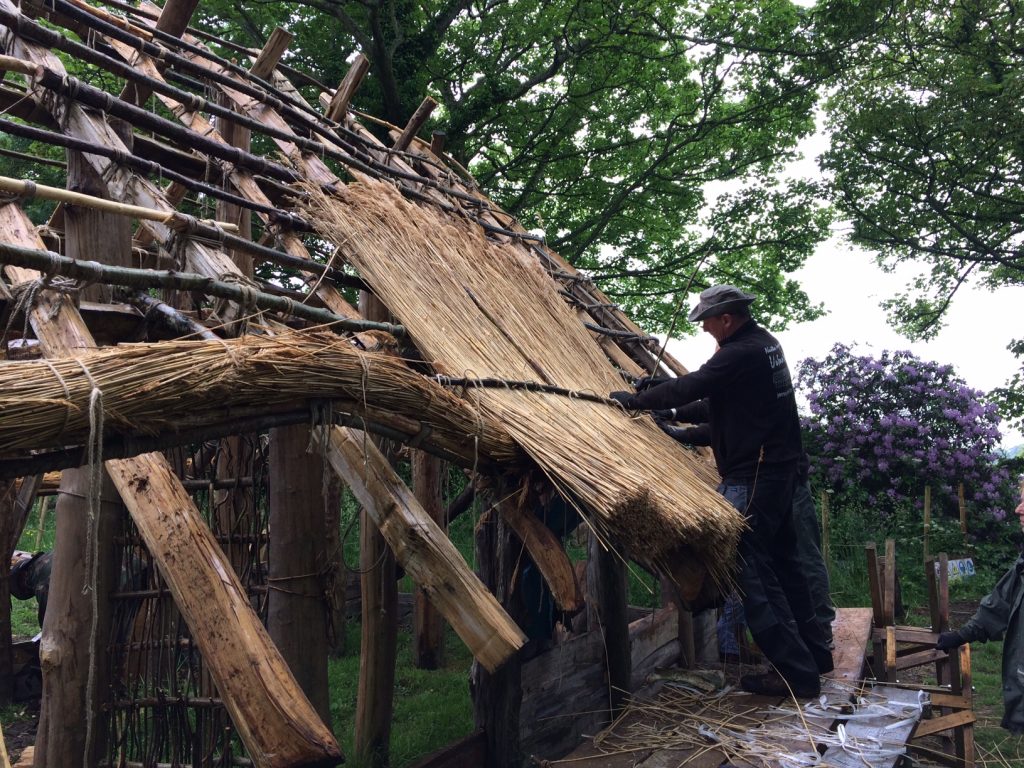
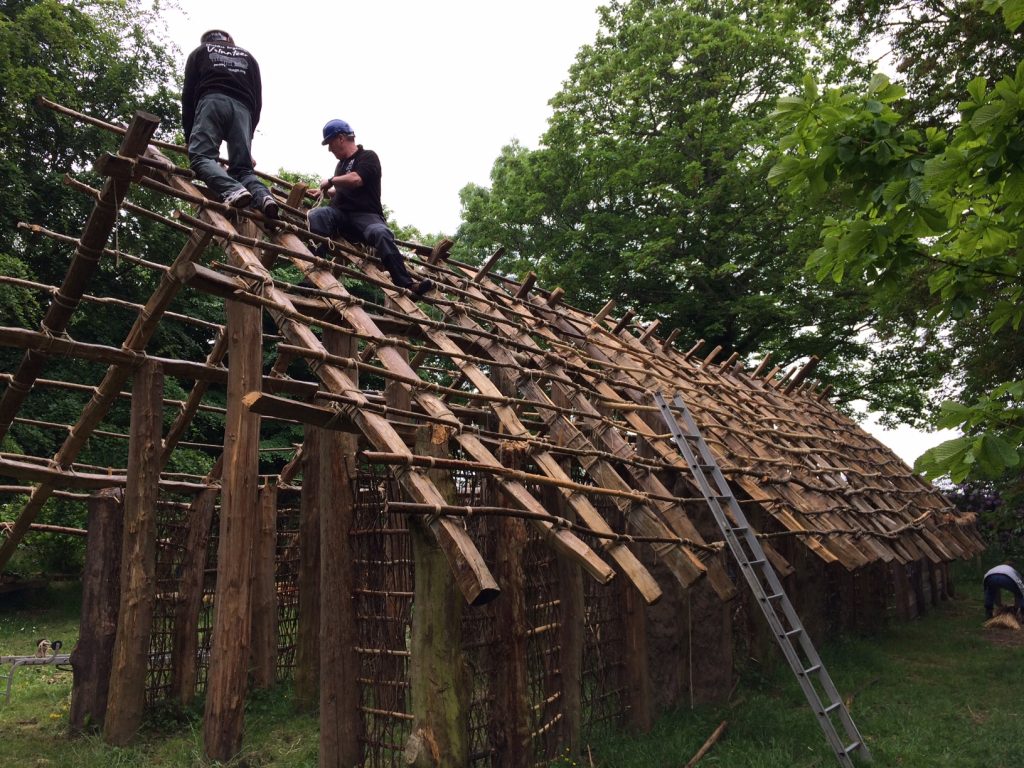
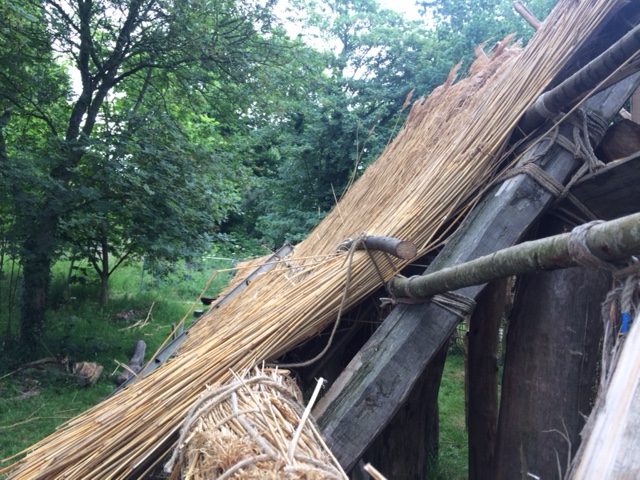
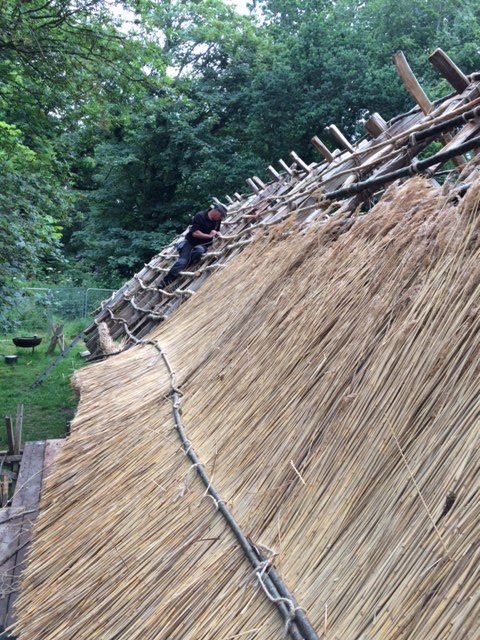
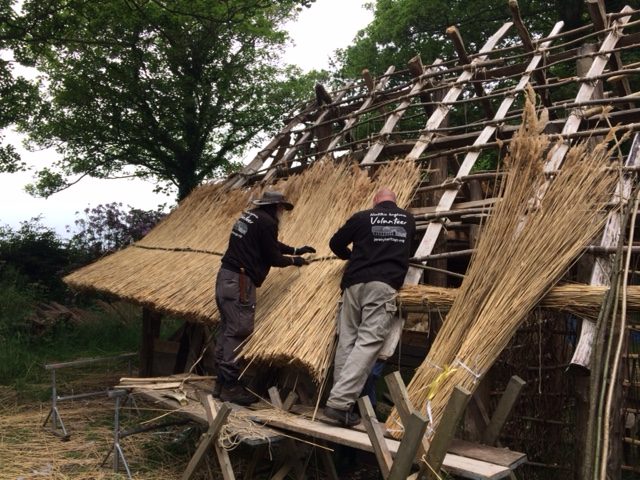
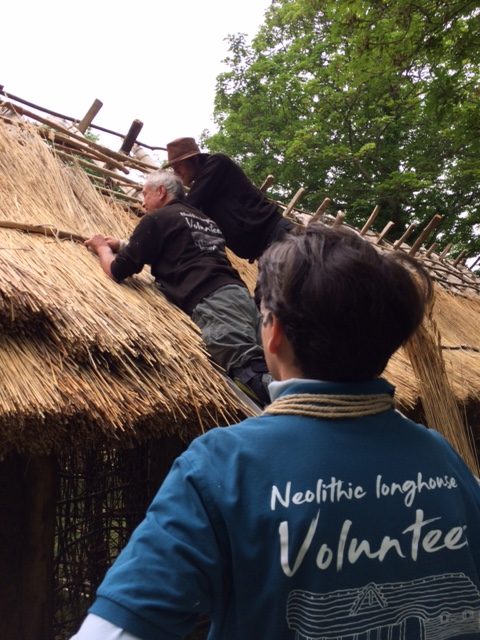
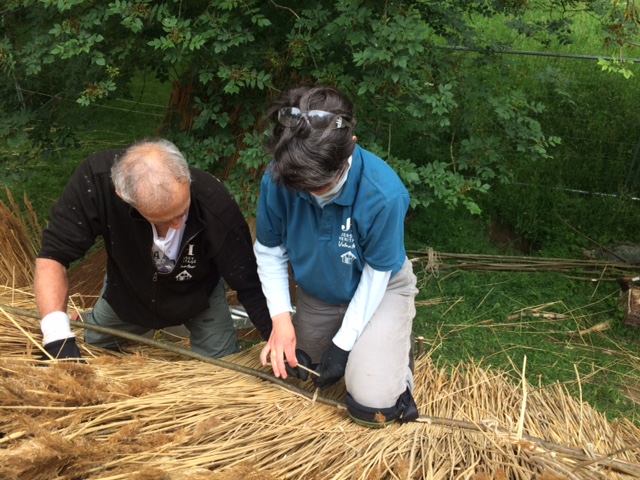
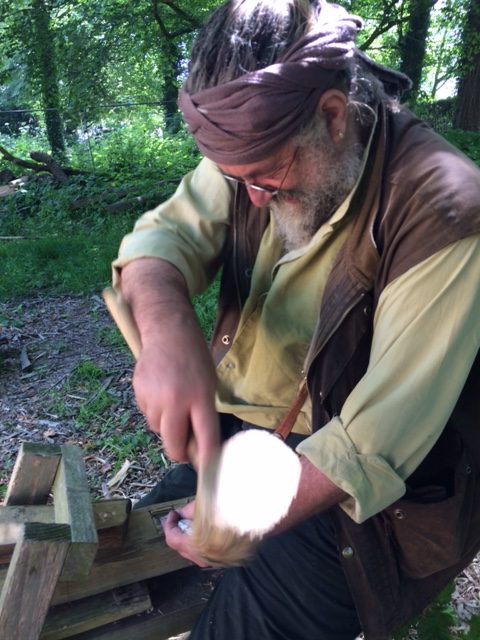
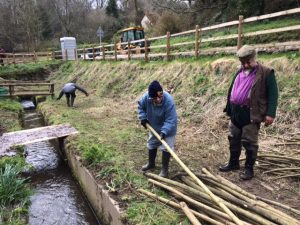
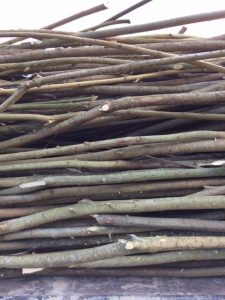
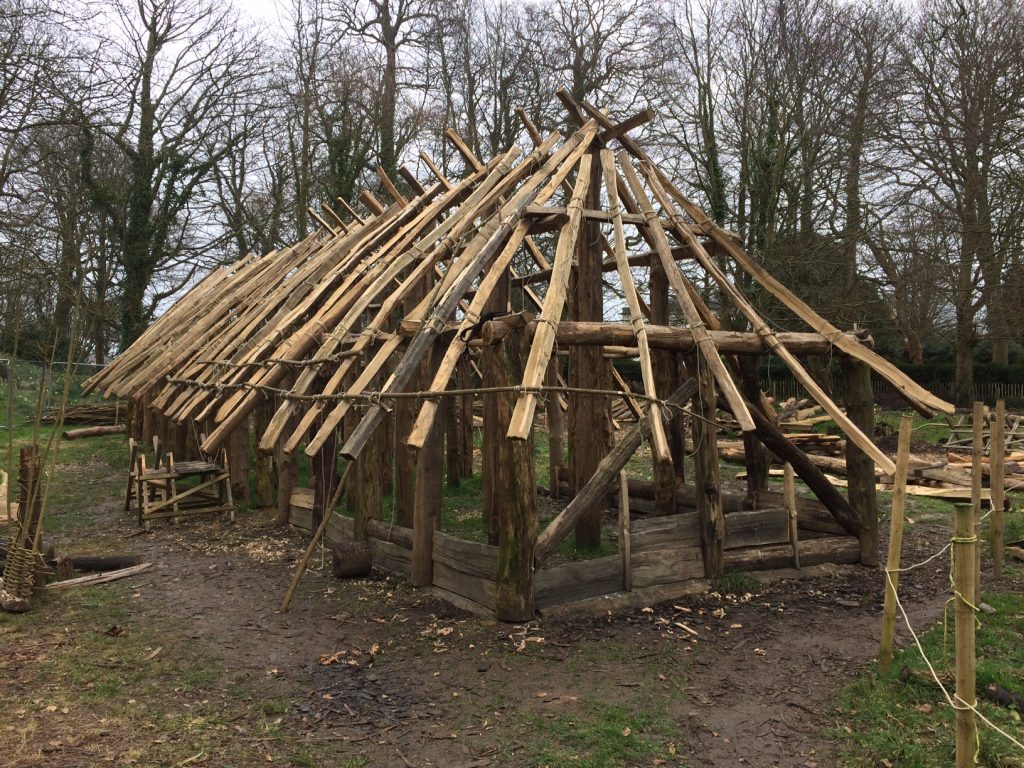
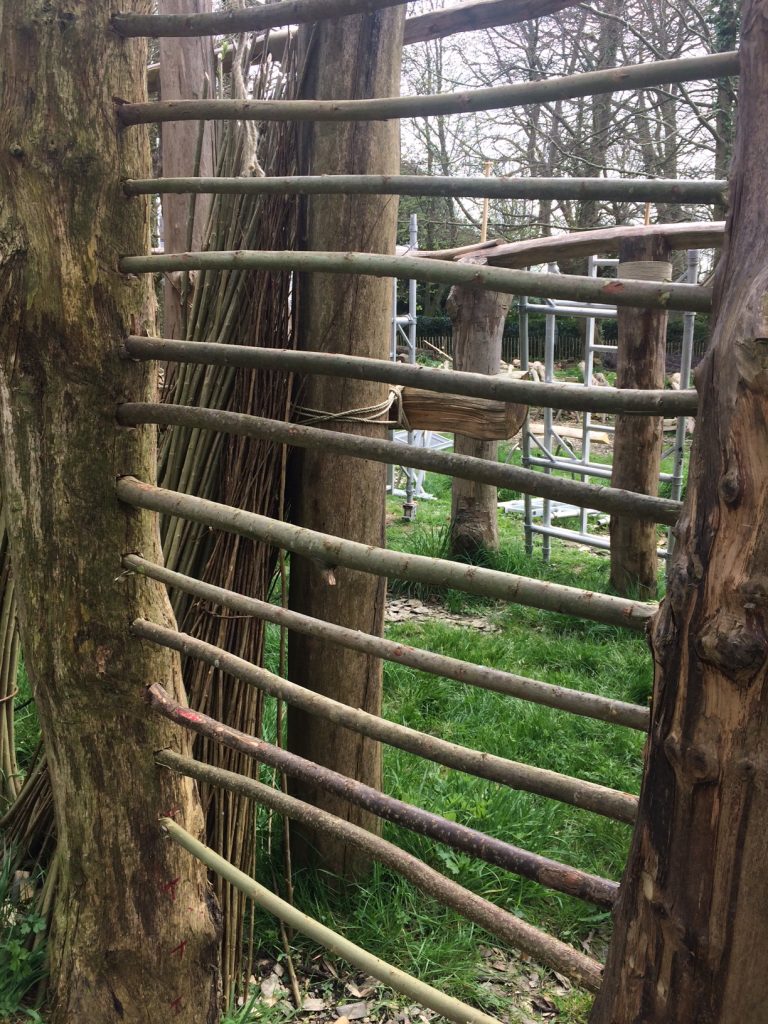
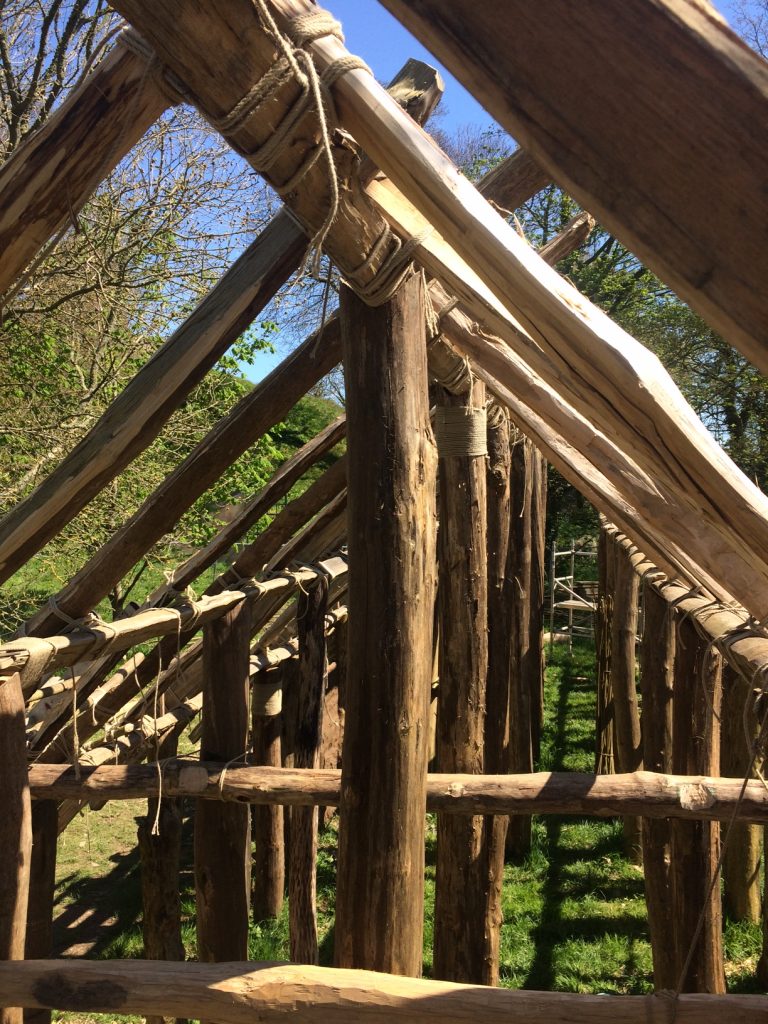
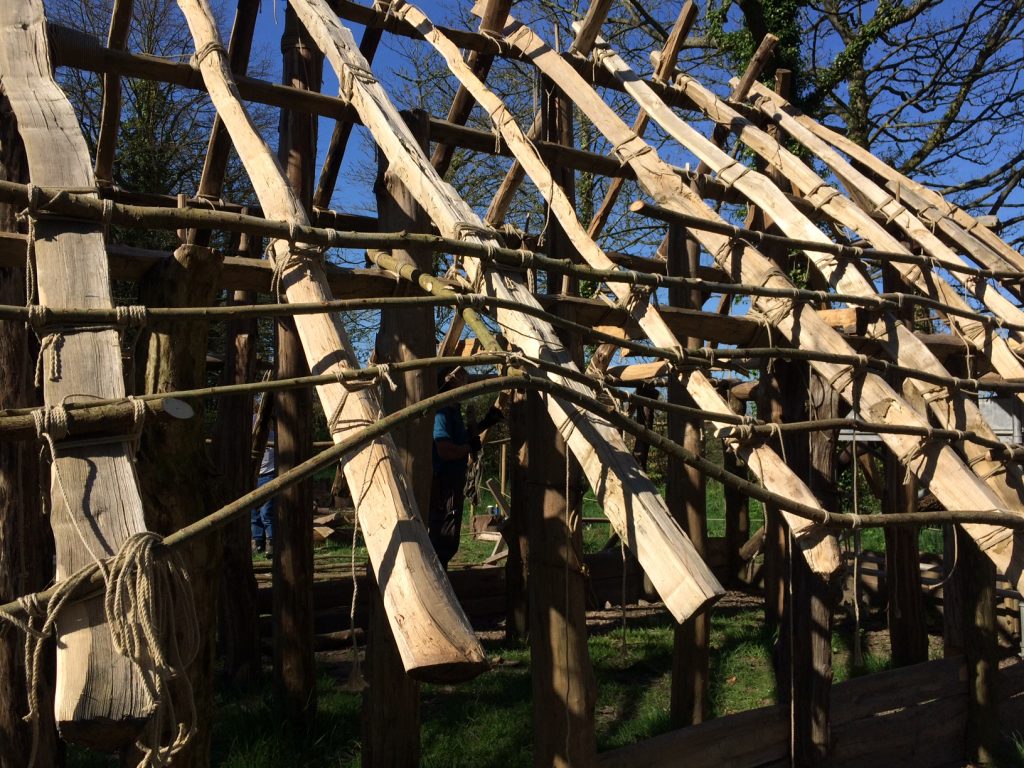
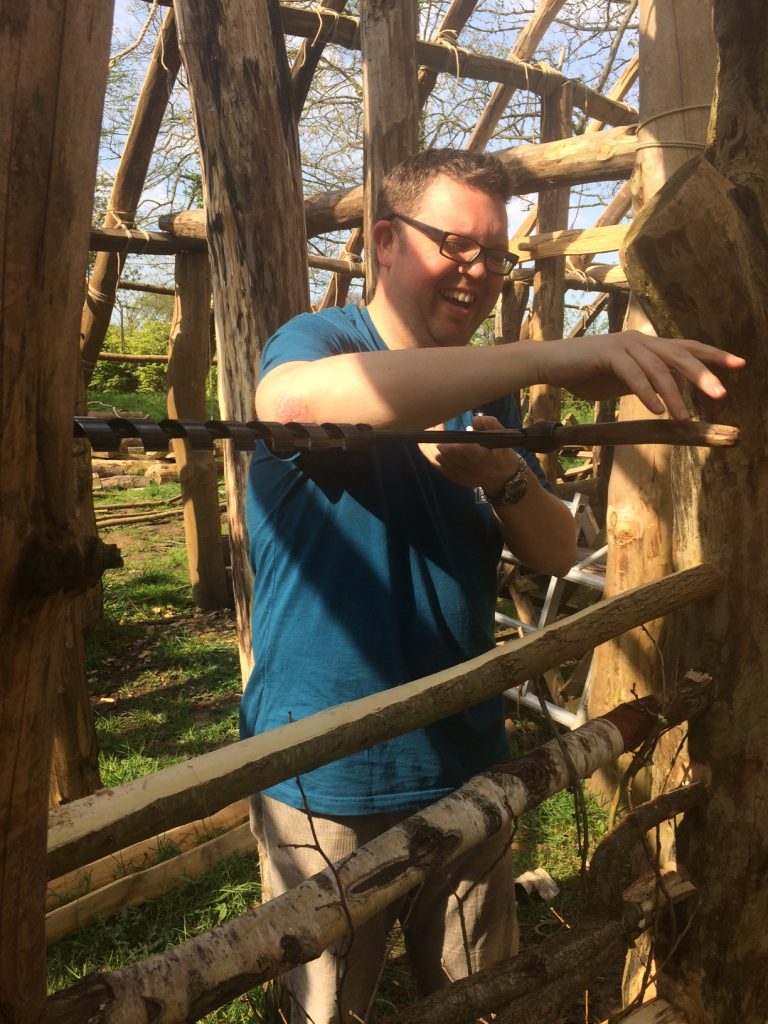
A team (Dave, Paul and Mike) are continuing with the lashing of willow battens to the rafters.  They are using 4mm hemp string to form the square lashings. Each lashing will have to support human weight as we work our way further up the roof.  I have calculated there will be around nine rows of lashed batten on each rafter – effectively forming a ladder up the roof. There are 47 rafters which makes a total of around 450 lashings.  Each lashing requires around 5 metres of hemp – so we are looking at an incredible 2 kilometres of rope to hold the battens in place. This highlights once again the sheer volume of cordage making that must have been a constant aspect of daily life in the past.  There is no knowing if every intersection of batten and rafter would have been lashed – our focus is to produce a building that will not require the constant maintenance that a permanently inhabited dwelling would be able to provide, but the scale of material processing is an inescapable part of producing this type of building.

Nicky, Pippa and Chloe are making final adjustments and lashings to the remaining rafters on the north side of the building.  

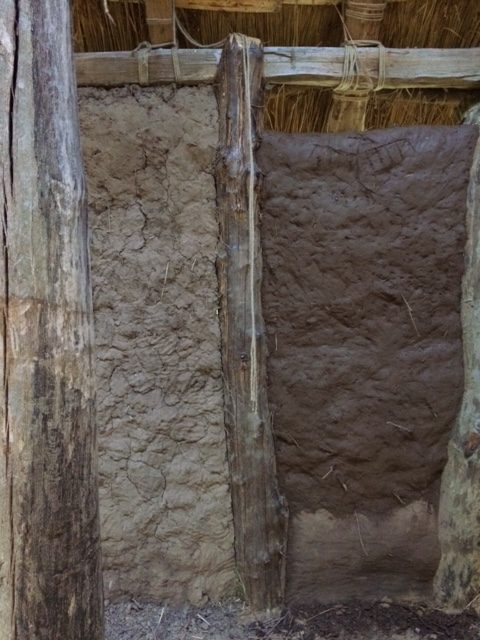
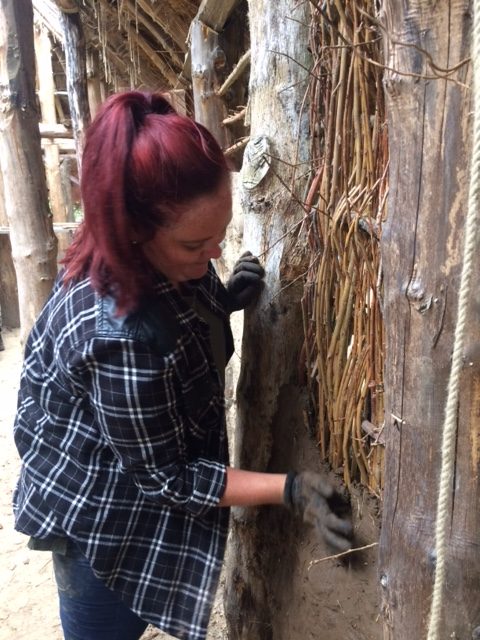
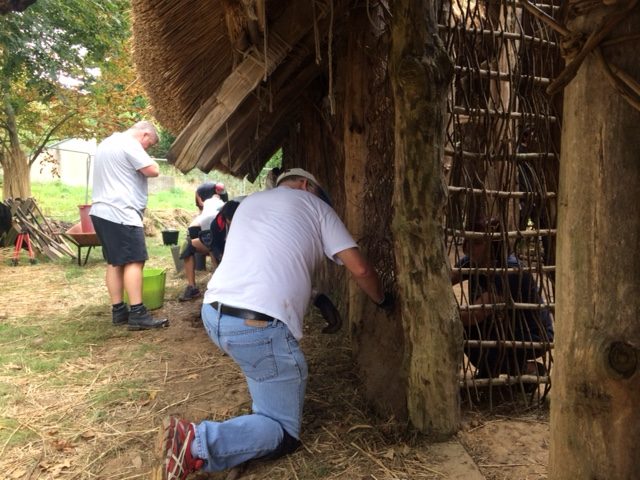
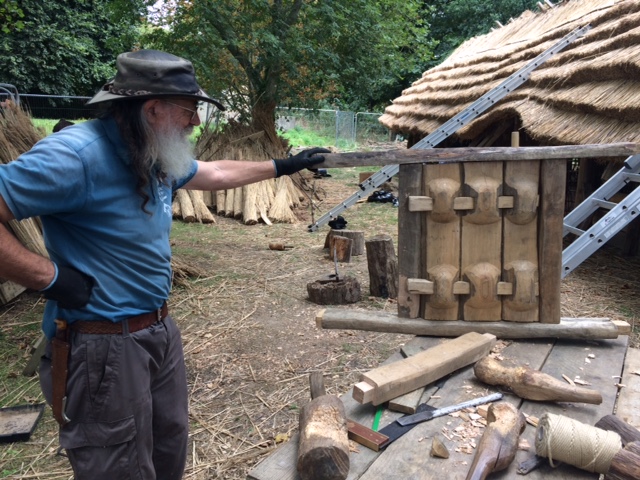
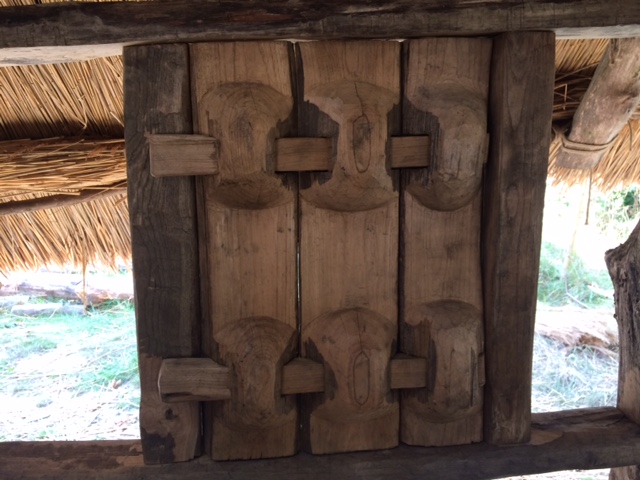
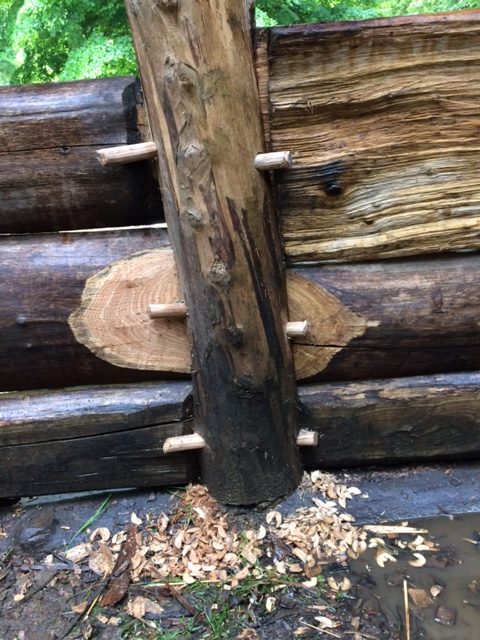
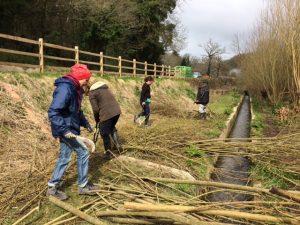
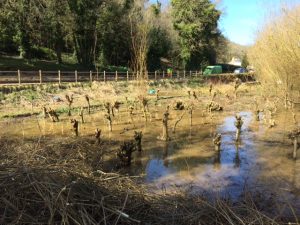
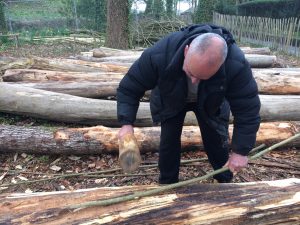
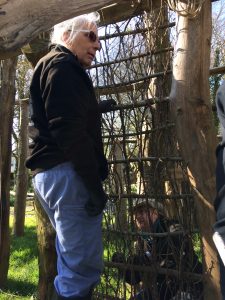
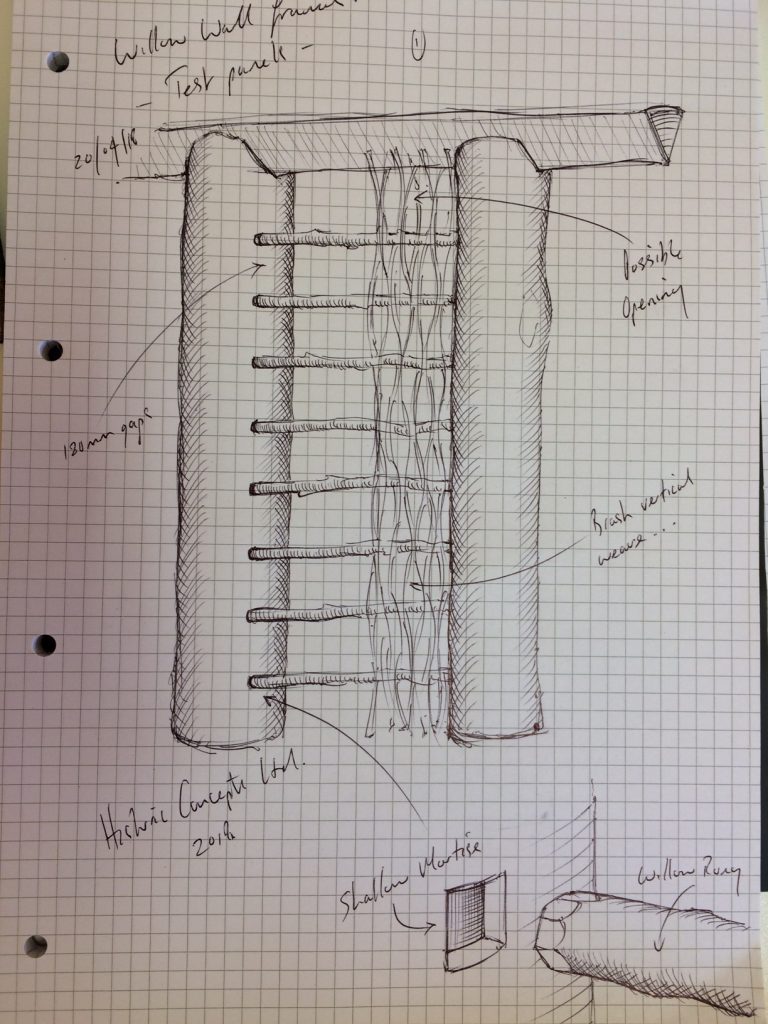
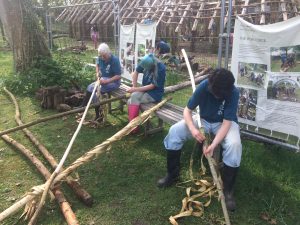
Astra, Danny, Edward and James are starting to work through some ideas for creating wall panels.  For many years, I have filled in the spaces between posts with densely woven hazel wattle. This was as much a result of having access to large volumes of well managed hazel coppice.  This woven wattle is packed tight and forms a strong but slightly flexible wall for the daub ( a mix of soil/clay with fibre and water) to adhere to. It is certainly a good method if material volume is not an issue.  This project suffers from a lack of local woodland and coppiced materials in large volumes and requires us to think slightly differently. The idea is to create a series of shallow vertical mortises on each opposing wall post and to flex short willow lengths into the gaps.  At this stage we are unclear as to what gap needs to be left between each willow strut to ensure any daub mixture adheres well. Two panels are being created. One with 18cm gapping and the other with 9cm gapping. These panels will be daubed (at least in part) to discover any issues.  We are hoping that this method will use less than half of a traditional wattle wall and also enable us to use the really uneven and irregular lengths of willow that are traditionally regarded as waste when creating wattle.

It is interesting to note that the availability of specific raw materials in specific volumes can account for the emergence of individual building styles.  This project is interesting because it is forcing us to move away from methods that I have used for many years simply because the material sets are different.  This is a really positive thing and makes us move away from the idea of specific construction traditions in experimental archaeology. Experimental archaeology suffers from the recurring issue of successful experiments.  The relatively infrequent reconstruction of buildings at full scale creates an environment where a successful experiment (whatever it may be) rapidly becomes “the way it must have been done” simply because it is successful.  Other practitioners are often put off trying alternative versions of the same experiment because “it’s already been done” and worked. This creates a mythology that can easily form an unintentional blueprint for the way a roundhouse was built, birch tar was produced, or what Neolithic longhouse walls looked like.  Other practitioners tend to copy the successful model rather than seeking other successful methods to answer the same question.

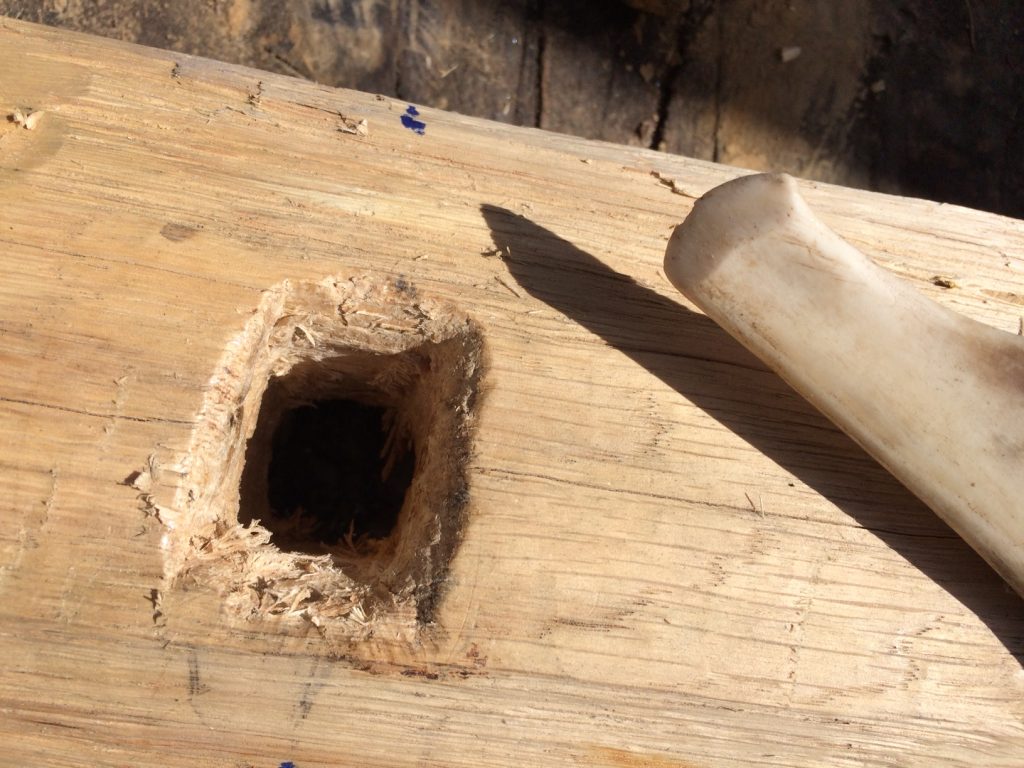
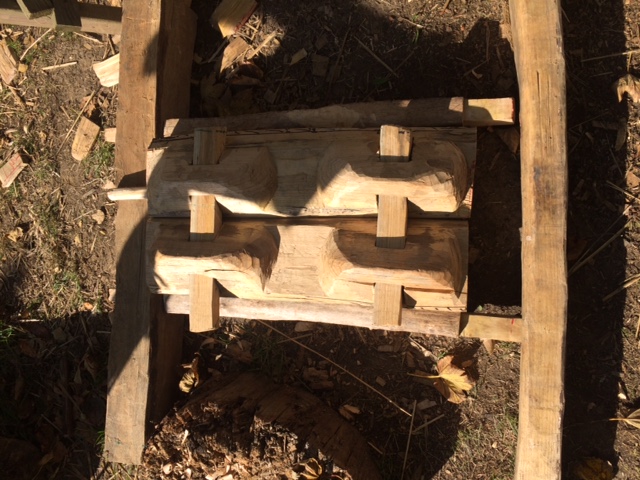
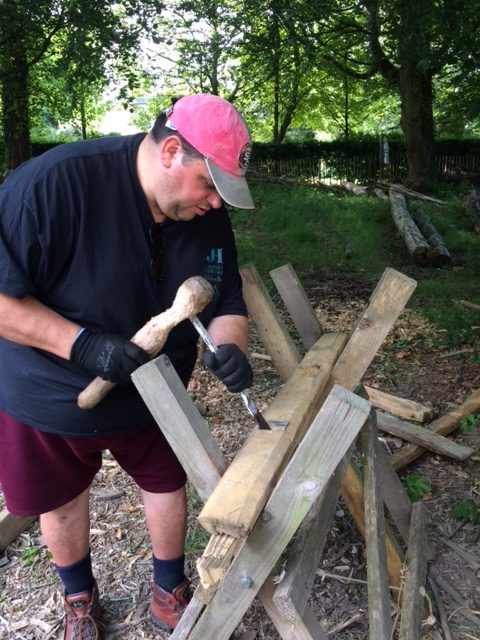
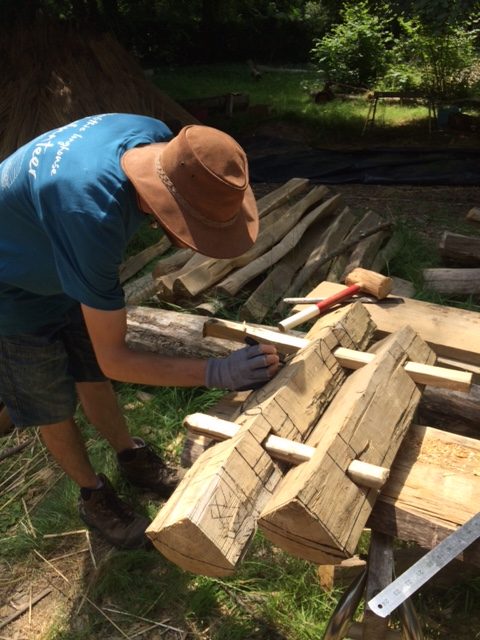
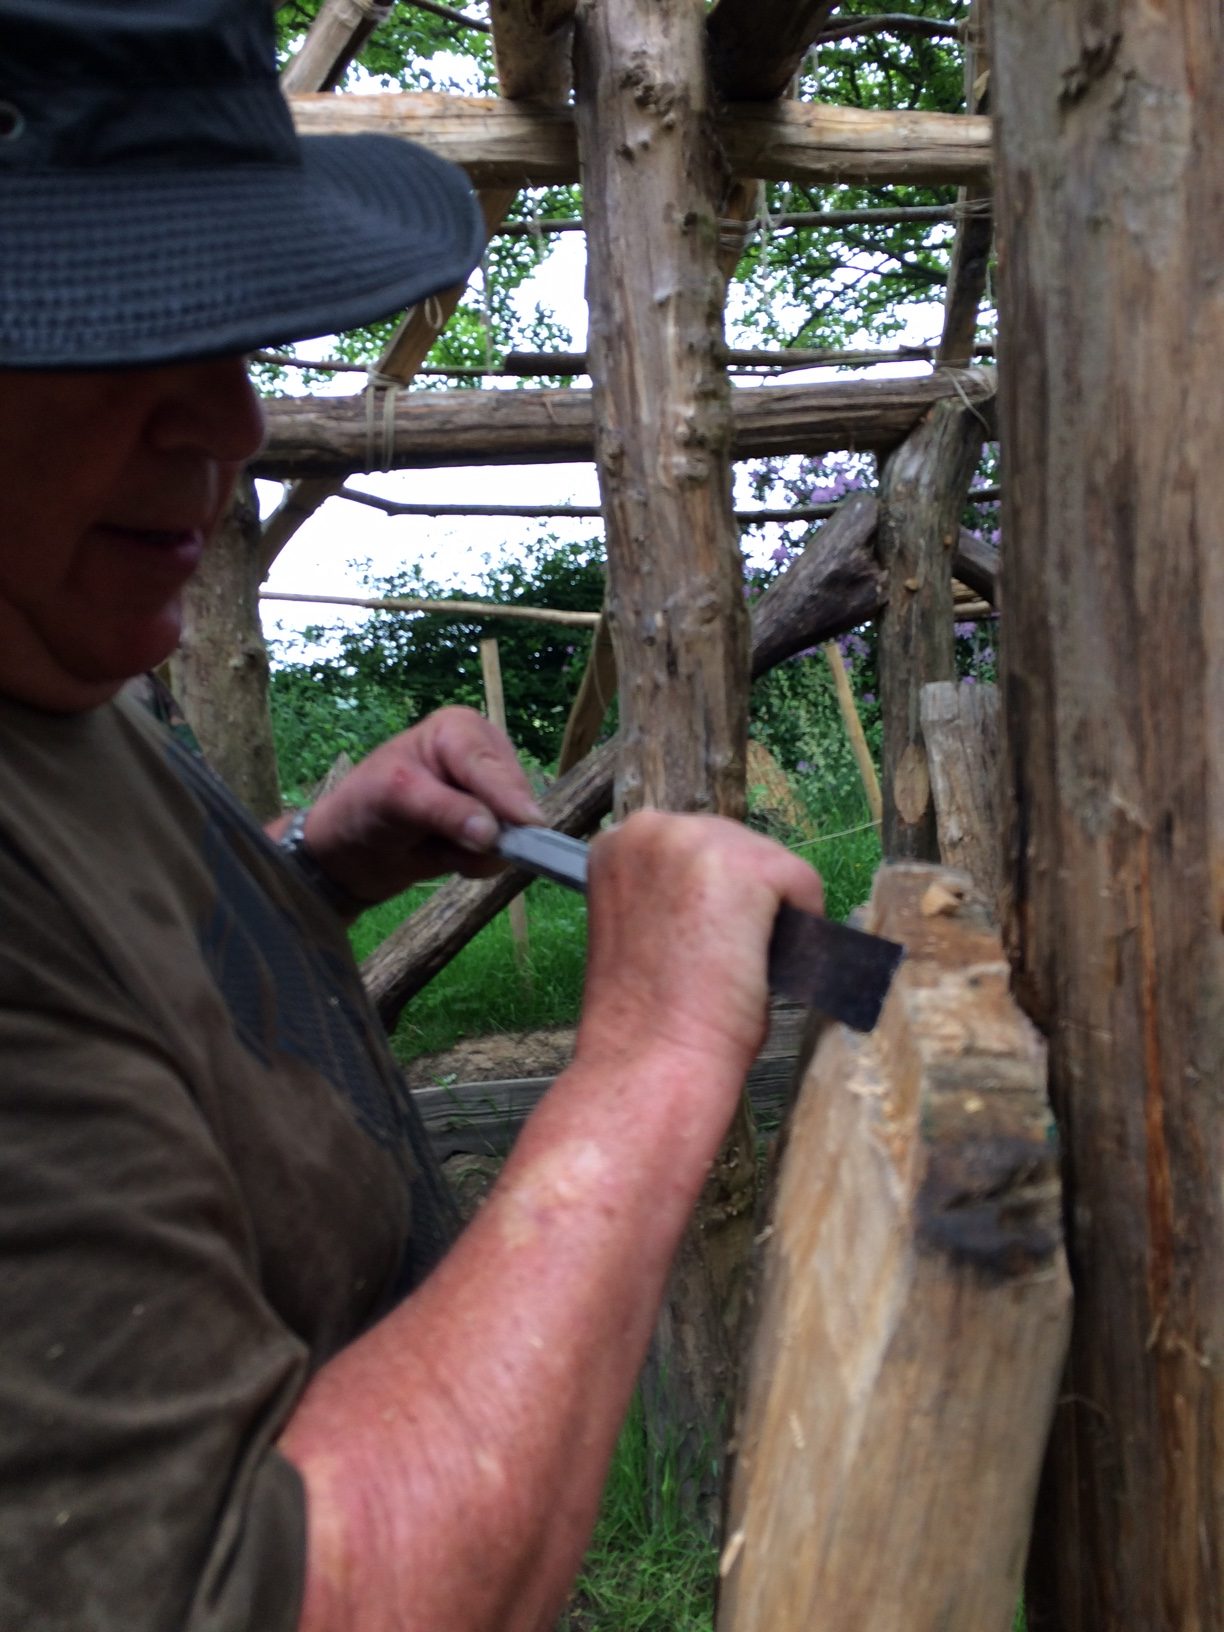
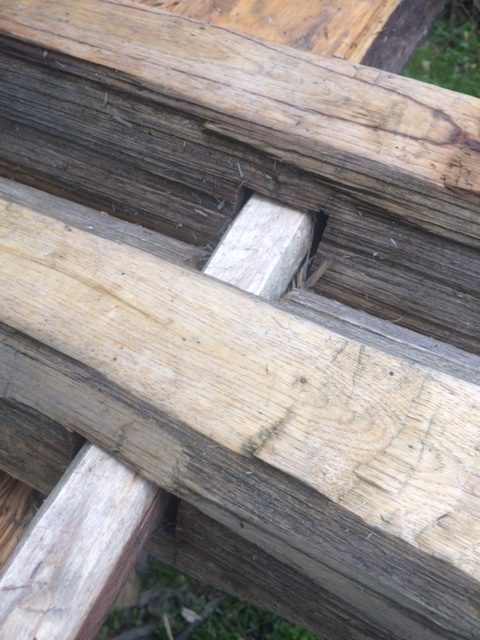
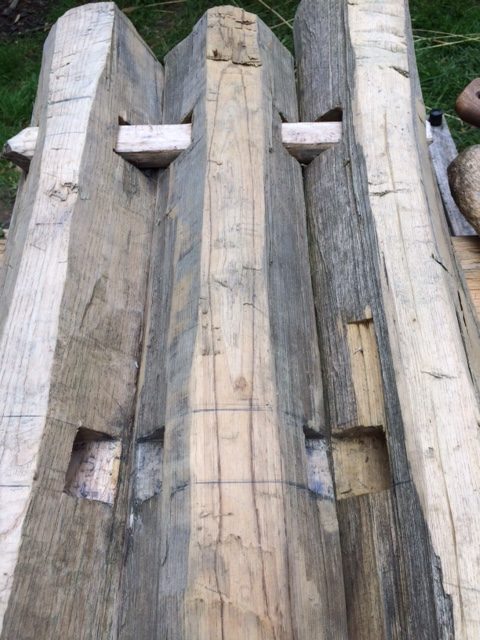
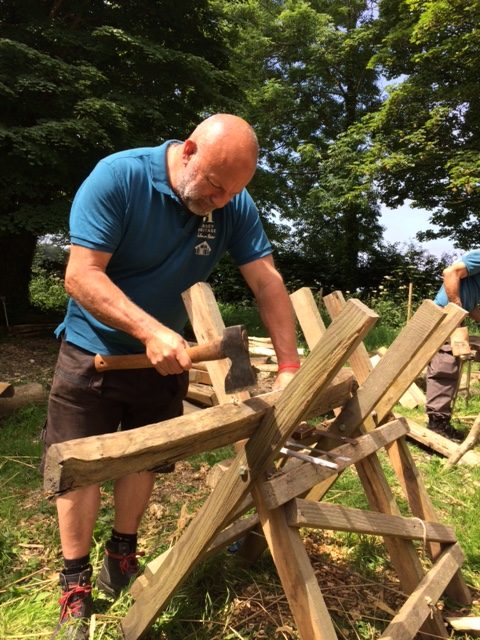
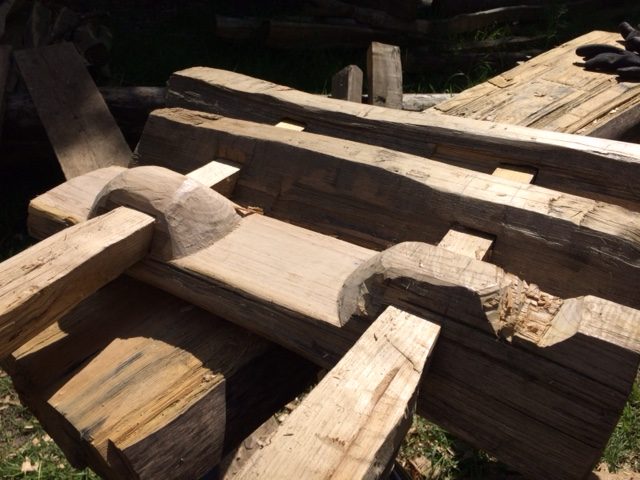
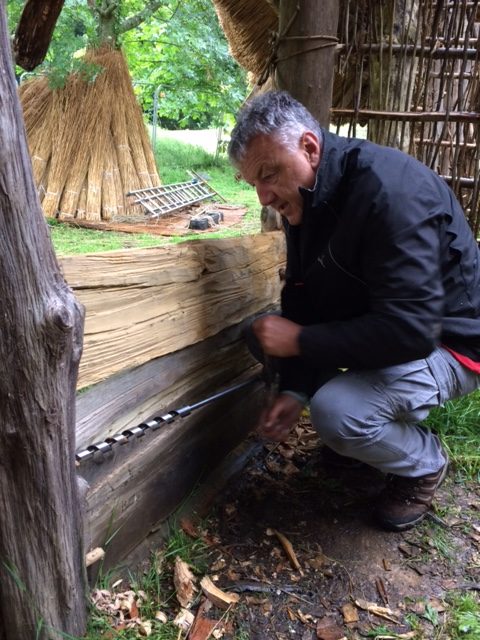
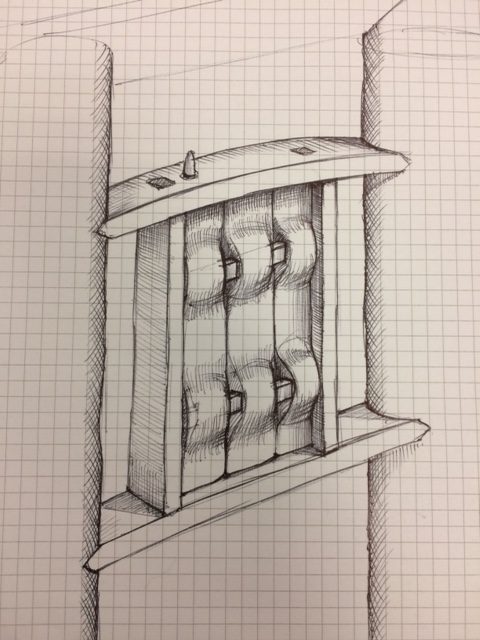
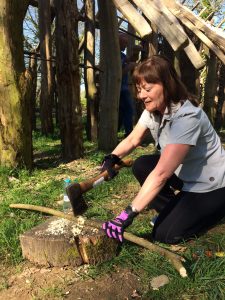
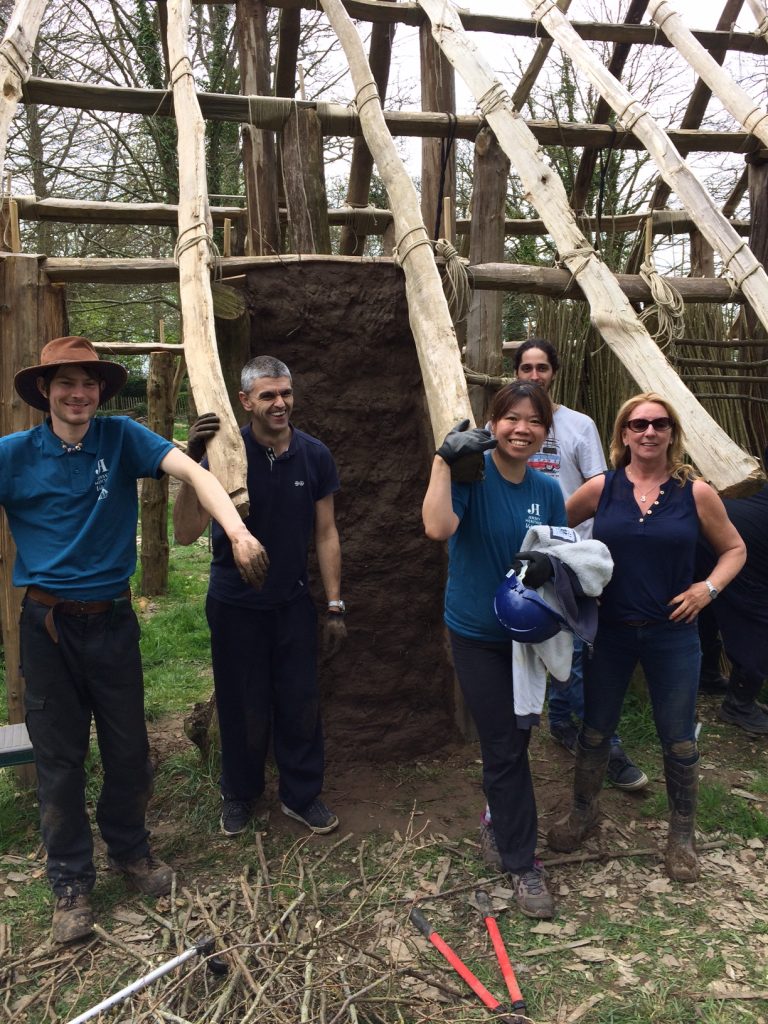
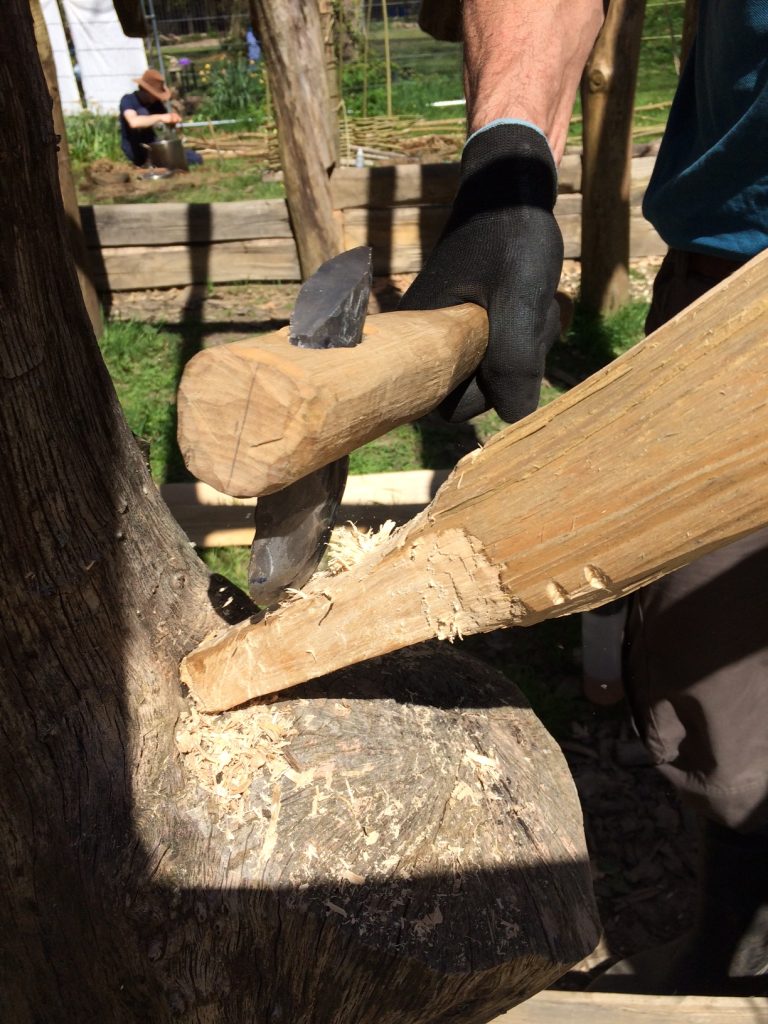
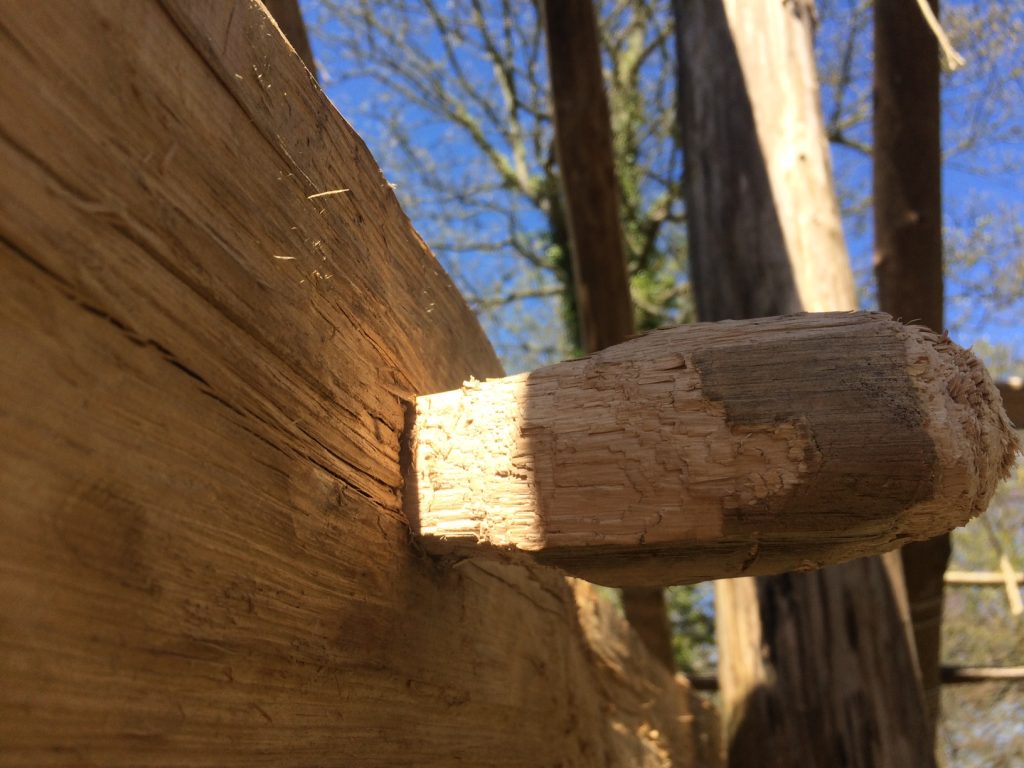
Derek has finished cutting the first mortise through the tie beam that will support the floor above the “livestock” end of the building with a bone chisel.  The total time taken was 285 minutes. The mortise is neat and surprisingly square and although the bone chisel required resharpening (by grinding on a flat stone) several times, the result is impressive.  This square mortise mirrors those found on well preserved Neolithic well linings from Germany.


Tuesday 17th April 2018

A second bright day has dawned at la Hougue Bie!  

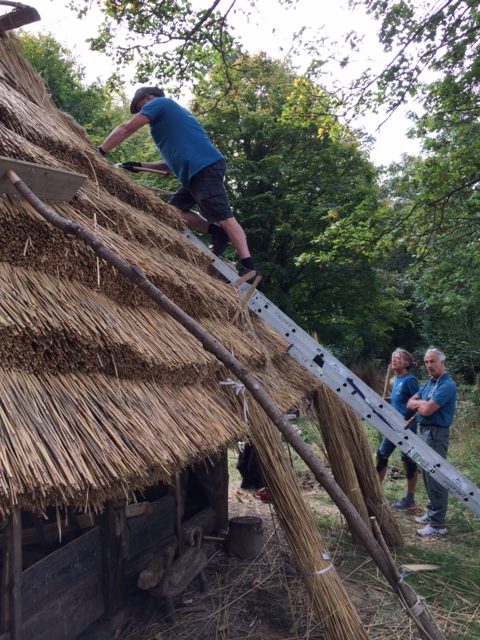
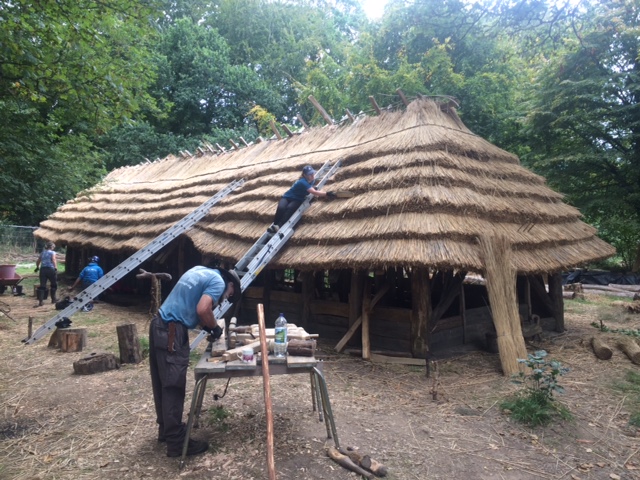
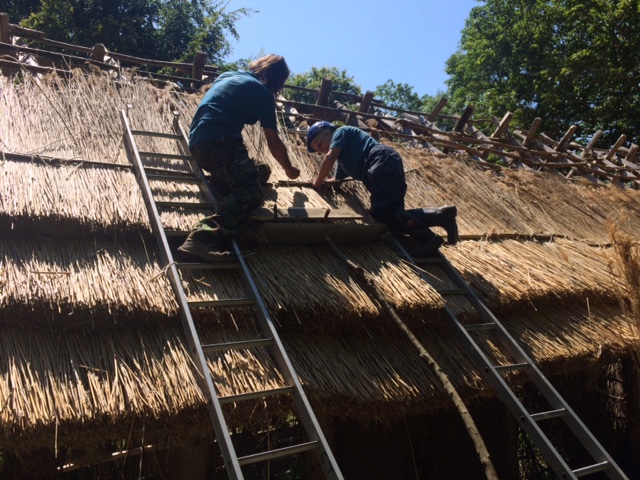
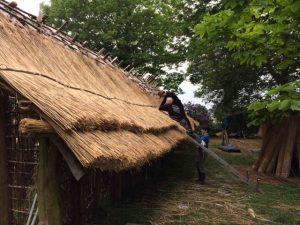
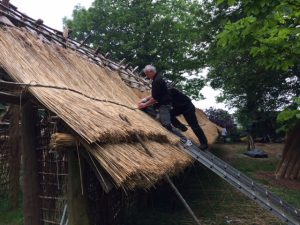
Today work continues with the placement and lashing of rafters in their final positions on the south side of the house.  Nicky, Astra and Pippa are working as one team while Derek and Danny find the remaining matched pairs of rafters and put them on the roof.

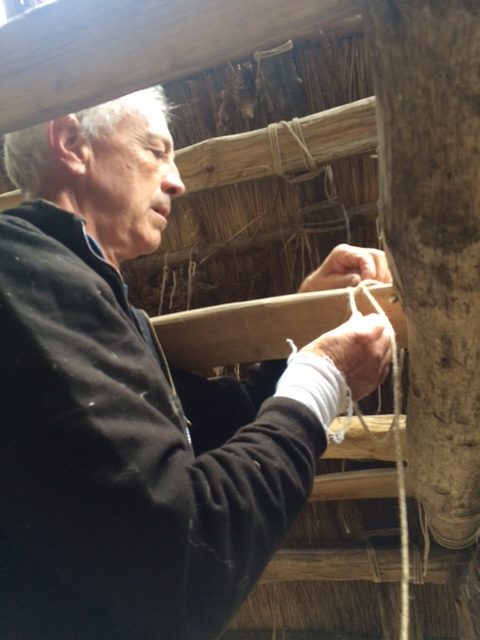
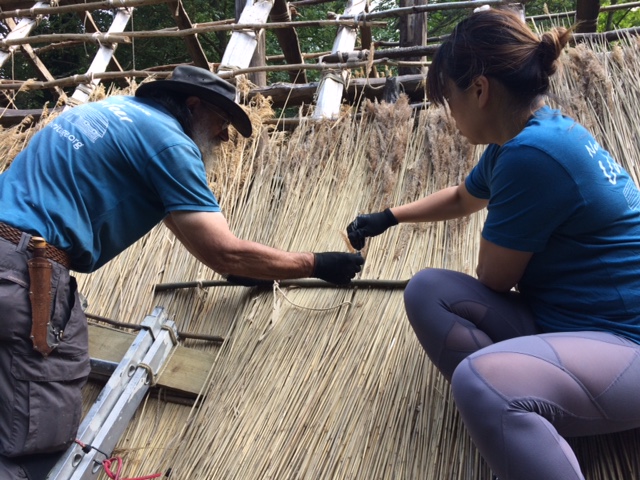
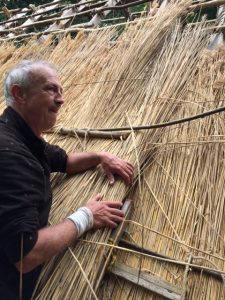
Mike and Ruth are continuing with the lashing of battens to the rafters,  This is (like all of our tasks) not as straightforward as it first appears.  It is crucial that joints between two battens are neatly matched to create a smooth surface for the thatch to lie over – and in places, the battens have to curve around the corners of the roof.  This requires the selection of specific lengths that will accommodate the required bend at a specific point.


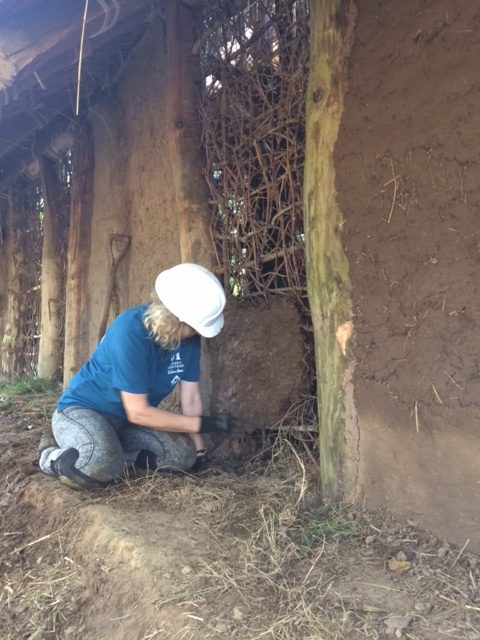
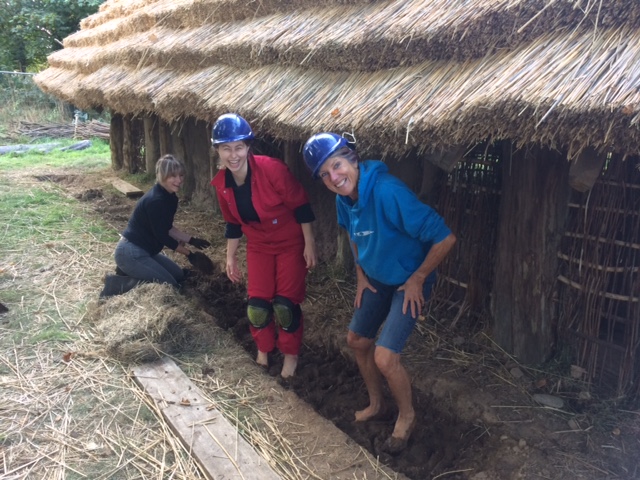
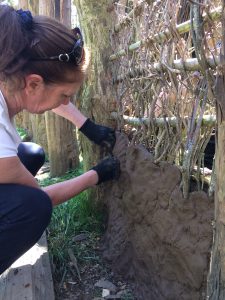
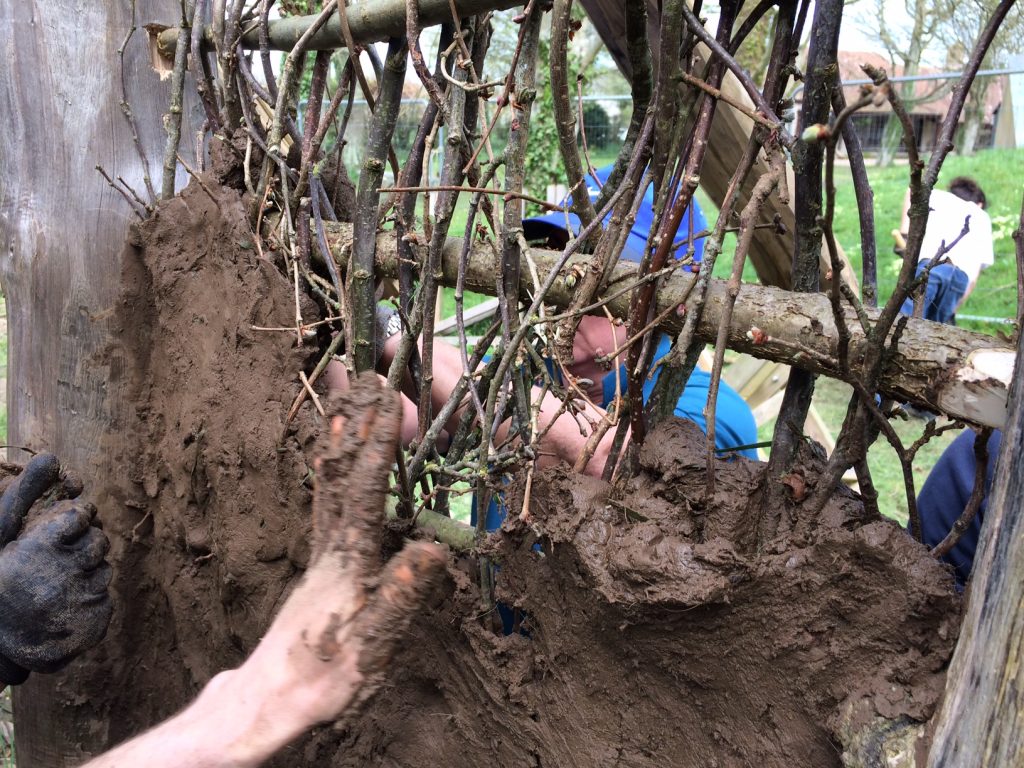
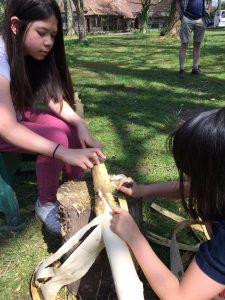
Today we are also testing the first batch of daub to apply to our test wall panels.  This process needs to be thoroughly tested before we call for large numbers of volunteers to help as it would be easy to apply a lot of the wrong mix only to see it fall off two weeks later when it dries!

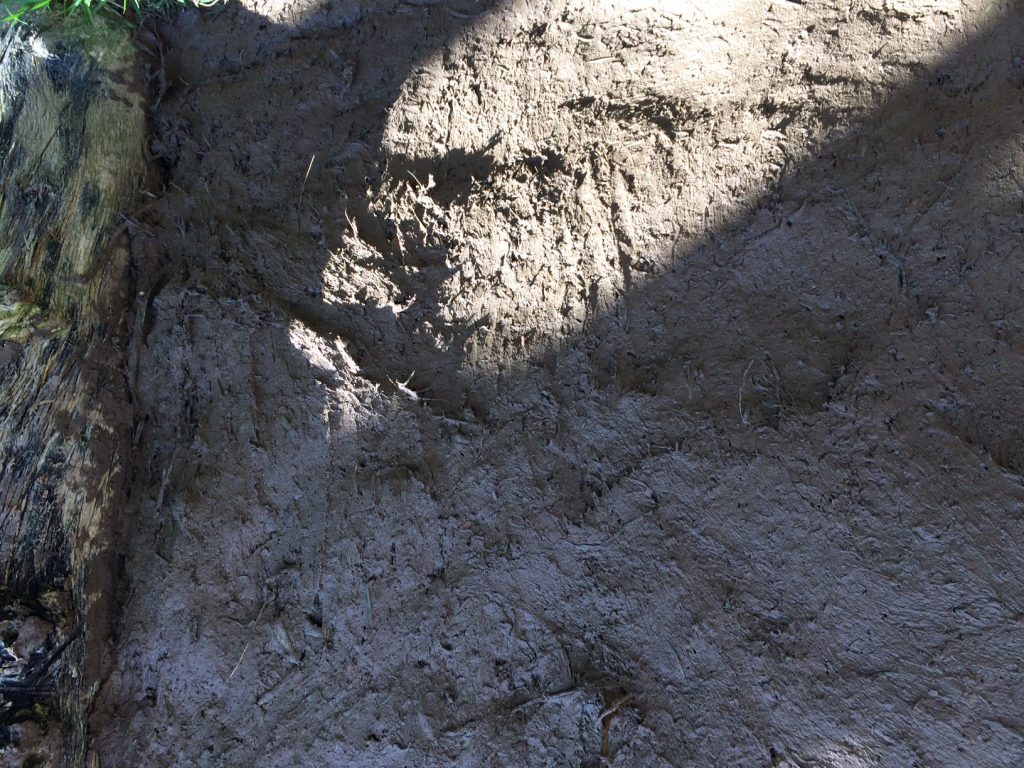
Mixing daub is an art.  The base material is the earth around the building (in this case Loess), mixed with large volumes of fibre (dry grass, green grass, horse hair and even dung) and a little water to create a good working consistency.  The idea of cramming the earth with other materials is to prevent too much shrinkage and cracking when it dries. In this fine weather we will know pretty quickly if we have got our daub mix anywhere near right!

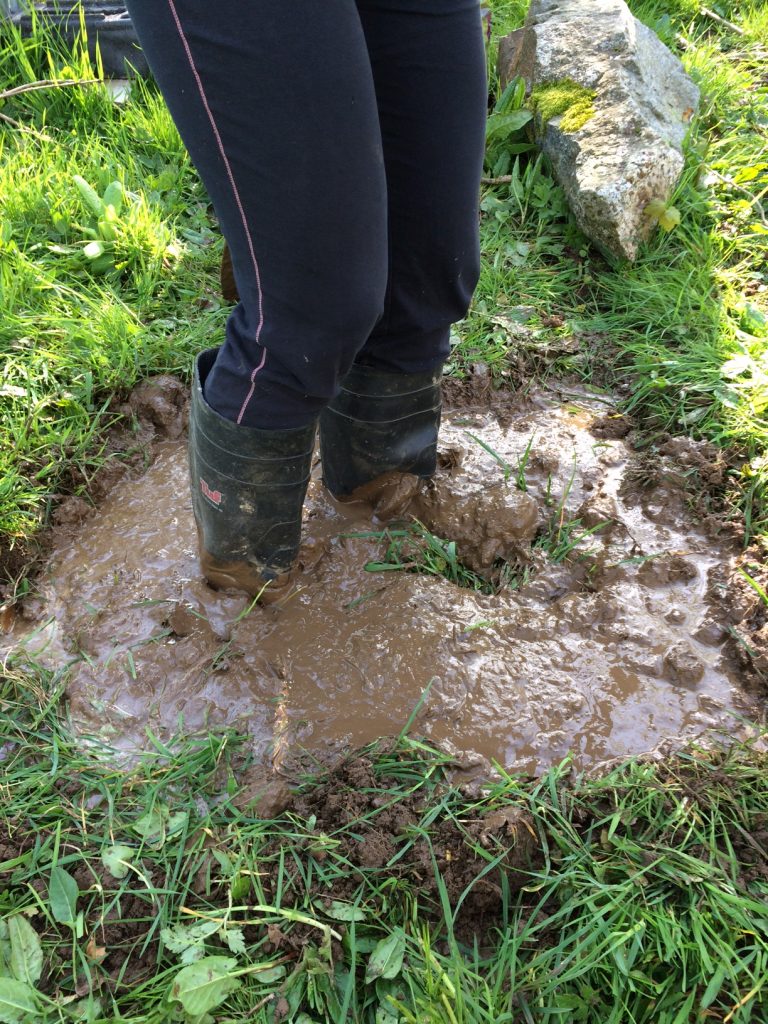
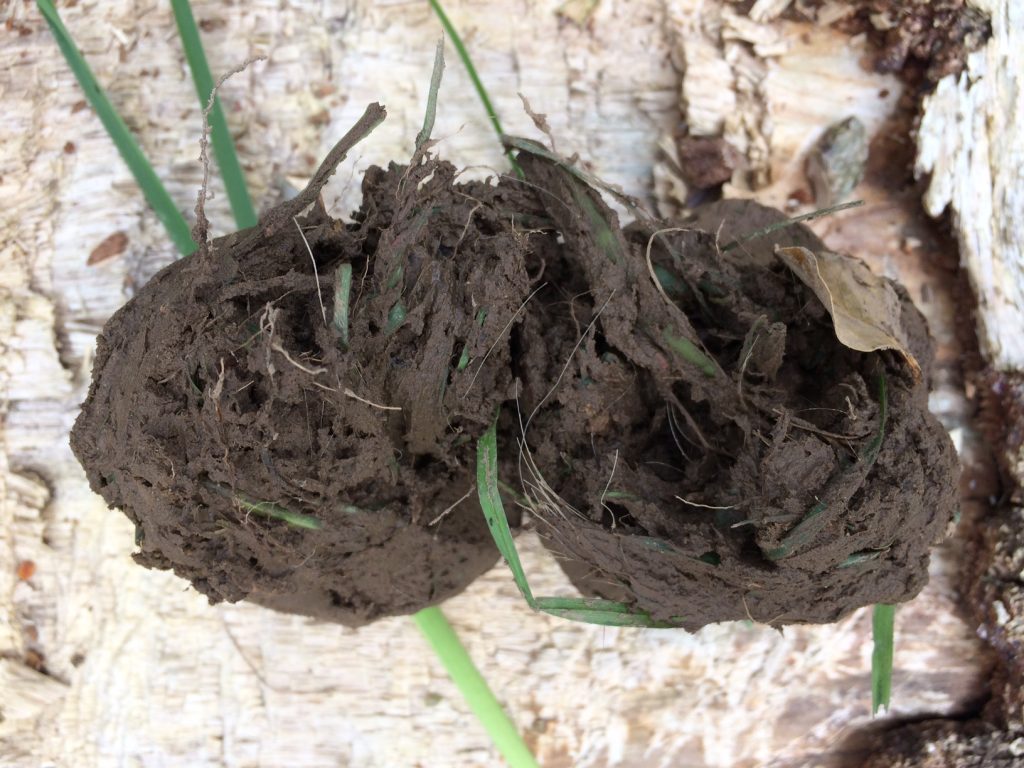
Rosie got into the Neolithic spirit of things and puddled the daub with her bare feet!  In a couple of hours of mixing and applying, the daubing team (Ed, Carol, Ray and Rosie) finished the first test panel   Now we wait….


Wednesday 18th April 2018

Another fine day at La Hougue Bie!  The temperature is set to rise today – but it is welcome after the seemingly wet and very long winter!

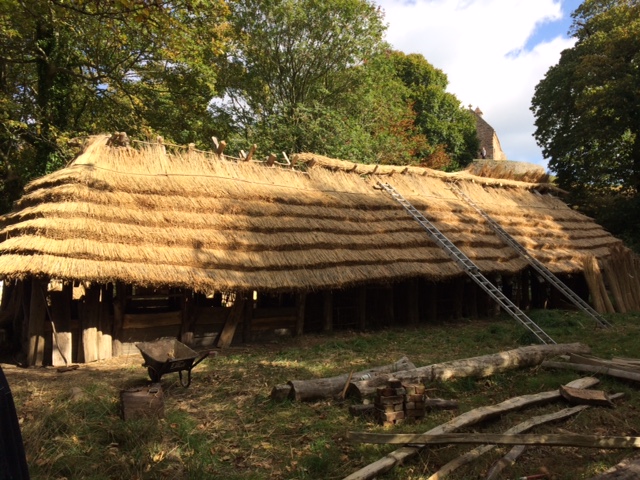
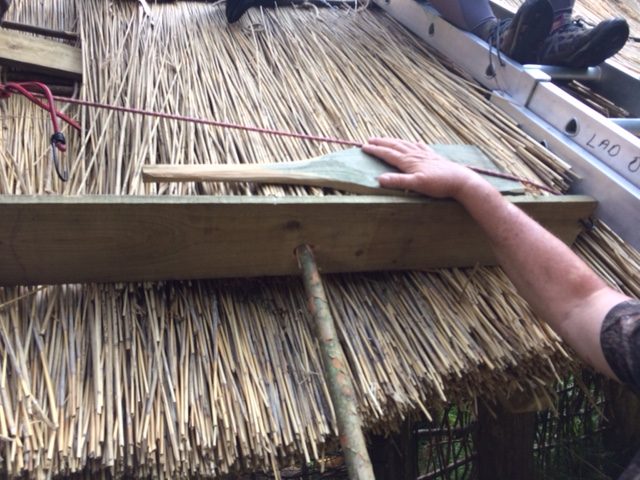
Tasks are continuing today with the lashing of battens to the rafters.  Nicky and Pippa have taken on this job today and are being careful to make sure there is a 16 inch (40 cm gap between each one.  This gap is essential to ensure the thatch is supported and lashed in place at the correct position to allow subsequent layers to overlap to the required amount.

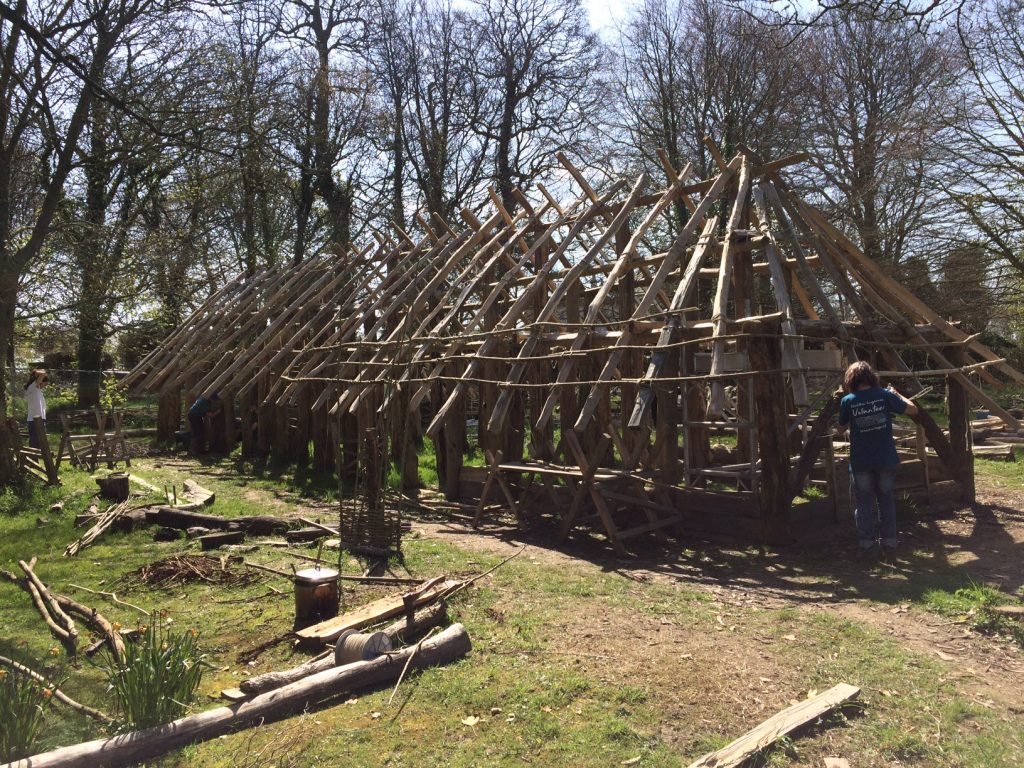
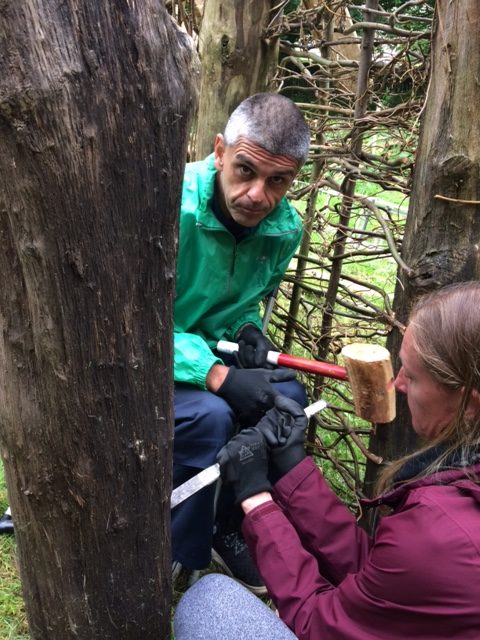
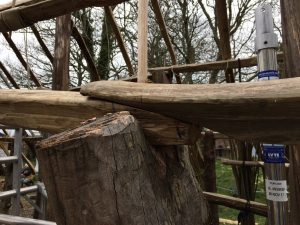
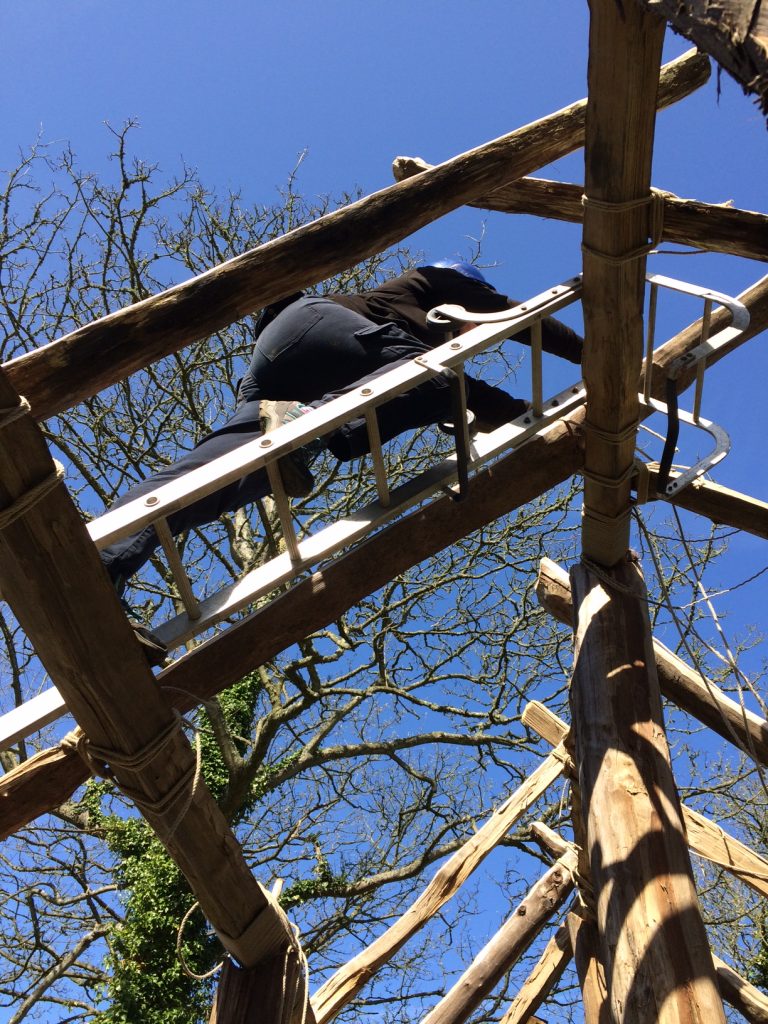
The final rafters are also being positioned by Danny, Tim, Bill, Derek and Astra.  As with many of the others, they require bending to shape in some places. This is being achieved using the classic “Spanish Windlass” to winch the two timbers together.  It is incredible to see the effectiveness of this simple method. One rafter is so irregular that Derek has suggested replacing it entirely with two shorter rafters that will meet side by side on the purlin.  This is a really good example of making the materials work for us and making those decisions that builders have always made through history.

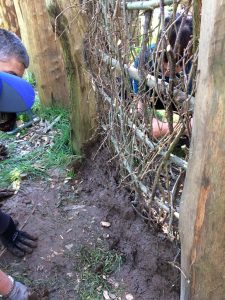
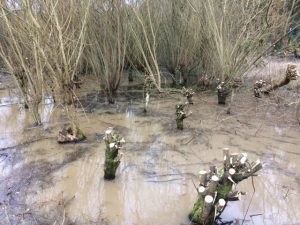
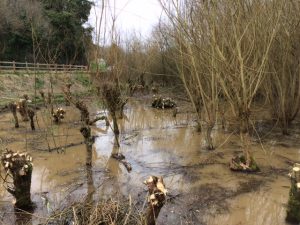
The second batch of daub has been made by Rosie, Jan and Erin.  This is being applied to the second test wall built by James. The aim here is to see how little supporting material (in this case willow and hazel) is actually required to produce a solid wall.  Although we suspect it might fail (half of the wall has only simple willow struts at 9 cm spacing), we felt we should test that it fails rather than assuming it would!


Thursday 19th April 2018


Another stunning day at La Hougue Bie!  

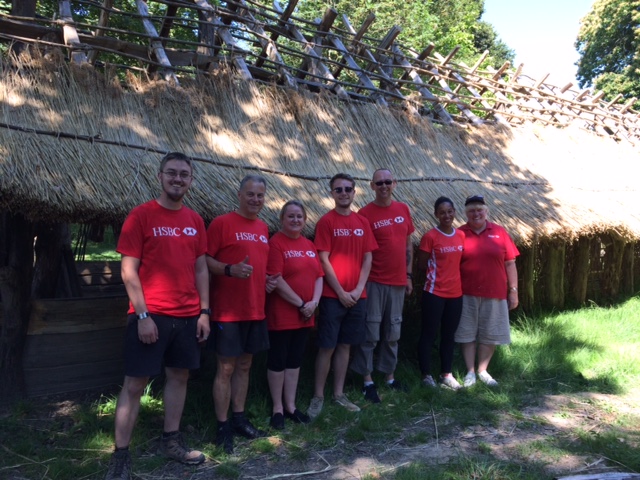
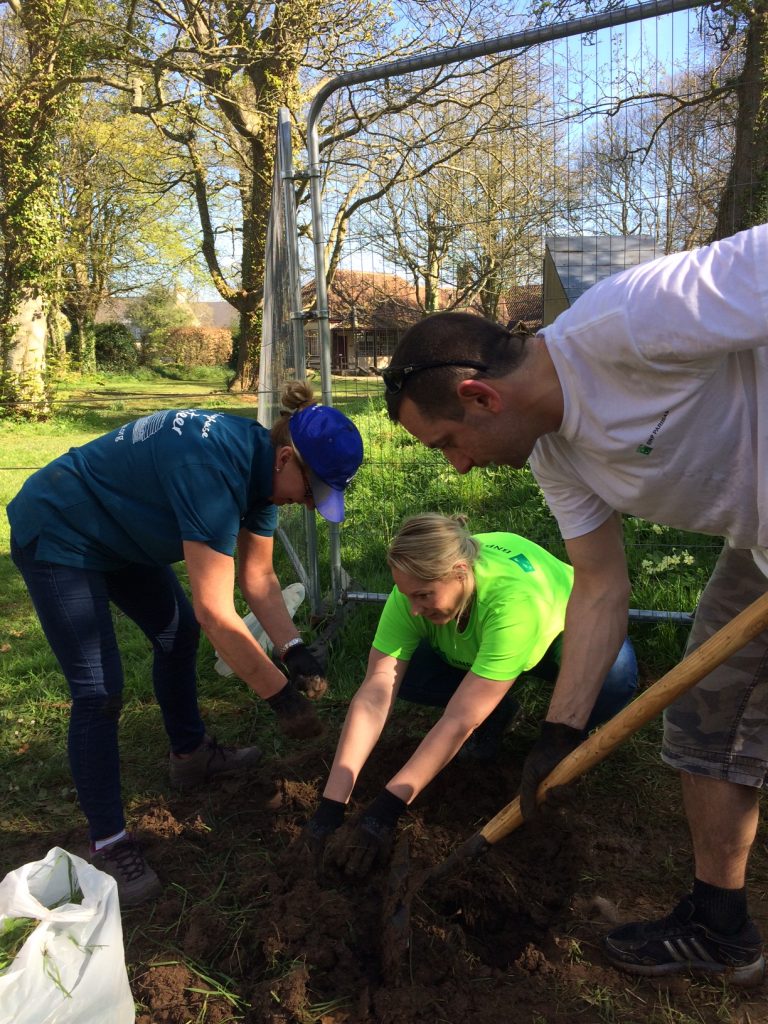
Today we have more volunteers from BNP Paribas who are getting stuck into the test panels of wattle and daub.  Great so see their enthusiasm and drive for a project that is so far outside their everyday workplace environment!  And thanks to carol for taking them under her wing and making them so welcome, Well done!


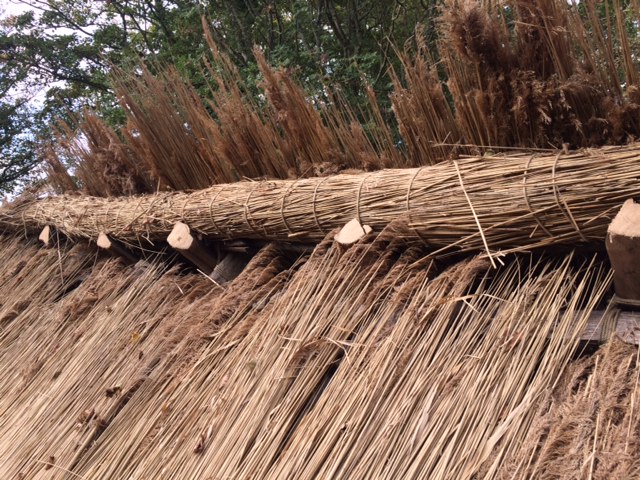
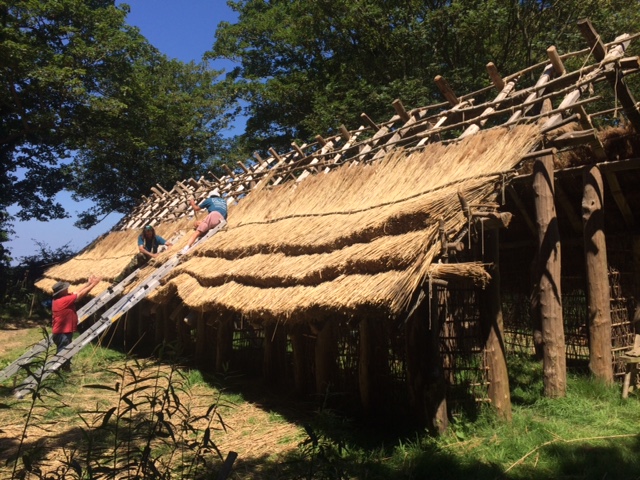
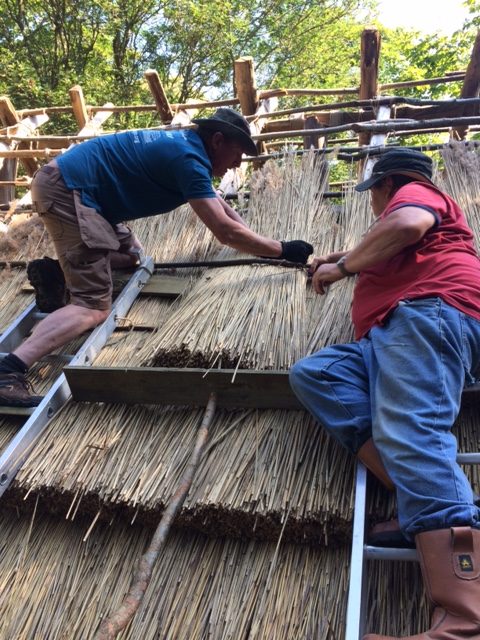
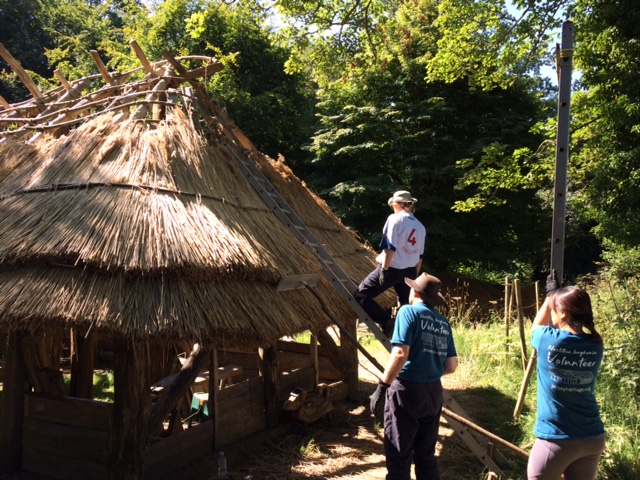
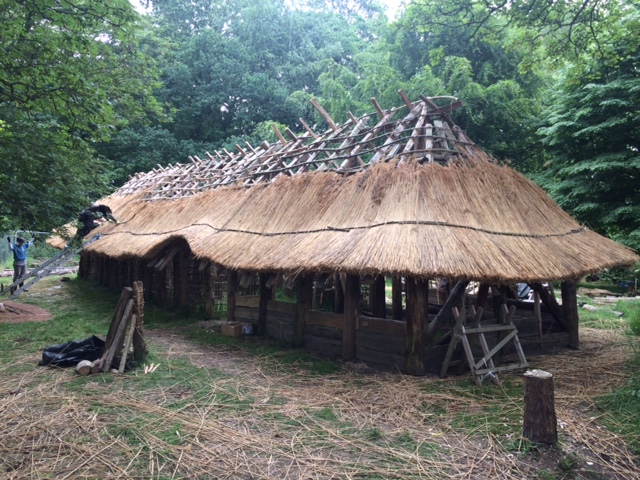
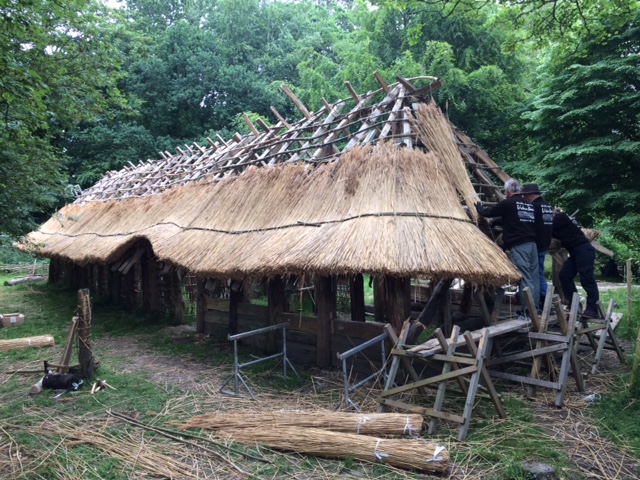
Tasks continue with the lashing of battens to the roof.  Today we have two teams on this task and we are aiming to finish one end of the roof this week.  This will allow the thatching process to begin when materials arrive.

The third batch of daub is being prepared to apply to Tim’s’ willow wall frame.  Two further willow frames are being prepared to test the effectiveness of their structure and how the daub adheres to them.


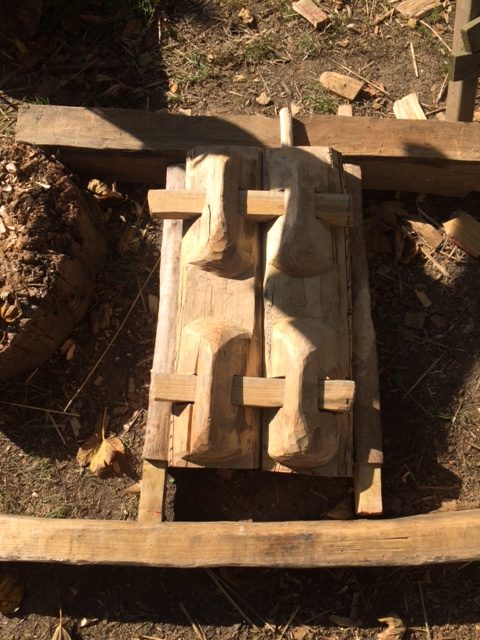
Derek has just has completed his authentic mortise and peg joint!  The second mortise into the post and the making of a square peg using only a flint axe and bone chisel took 7 ¼ hours.  The peg is 3 ¾ inches long and is 1 ½ x 1 ¼ wide. Combined with the 4 ¾ hours spent putting the first mortise through the oak tie beam, this once again highlights the sheer level of input in seemingly simple tasks.  The question is, “would they have avoided making pegs and cutting mortises because of the time and energy required? I think not. The idea that this process is lengthy is entirely modern and based on our own experiences of how quickly the same task could be achieved now.  Once again, the evidence from Neolithic well linings in Germany show clearly that, in areas where strength was required in carpentry, pegs and mortises were readily employed.

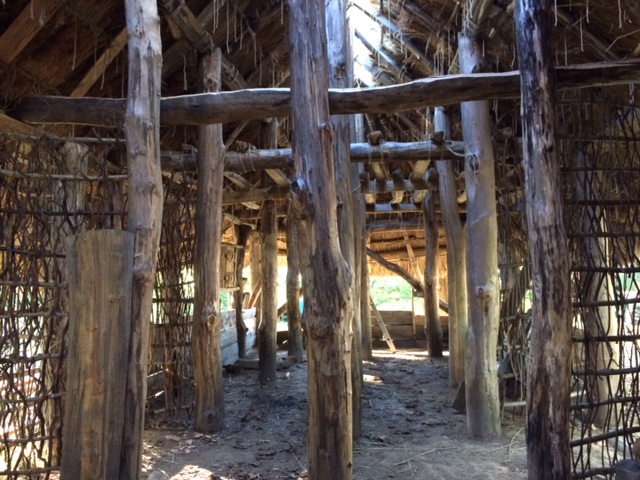
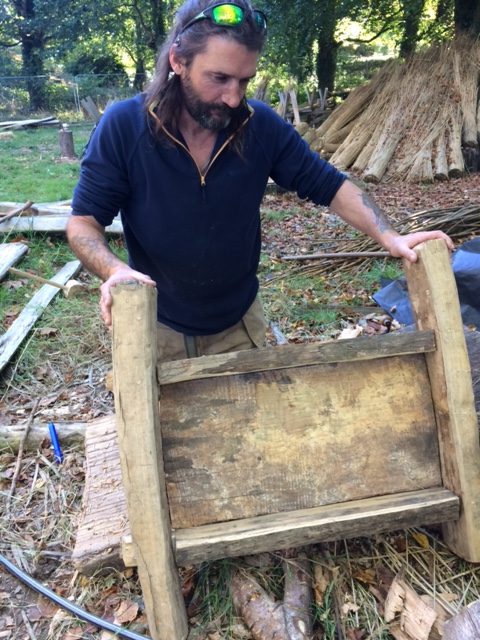
Doug is starting to think in detail about how we construct the mezzanine floor at the “livestock” end of the building.  There are various ways of achieving this and it may well be (like every other aspect of the building) that we try a range of alternatives.  The mezzanine floor consists of 3 bays. Each bay is separated by a tie beam that will support the joists or the joist supports (depending on the method). Our intention is to produce a good load bearing floor, so any solution will need to accommodate the requirements of Neolithic storage!

As with every “above ground” aspect of this project, there is no such thing as an easy decision!  We are constantly evaluating how the next stage may be achieved and whether it is in keeping with the limited Neolithic evidence we have.  What becomes clear during all of these decisions, are the limitations and properties of the materials we are using. Particular timber species and dimensions suggest specific uses.  If we had an entirely different set of materials, the finished building might look quite different. What remains constant though, are those basic principles that tell us when something looks or feels “right”.  The ability to confirm your construction decisions on the basis that it “looks right” is only possible with experience with materials over many years (especially when a structure has to be proven to be safe with engineering calculations).  But I also feel that human ability to recognise when something “looks right” is in some way innate. Leave a group of children alone in the woods for a few minutes and their need to build “dens” is clear to see. The older the child, the more elaborate the den, based of course on previous experience and knowledge.  During the many projects I have designed and built over the years, engineers have been used at the end of the design and model building stage to check if the proposed building will stand.  I have never used engineering calculations to kick start a project and to inform the dimensions of timbers required. In terms of construction, I trust the builders of the past to know their own trades far more comprehensively than I ever will, and if the archaeology suggests timbers of a certain dimension at ground level, then for me there is a certain common sense, based on practical experience and a good knowledge of material properties and traditional methods, that leads, via piecemeal windows of evidence, to a structure that works and that might have been in some way familiar to those ancient people.


Friday 20th April 2018

We are starting to get used to this fantastic weather – and to expect it each day.  Spring/summer feels like it is finally here and the project seems to be moving fast!

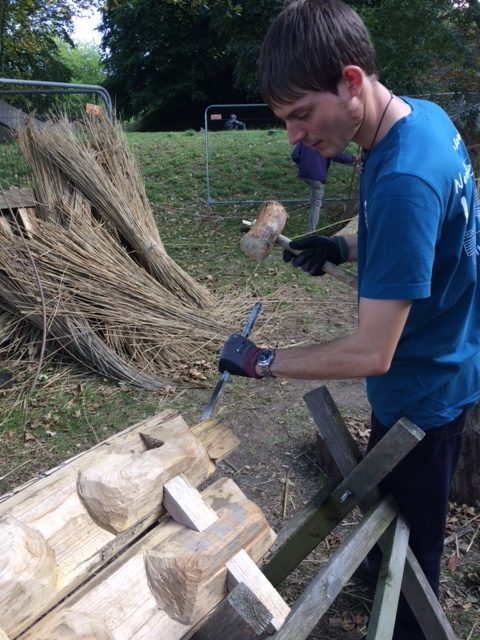
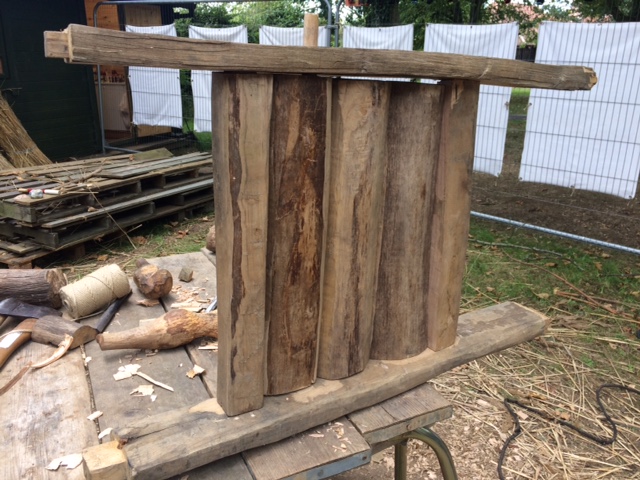
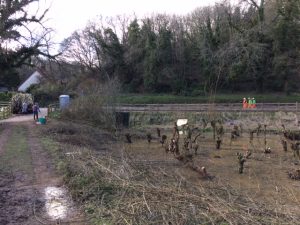
Today, all hands are on the construction on willow frameworks for the walls.  We have learned a couple of useful lessons already, firstly, that although a traditional wattle or hurdle panel clearly works, it uses large volumes of good quality material to build.  Secondly, its is possible to build a sturdy framework using a ladder of willow rungs at 18 cm spacings and to infill with the “brash” of the stems (the twiggy bits) to create an impressively strong frame.  This method uses only ¼ of the materials a hurdle uses – and also uses up every part of the tree. Lastly, although it is possible to daub a panel consisting only of willow ladder rungs at 9 cm spacings, it is difficult and time consuming to ensure the daub stays in place between the rungs.  In the name of time and material efficiency, we are pushing forward with the general pattern of wider rungs (18 cm spacings) and brash infill.

The jury is still out regarding the exact daub mix we eventually go with.  Our test panels are drying, and although the weather has been very wartn this week, the shrinkage is less than expected.  James is going to do another daub test today, using local clay and straw. It will be really interesting to compare all of the panels nest visit.

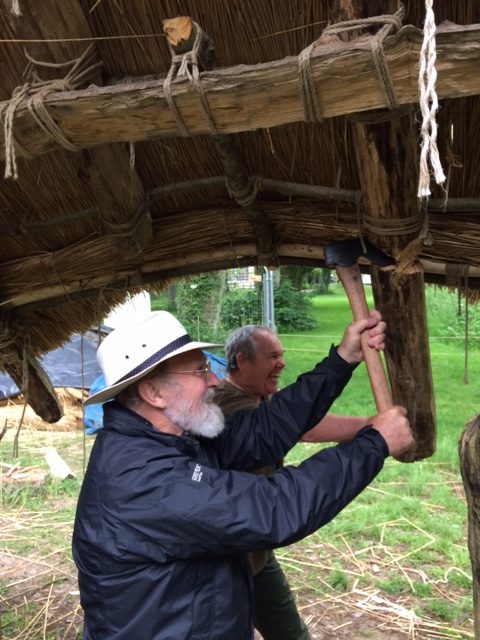
Derek is pushing on with the installation of the first tie beam.  The tap tap tap of a bone chisel on oak is resounding across the site like a tired woodpecker…

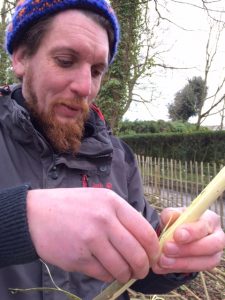
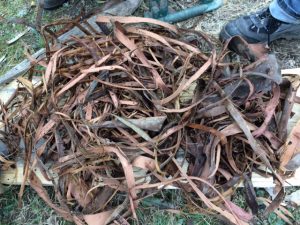
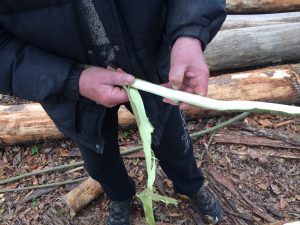
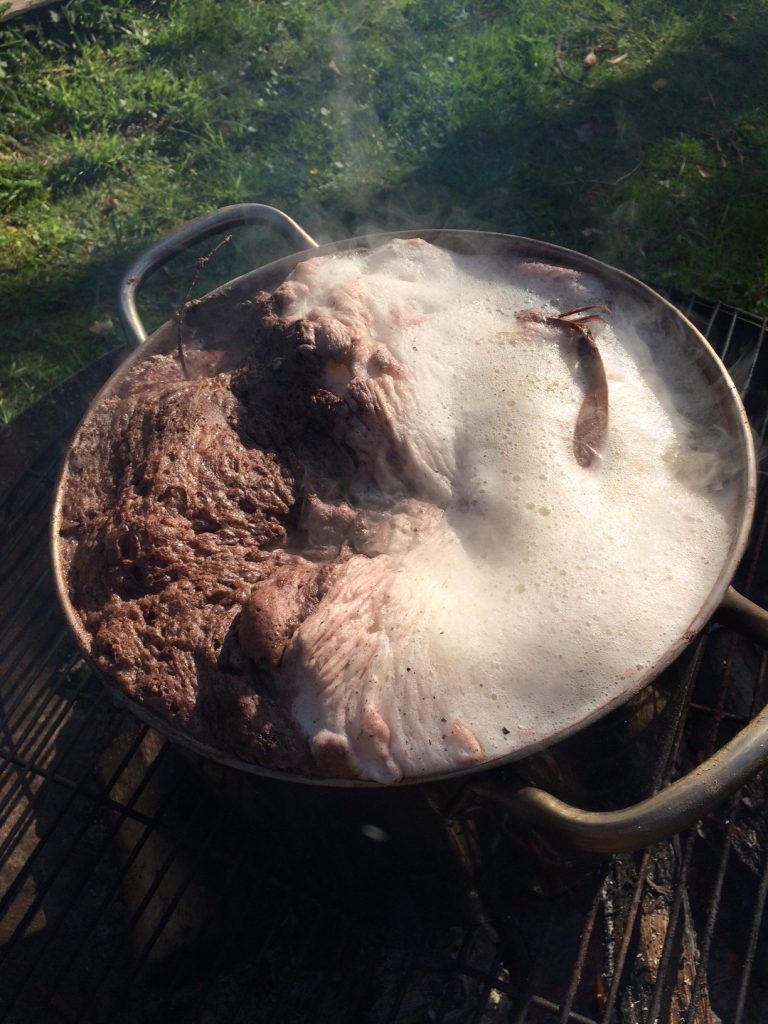
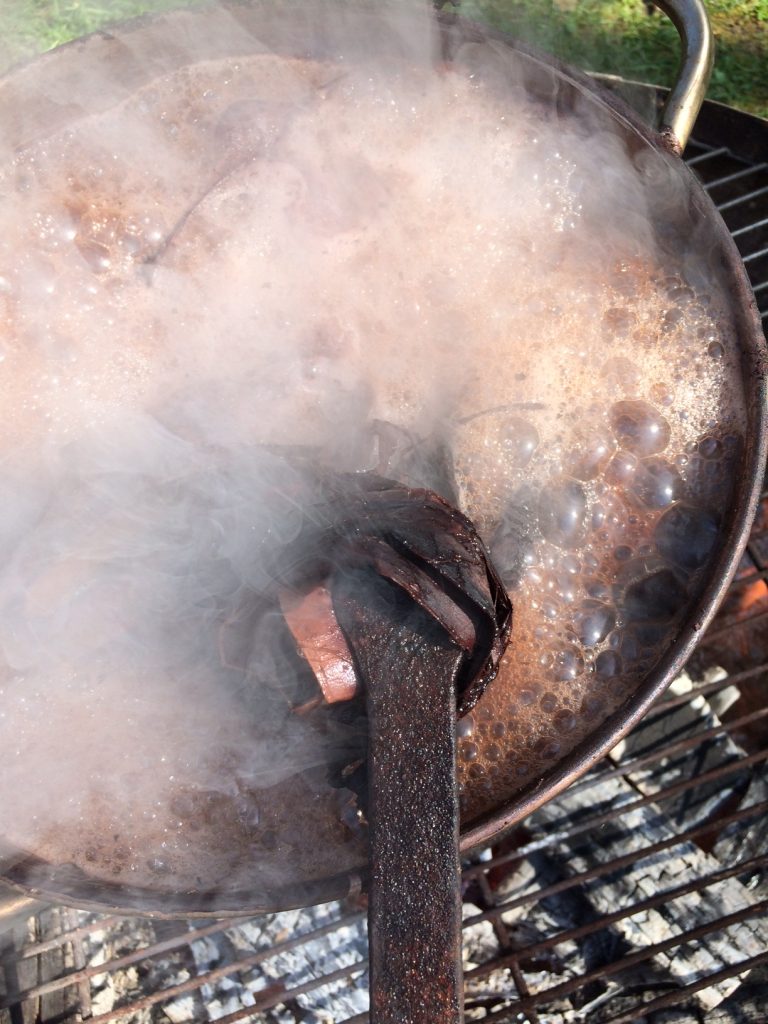
We are boiling the first batch of willow inner bark prepared with our new methodology.  The outer bark is scraped off with a flint scraper. The inner bark is then peeled from the stem.  We found this is best done in stages on a long stick to avoid the inner bark drying onto the stem. The peeled inner bark is then bundled and placed into a pan with wood ash and boiled for around two hours – or until the bark changes colour to a deep nut brown.  The bark is now ready to process and twist into cordage.

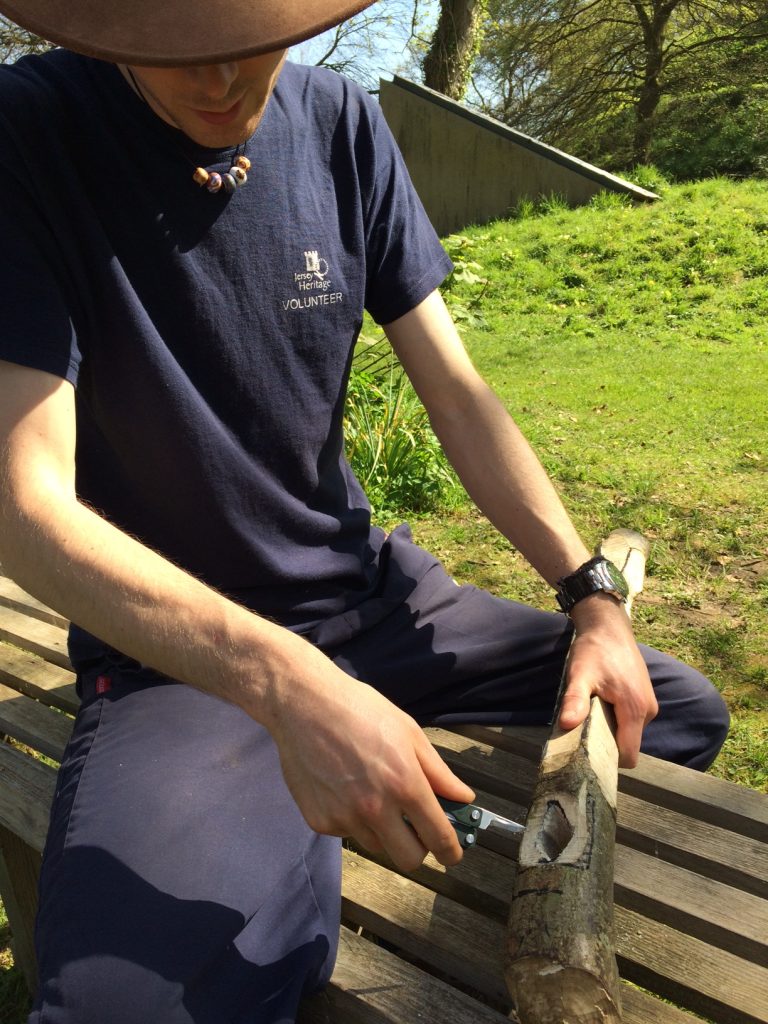
Edward is working on a replacement haft for one of our flint axe heads.  Version two went the way of version one and split during use. Getting the socket just right for a flint axe is really tricky.  The axe needs to bear on its top and bottom edges rather than its sides to avoid it acting like a wedge and simply splitting the haft in two.  It sounds simple in principle – the reality is quite different. It will be interesting to see how version 3 holds up to its arduous future!


Saturday 21st April 2018

A sharp shower this morning has reminded us that it is still only April – despite the incredible week of sun we’ve had!

The daub wall tests are holding up well to the heat.  It has been a good test of their resilience to see them baked for a few days.  Although so cracks have appeared, they are minor and demonstrate that we managed to achieve a good level of fibre content and mixing.  They are now dry enough to “tap” and seem to be holding well. At some point we will have to consider how we finish the walls in terms of colours or further coatings.

We have a great turnout this morning – with lots of volunteers working hard in the sun.  Work focuses on the construction of more willow wall panels today. Our emphasis is on function rather than aesthetics!  We keep having to remind ourselves that the willow frames will not be seen once the daub is applied, so as long as the frame is solid, appearance really doesn’t matter.

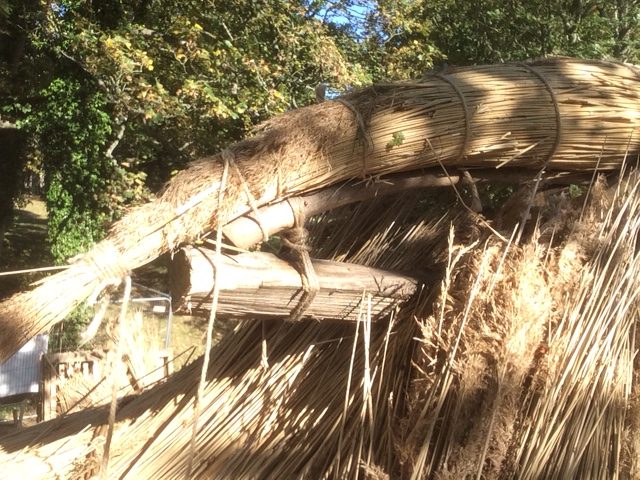
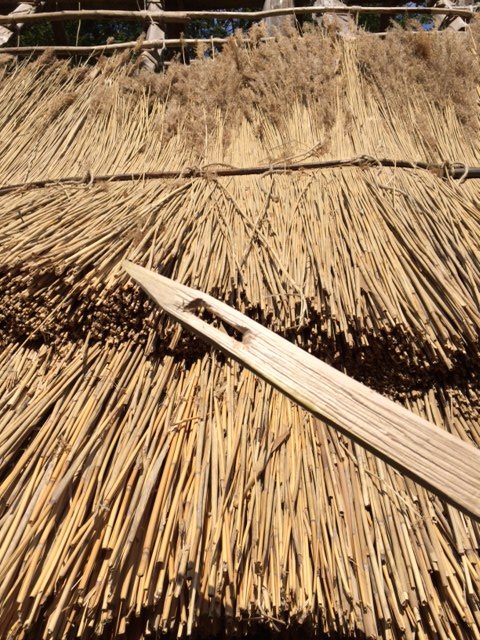
We have decided that the battens that run across the roof over the main living hall will be stripped to give a lovely smooth and white finish.  This will provide some really good quality inner bark for rope making while making a visual difference to the living area.


Its been a really productive week!  

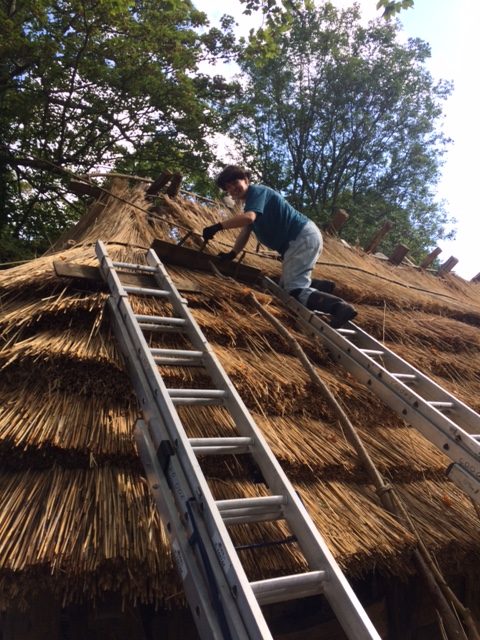
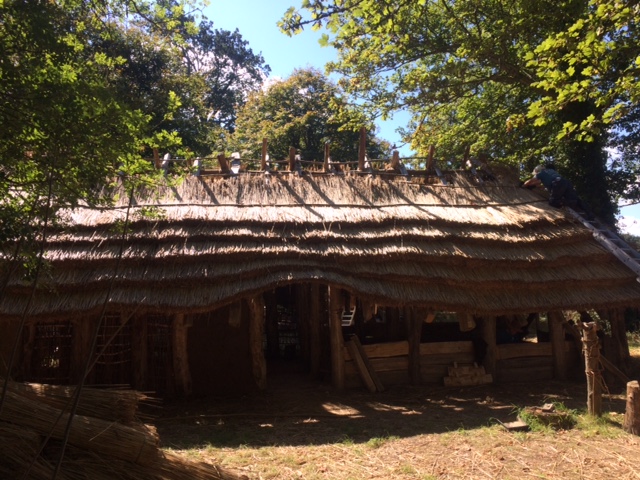
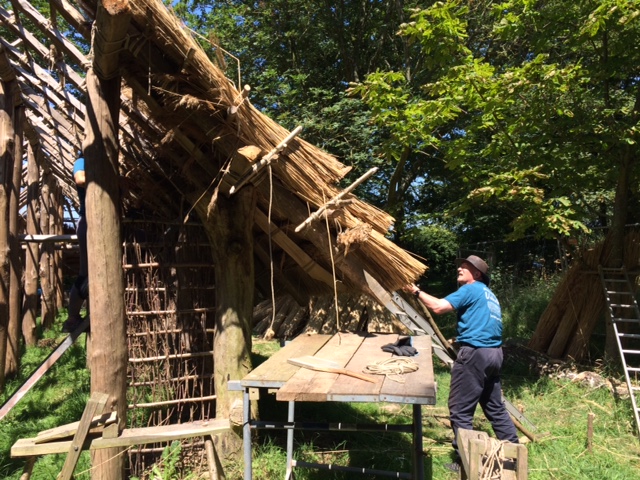
The weather has given us a premature taste of summer and everyone has felt compelled to get stuck in.  All of the tasks are now leading to the inevitable moment of thatching!! Coming soon to a Neolithic Longhouse near you….


Jersey Neolithic Longhouse; March 19th – 23rd 2018

Monday 19th March 2018

Winter is baring its teeth one last time with snow flurries and low temperatures at La Hougue Bie.  Today saw determined volunteers showing up despite the cold weather to make a start on another week on the Neolithic Longhouse.

This week, our time will be split between the building ad the harvesting of materials for the construction of the walls and roof.

Although my arrival was delayed by snow in Southampton, the volunteers made a start, continuing their efforts on the final sections of wall plate. Derek has shortened two posts to enable more V notches to be cut.  Bark stripping and log splitting continued to produce more joists and beams for the floors.


Tuesday 20th March 2018

Spring is officially here!  I gathered with a few others inside the passage monument of La Hougue Bie just after 6 o’clock this morning in the hope of seeing the first spring sunlight shine down the passage and into the chamber beyond.  The sun rose beautifully – but a bank of cloud prevented the glowing orange show we all hoped for. Still, Winter has turned and we now look forward to those long summer days on the project!

Today saw the volunteers gather at some willow pollards in St Peters Valley.  The willow was last cut 3 years ago and has (as willow does) grown impressively since.  Pollarding and Coppicing are woodland management techniques that go far back into human history.  Coppicing can be practised on a range of tree species including hazel, Willow, Ash, Oak and Sweet Chestnut. The process involves the cutting of all (or selected) living stems as close to the ground as possible.  This task must be undertaken in the winter season (when the tree is not actively growing) and forces the tree to throw up many new shoots in the springtime. The coppiced stump has a variety of regional names – “stool” being the common version.   In a perfect coppiced wood, the stools are packed closely together to encourage any new growth to grow straight and true to the available light. Coppicing is a traditional method of managing trees for product.

The type of product required is determined by the number of years the stool is allowed to grow before being re-cut.  Weaving material for baskets might only be one years’ growth (or less!), weavers for fence building and hurdles (gates) might range between 5 and 7 years growth, poles for construction might range from 15 to 25 years. A coppiced stool must be protected from animal damage to ensure a good crop of timber. This can be done by fencing off the area (or coup) or by cutting the tree at a height beyond browsing animals – the principles are exactly the same but the process is referred to as pollarding.

Today the volunteers experienced the mud and welly deep water that is pollarding in a low lying valley!  The main stems from each tree were cut and each stem then processed into thick medium and thin rods. The work was carried out with axes, saws and billhooks.  

Although the piles of material after day one look impressive, the Longhouse will very quickly eat up this material in the form of roof battens, thatching sways, hurdle walls and hurdle mezzanine floors – it will be interesting to see how far this material goes towards finishing the basic structure of the house.

Wednesday 21st March 2018

This morning saw a second attempt at sunrise at Hougue Bie – and what a difference!  The light crept into the darkest recesses of the chamber, turning the granite a burnished bronze colour – there really is something special about seeing it happen and watching the light move across the stones as the day unfolds – fantastic!

The second day of coppicing began some time later and once again, the volunteers worked their socks off to finish the job.  Dave Pittom’s (volunteer) son Alex, very kindly offered his truck to move the willow to the Longhouse tomorrow – a very kind and useful gesture which will save us a great deal of time.  

We now have enough willow to make a start on the walls and roof of the project.  We are also planning on using the willow bark to make strapping for the building – experiments begin tomorrow!

Thursday 22nd March 2018

There was an early start this morning for volunteers who came to la Hougue Bie in the hope of a clear sunrise.  Clouds prevented the spectacle of yesterday from happening again, but a fire and bacon butties made up for the disappointment!

The harvested willow arrived this morning – kindly delivered by Alex Wareham’s scaffolding truck.  Dave the driver and Dave Pittom were fantastically helpful in the traffic management during the unloading.  It was only as the willow was heaped on site that we realised just how well we had done in the last two days of harvesting!

Today the volunteer teams are swinging into action on several tasks.  Nicky, Ruth and Iris are working methodically through the positioned rafters to adjust them (where necessary) and to finally lash them in position.  The rafters need to cross at the apex of the roof, be lashed to the ridge beam, purlin and wall plate and overhang the walls to create an eave. Lashings need to be neat and strong as they will eventually ensure the strength of the roof.

Astra and Murray are working on stripping some of the fresh willow.  The stripped bark will be boiled in its own outer bark to effectively tan the inner bark and create strong strapping for future lashings.

Carol, Danny and James are sorting through the huge pile of willow and sorting into usable piles for the roof and wattle walls.  

Derek, Bill and Rosie are working on the final fitting of wall plate 6b and 7b.  That will leave just one final wall plate section to fit!

Paul, Mike and Edward are running an education workshop with a visiting school – explaining the building and project, polishing a flint axe and having a go at chopping with one too!

.

Friday 23rd March 2018

The sun is shining and there is a Spring warmth in the air.  Today we continue with lashing rafters into their final positions.  Some of the thicker willow stems are being lashed into place at battens.  These are placed at 40cm intervals up the rafters to effectively form a ladder.  This ladder will not only bear the weight of thatch but also provide tying on points to hold the thatch in place.  

At last, the final stages of the roof structure have begun.  It won’t be long now before the thatching begins!

It’s been another good week on the project with our time split between the harvesting of materials and their use on the building.

This week has really highlighted the volume of effort required to produce a building like this in terms of harvesting and processing.  Rope making is still an epic task that requires a great deal of preparation to get right.  any good quality cordage requires large volumes of effort and skill, not just in the harvesting and preparation of materials, but in the physical production of the cordage itself.   What becomes obvious as we test these methods, is the level of refined knowledge our ancestors must have had in their daily lives, and how that knowledge would have affected the timing (daily and seasonal) of various tasks to ensure the most efficient and effective use of materials.

Our harvested willow is not peeling as well as it would in just a couple of weeks time – to prevent disturbance of nesting birds.  The result is that more effort is required to strip the bark in order to make cordage.  James, after some good ideas has developed a good method of removing the bark by tapping the stem with a mallet.  It is this ingenuity in the face of adversity that has seen humans move from the stone age to walking on the moon in just 10,000 years!!